Surly Pugsley in the Rivendell Reader circa 2007…

7 06 2013
Click to jump to Rivendell bikes...

Click to jump to Rivendell bikes…

I found this 2007 Rivendell Reader article about the Surly Pugsley floating about the interweb. I figured it was worth archiving and reposting for historical interest.

You can read it in higher resolution at these links:

If you think it’s cool Rivendell was hip to fatbikes back in 2007 jump to their website and see what cool gear they have that might be of interest to you.

BTW – if you are from Rivendell Bikes and want these scans pulled down to protect your copyright just drop me a comment and I will do so.


Sharon’s First Bike Tour…

22 05 2013
Sharon on the move...

Sharon on the move…

After a lot of tries to get out on a bike tour the stars aligned so Sharon and I hit the road this past weekend for some bike camping. We fitted Porcelain Rocket bikepacking bags to her Surly Pugsley and head up the Galloping Goose MUP towards the Sooke Potholes Campground. This a 50km dirt ride which is challenging enough on a loaded fatbike to be interesting without being so hard it might deter a novice bike tourist from going on a second tour. The scenery is nice and it’s 99% car free.

Sharon carried her own sleeping bag, pad, food, water and clothing. I carried all the group gear [tent, stove, cups, tools, spares, F/a kit etc..]. I ended up using rear panniers on my Pugsley to carry the extra group gear. It worked just fine, but the whole time I wished I had Porcelain Rocket softbags on my bike. Riding rough terrain with panniers is not a lot of fun.

We stopped on the ride out for a bite to eat at the 17 Mile House Pub which is perfectly situated about an hour from the campground. I wanted to reinforce all the good things about bike touring so stopping to eat, drink and relax seemed important!

I was a bit worried that the campground would be full of party animals as it was a holiday weekend in Canada. Happily we found a whole section of the campground unoccupied and the rest of the campers were chill. Some hot tea, a campfire and a chill session rounded out the evening.

My 2 person bike touring tent is cozy, but once Sharon got the hang out climbing in a out she had a good nights sleep.

The next morning we fired up the stove for tea and oatmeal before checking out the potholes down by the Sooke River.

The ride back was pleasant if repetitive. – sadly there isn’t a good loop route from the potholes back to Victoria that doesn’t involve significantly longer distances and a lot of climbing. We stopped for some Thai curry on the way back – again to emphasize that every good bike tour is an excuse to eat well!

By the end of the ride Sharon had enough energy to beat me to the top of a few climbs while smiling. That was a great sign that we had picked an appropriate route for her first tour. I’ll post something about using a Pugsley as a touring bike separately, but let me say that if you own a Pugs and you want to tour don’t think you need to buy another bike or even another set of wheels.

All in all the tour was a success. I’m sure Sharon will want to head out again once she’s recovered from knee surgery over the summer. The trick will be to pick routes that offer the most smiles for the least gnarliness.

Trip photos are here.

Click for detailed map...

Click for detailed map…

Enjoying the sunshine...

Enjoying the sunshine…

Corn dogs?

Corn dogs?

My Pugsley...

My Pugsley…

Where is the pub?

Where is the pub?

Lazy pulling up the rear...

Lazy pulling up the rear…

Beer!

Beer!

Great reason to bike tour - no traffic jams...

Great reason to bike tour – no traffic jams…

Strait of Juan de Fuca...

Strait of Juan de Fuca…

Rest stop...

Rest stop…

Barnes Station Shelter...

Barnes Station Shelter…

We made it!

We made it!

Our camp....

Our camp….

Getting a fire going...

Getting a fire going…

Where are you sleeping?

Where are you sleeping?

Let's ride!

Let’s ride!

Where did the trail go?

Where did the trail go?

The mighty Sooke River...

The mighty Sooke River…

I think I can ride this!

I think I can ride this!

Bridge to somewhere...

Bridge to somewhere…

Back at the water...

Back at the water…

Let's get 'er done!

Let’s get ‘er done!

Still smiling...

Still smiling…

Watch out for falling rocks!

Watch out for falling rocks!

Almost home...

Almost home…


Q-Tubes…

12 05 2013
Lightweight tubes for my Pugs...

Lightweight tubes for my Pugs…

Folks are using these light tubes instead of the “normal” Surly fat bike tubes to drop some weight from their fatties. I may try these in my Pugsley. I’m just bookmarking them here for easy reference later.


Surly Pugsley – Amazon Tree Frog Edition…

8 05 2013
Red is faster...

Red is faster…

I’ve been working on some born again Pugsley wheels since January. First I bought some Rolling Darryl rims and got them powder coated red.

My inspiration...

My inspiration…

Then I overhauled my Alfine 8 IGH. Finally I got the new rims swapped into the old wheels at the Fairfield Bicycle Shop.

The Pugsley ready for action...

The Pugsley ready for action…

The new wheels are wider and lighter than before. They should improve my sand floatation. If I am lucky they’ll never seen any snow! 😉 I’m not sure if I will notice much difference in bikepacking mode.

Alfine 8 and Rolling Darryl - what a team!

Alfine 8 and Rolling Darryl – what a team!


The Girlz ride Terra Nova Trail…

15 04 2013
Dead fall...

Dead fall…

Last time I went riding with Sharon and her friend J [fall 2012] we left with J having two broken hands and Sharon could barely walk. That was an easy paced chill ride… 😉

One of many water crossings...

One of many water crossings…

So when we all went riding again last week our mission was clear – everybody comes home in one piece!

I picked a trail that is as close to XC as I have near at hand to our home in coastal BC. Sadly that doesn’t mean buff endless singletrack. But it does mean you can ride your bike a bunch of the time without facing a techy obstacle at every turn and when you do face an obstacle you mostly have to get off your bike and walk. Walking may not be as fun a riding, but it’s safer…;)

Here is a solo ride report from the same trail last August when it was much much drier.

Sometimes you gotta push in the bush...

Sometimes you gotta push in the bush…

Our typical MTBing trails are what the kids call “all mountain”, which translates to steep and techy. I’d call it “Costal BC all mountain” which in my mind denotes a higher than normal density of the tech and often slippery conditions”. So although this isn’t a Colorado Buff trail this is a chill safe-ish MTB option around here.

Sharon riding her Pugsley...

Sharon riding her Pugsley…

I suggested that Sharon ride her Pugsley instead of her 6″ travel FS bike. Partially because this trail didn’t really need tons of travel and partially because I want her to get comfy doing easy MTBing trails on the Pugs to facilitate future bikepacking adventures.

J still smiling...

J still smiling…

Although Sharon has turned into a decent shredder she’s only been riding MTBs for 3yrs. Has really only ridden 1 MTB [Santa Cruz Nomad] and 95% of her MTBing has been in 1 bike park. So her skill set is good, but not broad.

She also has a lot of Baja sand riding experience, but that’s a pretty niche skill set not much use most other places.

Team effort...

Team effort…

For the first hour I got flack about suggesting the Pugs because she got pounded on a rigid bike trying to ride it like a long travel FS bike. Her FS bike has a dropper post so I setup her saddle at 70% normal height which she thought was too low when it was chill and too high on the few steep sections.

So she walked her bike a bunch when she could have ridden and complained a lot. I just told her that the bike she had at the moment was the Pugs and to get on with riding it…lol…tough love!

The mighty Krampus...

The mighty Krampus…

It would have helped morale if I was riding my Pugs as well, but it was at the LBS getting my Rolling Darryl rims built into wheels. I was riding my Krampus which was rigid and semi-fat so I didn’t feel guilty for flying along on a cloud of high-tech suspension!

Gloomy forest singletrack...

Gloomy forest singletrack…

The good news is that after an hour the complaints went away and Sharon started shredding the rocky climbs and other challenging sections. Then she even commented how easy it was to climb the Pugs on rough or slippery terrain and how it rolled over river rocks like they weren’t there.

Mission accomplished! 🙂

Splish Splash!

Splish Splash!

I’m not one of these guys that thinks fat bikes are the best MTBs for just about every kind of riding. I like my other MTBs plenty and for a lot of the riding I do they are miles better than my fatty…BUT…for ‘xploring poorly maintained trails in wet conditions big fat rubber is pretty sweet and the Pugs has a great geometry for this kind of riding.

I’m glad Sharon came to that conclusion on her own. Especially riding an unloaded bike on a short trail ride. This will make the leap to carrying some camping gear and having to mountain bike a lot easier.

J charging the creek...

J charging the creek…

I’m happy to report J made it back to the car un-broken and smiling. 😎

Racing the setting sun back to the car...

Racing the setting sun back to the car…

Of course Sharon did have some criticisms of the BB7s for MTBing compared to her Nomad’s hydros as well as a few other upgrades. I pointed out that the Pugs was a bike worthy of upgrading and when she wanted to spend some $$ we could tackle anything she liked…:D;):thumbsup:


The more purple Pugsley…

22 03 2013
After som DIY rim painting...

After some DIY rim painting…

Sharon’s Pugsley has some wheels that need love. The aluminum spoke nipples are corroded to the point of nearly not existing. The old Large Marge DH rims are heavy even with the DIY cut outs I drilled. Plus I damaged some spokes when I did the drilling! 😦  So at some point in the next couple years we’ll replace the rims with Surly Marge Lites and rebuild the wheel with fresh spokes and nipples.

Before painting...

Before painting…

I figured since the wheels were not keepers I might as well experiment with some DIY rim painting.

Primer first...

Primer first…

I really liked the look of the white primer and if it was my bike I would have stopped here, but I don’t argue with a lady about style. 😉

Then Sharon selected a shade of purple...

Then Sharon selected a shade of purple…

I masked off the spokes with electrical tape. It worked fine at controlling most of the overspray. If you aren’t lazy you should probably cover the disc rotor with plastic or remove it.

Looking good...

Looking good…

The purple Sharon chose for the rims looks good with the frame in an understated Osmond Family sort of way.

The whole enchilada...

The whole enchilada…

The whole process cost me $10 for paint and $12 for beer. The result isn’t as pretty or durrable as powder coating, but it’s cheap and fast. If we get sick of purple we can change the colour anytime we want.


Pugsley 29er Wheels…

8 03 2013

I love my Surly Pugsley and I have considered building up a 29er set of wheels for it a few times over the years. The Pugsley has a 17.5mm offset of the rear wheel to the right so the chain clears the big fat tire. That works great with the wider fat rims out there as they have enough real estate to offset the hole over to the right so that the end result is a strong wheel with reasonably even spoke tension on both sides. My Large Marge rims [shown below] have the spokes offset ~13mm to the right for example.

Note offset spokes...

Note offset spokes…

With narrower 29er rims you can’t move the spoke holes over as much so there are some compromises to be made that are worth looking at.

What’s normal?

Standard rear MTB wheel...

Standard rear MTB wheel…

I like strong wheels with even spoke tension, but most mountain bikes roll along just fine on rear wheels that are tensioned at 100%/60%. So that’s worth keeping in mind.

Offset Fork + Zero Offset Rims

Zero offset rim in the rear of the Pug...

Zero offset rim in the rear of the Pug…

If you build a Pugsley a set of 29er wheels using standard zero offset MTB rims [spoke holes centred in the rim] you get the spoke tension shown in the images above and below.

The rear wheel uses a SRAM X9 hub and the spoke tension is 100%/45%.

The front wheel uses a Surly 135mm SS hub in the Pugs offset fork and the tension is 100%/30%

Neither of these options looks that great, but I know folks that have built up 29er wheels for Pugsleys using zero offset rims and they can work if the rider isn’t super heavy and/or the use is gentle [ie. road commuting vs. loaded dirt touring].

Surly SS hub in Pugs offset fork...

Surly SS hub in Pugs offset fork…

Offset Fork – 4mm Offset Rims

Velocity Synergy OC 4mm offset rims with SRAM X9 rear hub...

Velocity Synergy OC 4mm offset rims with SRAM X9 rear hub…

Nick over at the Gypsy By Trade Blog posted about building a Pugsley 29er wheelset using 4mm offset Velocity Synergy OC rims. As far as I know these offer the most offset in a “standard” 29er rim.

The rear builds up with a tension of 100%/62% – so that’s essentially the same as our “normal” MTB rear wheel at the top of the post. Although this wheel has slacker spokes on the driveside vs. the “normal” MTB wheel which has the slacker spokes on the disc brake side. I’m not sure if that matters a lot – anyone have a comment on that?

The front builds up with a tension of 100%/40%. A normal MTB front wheel is around 100%/70%. But the front wheel sees less abuse so perhaps this is just fine as long as you aren’t on the really heavy/rough end of the use spectrum. I’m keen to follow Nick’s blog and see what happens.

Surly SS hub in offset fork with 4mm offset rim...

Surly SS hub in offset fork with 4mm offset rim…

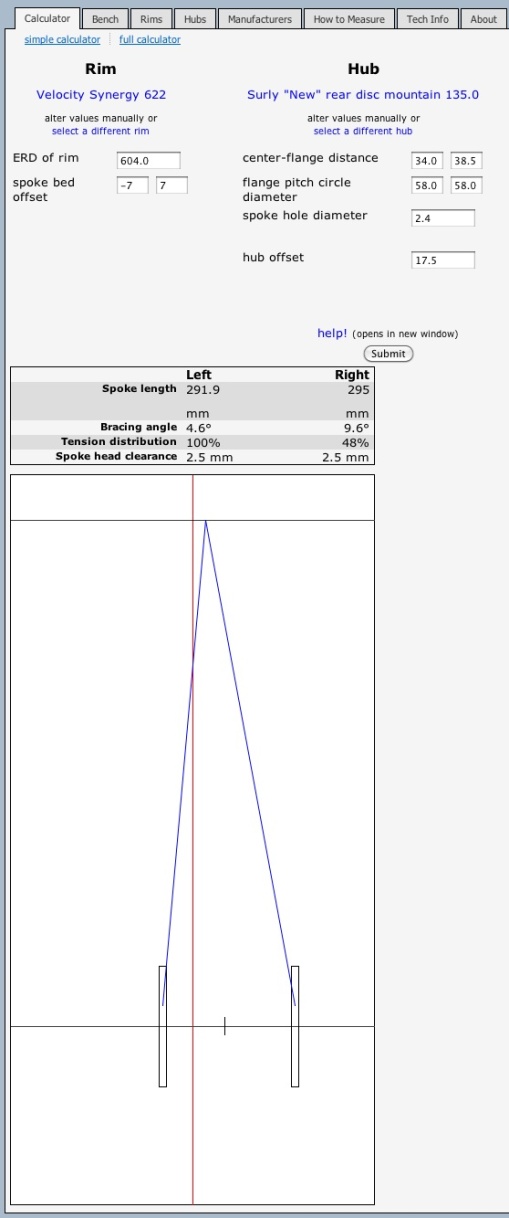
Offset Fork – 7mm Offset Rim

7mm offset rim in rear of Pugs on SRAM X9 hub...

7mm offset rim in rear of Pugs on SRAM X9 hub…

Surly has released a 50mm wide Rabbit Hole rim that takes 29er tires as well as their new Knard 29 x 3.0″ uber wide rubber. It has a 7mm offset and fits into a Pugsley frame/fork no problems. I wish Surly has pushed those spoke holes out another couple mms to get better tension with the Pugsely offset frame/fork. It looks like there is enough real estate on the rim to do that.

The rear builds up with 100%/78% spoke tension which is nice.

The front builds up with 100%/48% spoke tension which is better than the 4mm offset rims, but still quite a bit short of the 100%/70% tension of a standard MTB front wheel.

So you are getting a more balanced build with these wide rims, but they are heavier [~200g/rim compared to the Synergy OC rims]. OTOH – they are wider so if you want to run wide 29er rubber including 3.0″ wide Knards the weight penalty may be worth it on that count.

Surly SS hub in Pugs offset fork with 7mm offset rims....

Surly SS hub in Pugs offset fork with 7mm offset rims….

Zero Offset Moonlander Fork – Zero Offset Rims

Moonlander symmetrical fork with zero offset rim...

Moonlander symmetrical fork with zero offset rim…

If you have a Necromancer Pugsley you have a symmetrical Moonlander fork that takes a 135mm front hub. I don’t have the specs on Surly’s 135mm front disc hub so I used the same Surly rear hub as the other examples. It gives you a pretty good idea where things are headed although the spoke tension with the front 135mm hub may be a bit worse since the right flange doesn’t have to make room for a cog.

For a zero offset rim I got 100%/89% spoke tension which is great. You could use 4mm or 7mm offset rim to get an even stronger wheel.

Pugsley 100m Symmetrical Fork – Zero Offset Rim

100mm front hub in Surly Pugsley 100mm symmetrical fork...

100mm front hub in Surly Pugsley 100mm symmetrical fork…

Surly sells a 100mm symmetrical fork for the Pugsley at a cost of ~$99. That would allow you to use an existing standard 29er MTB wheel which you may own or can buy pre-built for a lot less than a custom wheel build. You can also swap this wheel into another MTB you own. The spoke tension is 100%/70% – which what most MTB front wheels would be.

Note this would be the same result as using a 29er suspension fork with your Pugsley.

IGH + Pugsley Offset – Zero Offset Rim

Alfine 8 in Pugsley offset frame with zero offset rim...

Alfine 8 in Pugsley offset frame with zero offset rim…

If you are like me and want to use an IGH with your Pugs you find out that it’s a challenge with 29er wheels. As you can see from the example above of an Alfine 8 in the rear of a Pugs with zero offset rims the spoke tension balance is poor at 100%/30%. It’s essentially the same as the tension achieved with the Surly SS hub in all the examples above so your best case using a 7mm offset Rabbit Hole rim is ~100%/50% tension balance.

Some Other Ideas

Here are some additional things to consider:

  • a wider flange to flange spacing will make for a stronger more stable wheel all other things being equal
  • it may be possible to drill new spoke holes on Surly Rabbit Hole rims further to the right than the stock ones
  • you can use two rear cassette hubs in your Pugs to avoid the funky spoke tension you get with a SS/FG hub up front

So what should you do?

The very first thing I would do if you are going down this road is to evaluate how tough you are on wheels. That will let you know how important getting strong wheels should be to you.

  • how much to do you weigh?
  • how much gear do you carry?
  • how rough is the terrain you ride?
  • are you a finesse rider or a smasher?
  • how much do you ride?
  • how well do normal MTB wheels last under you?
  • how much attention do you want to spend on your wheels?

Next up you need to consider some of the other factors like:

  • how frequently do you plan on swapping wheels?
  • how far from help do you ride?
  • do you have an existing 29er front wheel you could use?
  • do you want to ride narrow 29er rubber? [less than 2.4″]
  • do you want to ride uber wide 3.0″ 29er rubber?
  • do you want to use a suspension fork?
  • what is your budget?

There is no set answer.

  • The more abuse you will dish out the stronger your wheels need to be.
  • If you want to swap wheels once a season a fork swap is no big deal.
  • If you want to swap wheels twice a week swapping forks will get old fast.
  • If you own an existing 29er front wheel you like getting a $99 Pugsley 100mm symmetrical fork is a great idea.
  • If you ride far into the backcountry you won’t want to take a lot of risk.
  • If you are never more than a few miles from the car you can afford to have a wheel failure.

Don’t use a Pugsley

If you haven’t got a fatbike and using a 2nd set of 29er wheels is important to you than you may well be better off buying one of the symmetrical rear end fatbikes being sold. Without the offset rear end you can build up some 29er wheels without much trouble although you will need the correct size hubs for your frame so an off the shelf 29er wheel set won’t work.

What would I do?

Well I’ve talked myself out of a 29er wheelset for my Pugs. Using an IGH doesn’t get me a good wheel build even with a Rabbit Hole rim. I don’t feel like swapping wheels and the fork every time I want to run 29er wheels either. So that sort of leaves a whole bunch of not so great options on the table.

I think the better plan for me is to have a dedicated 29er MTB and leave the Pugsley on fatbike rubber. I have a garage and I have the existing 29er parts to outfit a frame at a cost that wouldn’t be much more than a custom set of wheels.

Having said that if I was a one bike guy and owning/storing a second bike was out of the question I’d switch my Pugsley over to a 1 x 9 derailleur drivetrain and use a Moonlander fork upfront. I’d run Rabbit Hole rims because I’ll either run a 2.4″ or 3.0″ tire. I like wide rubber.

Comparison to my existing Pugsley wheels…

Alfine in Pugs with Large Marge rim...

Alfine in Pugs with Large Marge rim…

Since we are going to town on wheel calcs the images above and below show my current Pugsley wheels. The rear Alfine has a spoke tension of 100%/92% with a Large Marge rim that has 13mm offset [same offset as Rolling Darryl rim]. The front Surly FG hub in my Pug’s offset fork has a spoke tension of 100%/69%. Both ends are pretty strong in theory and that’s backed up by a lot of abuse with zero issues.

It’s nice to be able to ride your bike as hard as you can without having to give a second thought to your wheels.

Surly SS rear hub in Pugsley offset fork with Large Marge rims...

Surly SS rear hub in Pugsley offset fork with Large Marge rims…


Pugsley wheel weight savings…

19 02 2013
Surly Rolling Darryl rims...

Surly Rolling Darryl rims…

I was curious how much weight my wheels would lose with my swap to Rolling Darryl rims and possibly going tubeless.

  • Rolling Darryl rims +890g [powder coating is ~30g]
  • Surly rim strip +95g
  • Stans 3oz +90g
  • split tube +175g
  • Surly fat tube -425g
  • Large Marge DH -1150
  • rim tape -50g

Net loss per wheel is 375g or 0.83lb if I go tubeless or 215g/0.47lb if I stick with tubes.

Some people are going fat tubeless without a split tube for even greater weight savings – maybe 475-500g [~1lb] per wheel assuming some extra foam/tape/sealant is required. I think I’d just use the split tube since it seems so easy/reliable.

For interests sakes I weighed an Endomorph and it came out to 1200g which is on the light end of the fat tire spectrum so I don’t see any weight savings available there.


Inspecting my Shimano Alfine 8 IGH…

12 02 2013
My Alfine 8...4yrs old and never maintained...

My Alfine 8 IGH…4yrs old and never maintained…

With some new Surly Rolling Darryl rims ready to be built up for my Pugsley I couldn’t put off inspecting my Alfine 8 IGH any longer. I bought it new over 4yrs ago and have never opened it up. To be honest I was a little worried what I would find inside and I was prepared to buy a new hub rather then spend the $$ building up a wheel set with compromised parts

A filthy Pugsley ready for some love after 9000kms on the back of my truck...

A filthy Pugsley ready for some love after 9000kms on the back of my truck…

Here is an outline of what my Alfine 8 has been through:

  • 6 months on the beach in Baja
  • 2 Canadian winters
  • bikepacking
  • winter mountain biking on Vancouver Island
  • 1 trip to burning man
  • 5 chains
  • 1 set of trashed Phil Woods BB bearings
Disc side of Alfine...

Disc side of Alfine…

My plan was to inspect the hub myself at home and then take it to the Fairfield Bike Shop for any maintenance it needed. If the hub was not worth a new rim I’d keep it built up with the Large Marge as a spare for our Pugsleys and buy a new hub.

I found the following useful guides for overhauling an Alfine 8 IGH:

Ready for surgery...

Ready for surgery…

Taking the IGH apart is straightforward – about a 15 min job taking your time. You’ll find the instructions in the links above.

This video will also walk you through it.

My Alfine 8 internals...

My Alfine 8 internals…

I was ready for all kinds of badness when I pulled the internals out. This hub has been used hard and didn’t owe my anything. So you can imagine my shock when the damn thing looked perfect.

Looking good...

Looking good…

And I’m not kidding about that when I say perfect. No rust. No dirt. No water. The factory grease was still clearly in place.

The empty hub shell...

The empty hub shell…

I was very impressed and changed my plans. I didn’t see any point in going through the cleaning and relubing process when the original grease was in such good shape. The oil lube promised even better hub efficiency, but when I thought about it ease of maintenance and reliability was more important to me than slightly easier rolling. Plus I can always strip the grease and relube with oil later now that I see how easy opening the hub is.

Non-driveside bearing race/inner lock nut...

Non-driveside bearing race/inner lock nut…

I cleaned the cones on both sides and made sure they were looking good. Everything was running great so I didn’t see the point in trying to break the hub down further. With my luck I would screw up a perfectly good hub trying to make it “better”!

Time to grease and reassemble...

Time to grease and reassemble…

I should have cleaned the driveside of the IGH before I cracked it open. Since I didn’t I was careful I didn’t contaminate the internals.

Alfine porn...

Alfine porn…

The only lubing I did was adding some grease to both outboard bearings to help keep water out of the hub.

Dropping the internals back in...

Dropping the internals back in…

I sealed the Alfine 8 IGH back up and ensured the locknuts weren’t too tight.

Time to deal with the external bits...

Time to deal with the external bits…

Next up was a quick clean up of the external parts of the hub.

Just a little bit dirty...

Just a little bit dirty…

Baja wasn’t kind to the drivetrain.

Time for chain #6...

Time for chain #6…

The cog and the chainring show some wear, but I figured I’ll get another year out of them. The chain on the other hand is trashed – another year – another $16!

Chain KIA - the rest is fine with some love..

Chain KIA – the rest is fine with some love..

I didn’t bother reassembling the hub 100% as its next move will be to a truing stand for the Rolling Darryl rim swap. Once clean I bagged all the small parts so they wouldn’t get lost.

The disc rotor looks good...

The disc rotor looks good…

For a final test I threw the rear wheel back in the frame and gave it a spin. It rotated for a long time confirming the axle wasn’t overly tight and that the new grease didn’t cause any significant drag. I also checked the hub for lateral play- loose is bad.

Back whens he was new...

Back when she was new…

I expected this mission to end with some saddness and possibly some $$ being spent on a new hub. I’m still amazed the internals are in such good shape. Perhaps not good as new, but certainly worth transfering over to the rebuilt wheels.

Nice one Shimano! 🙂


Pugsley Frame Failures…

10 02 2013
Seat stays at seat tube...

Seatstays at seat tube…

Based on the reports of quite a few Surly Pugsley owners on MTBR.com there seems to be a problem with a fair number of Pugsleys made in the last few years. Cracks are appearing where the seatstays attach to the seattube and where the cahinstays attach to the BB. The cracks seem to all be on the non-drive side of the bike.

You’ve got a 3yr warranty on your Surly so as long as you keep an eye on this and report it within the warranty period Surly will give you a new frame. Not everybody is experiencing this problem so I wouldn’t panic, but it’s wide spread enough to warrant regular inspection of the affected areas.

Chainstays at BB...

Chainstays at BB…

Both of my 2009 Pugsleys have been used hard and don’t show any cracking. Surly has changed the way these parts of the bike are attached to each other for 2013 so the problem should be solved.

Trying to crack my Pugs! ;)

Trying to crack my Pugs! 😉

Update: apparently some of the new Pugsley frames are cracking as well. Not sure what to say about that. Yikes!

Update 2: Surly posted some info on their blog about cracked Pugsley frames.


Can a fat bike be your only mountain bike?

8 02 2013

Dropping in on the Green Machine…

Update: I’m reposting this from a year ago because I keep reading the same question from folks online. I figured it was worth putting out there again. Interestingly the 2012 new product cycle has come and gone without a reasonable cost production fat suspension fork being announced. That means for now most fat bikes will remain rigid unless you want to order a fork from Europe [ie. Sandman] or get something modified to work. So that’s really the question you need to ask yourself – Can a rigid bike be my only mountain bike?

If you are taking the time to read this post you probably already know that fat bikes are not just for snow or sand anymore. People are starting to ride fat bikes on trails that they could ride with a standard 2.1″-2.4″ mountain bike tire. Two questions I get asked frequently are 1) can a fat bike be my only mountain bike? and 2) why ride a fat bike on a trail that a normal MTB can ride?

Can a fat bike be your only MTB?

The short answer is yes.

The longer answer is yes, but you need to be realistic about what a fat bike can do well and what it’s not ideal for.

First off most fat bikes are rigid. Yes there are some niche suspension options, but nothing that I would say is reasonably priced, widely available and high performance. That will change in the next year or two, but for now you are most likely going to be riding a fully rigid fat bike. That’s good in that it will be low maintenance for harsh environments. Fat tires do provide some very limited suspension action all on their own when properly inflated. A rigid bike can be fast and efficient on smooth trails. However, as the trail gets rougher and rougher you have to slow down to maintain control plus you’ll have to stand a bunch to absorb impacts. The end result is a slower more tiring ride on rough terrain.

Secondly most fat bikes are heavy with slow rolling rubber. In order to keep costs low in a niche part of the bike industry companies are specing their bikes with heavy cheap parts and basic frame tubes. Given that wheels, tires and tubes on a fat bike are bigger than a normal MTB to begin with using heavy parts here exacerbates the problem. If you have the know how and $$$ you can put your fat bike on diet the same as any bike. Although if you are going to spend $4K on a light fat bike you might want to consider spending $2K on a stock fat bike and $2K on a light stock 29er hardtail to get more bang for your buck. Riding a heavy bike is tiring if your trails involve a lot of climbing and constant accelerations. OTOH smooth rolling trails don’t penalize a heavy bike as much.

Thirdly what do your buddies ride? The bike you ride will dictate the trails you prefer, the speed you ride and the distance you ride. If your friends are on rigid 29er single speed rigs a fat bike would likely fit into the mix a lot better than if they had uber light XC bikes or 6″+ travel all mountain bikes.

Fourthly how steep and techy are the trails you ride? Production fat bikes have pretty middle of the road MTB geometries that are good for XC riding and plowing through snow. They don’t have the super slack angles of an all mountain rig. As the downhills get steeper and rougher you won’t be smiling nearly as much as you could on a fully suspended MTB with really slack angles. The steering geometries of fat bikes are starting to vary a bit more from somewhat slacker snow friendly options like the Salsa Mukluk, to all rounders like the Surly Pugsley and dirt specific designs like the new On One dirt specific fat bike. So it’s worth doing your research before you buy.

How fit and skilled a rider are you? The better the engine and skill set the less of a handicap a heavy rigid bike is. In fact if you are the strongest rider in your posse a fat bike might be just the challenge you need to stay even with your friends. OTOH if you struggle to keep up with your regular riding partners as is do you want to make each ride more challenging?

Do you ride alone or will you be riding with other fat bikers? As soon as you take other bikers or other types of bikes out of the equation the unique capabilities of a fat bike really shine. As an exploration rig and a fun machine the big soft tires on your fat bike will let you go places and ride in ways you never thought about before.

So ultimately the answer is that a fat bike is a mountain bike and there is no reason you can’t ride it on your local dirt trails. Rigid is fun, simple and easy to maintain. Just don’t loose sight of the downsides.

Fatties – not just for snow!

Why ride a fat bike on dirt trails?

It’s not unreasonable to ask why bother riding a fat bike on dirt trails when the big rubber isn’t needed for flotation. Here are my top 10 reasons…

  1. you already have a fat bike and don’t want to buy a 2nd rig.
  2. you want an excuse to buy a fat bike, but don’t have snow or sand locally.
  3. you’ve ridden your local trails so many times on normal MTBs you are looking for a fresh perspective on the same dirt.
  4. rigid fat bikes provide an efficient semi-suspended ride that’s very fun.
  5. you want to explore your local area more and need fat tire floatation/traction at some points of your rides to do so.
  6. your local trails are only rideable year round with fat rubber.
  7. you are so strong and generally awesome that you need a handicap for rides with your friends/SO to be fun.
  8. your regular full suspension MTB is a maintenance hog if ridden in wet sloppy conditions so you want a rain/mud bike.
  9. you have no idea what’s going on, but you can’t stop thinking about riding a fatty.
  10. all the cool kids are doing it….=-)

The green zone…

29er Fatty MTB

Note that you can convert almost all fat bikes to standard 29er MTBs with a second wheelset and possibly a suspension fork. The 170mm symmetrical rear dropout fat bike frames work best for this conversion. Once completed you’ll have a 29er with a ton of tire clearance! This might be a good option if you want to use all your stock fat bike parts and spend your upgrade $$ on a light 29er wheelset. Setting up a fat bike as a rigid 29er is no problem. If you want to add a 29er suspension fork you’ll have to consider the stock fork length vs. the suspension fork length and determine whether the fat bike’s handling will be negatively affected. Keep in mind once you roll on 29er MTB hoops it’s really not a fatty any more!

Photo: It’s Time to Ride Blog

The Future

As fat bikes continue to gain market share and folks ride them more on dirt you’ll see lighter stock bikes being sold by the major players as well as dirt specific designs which will include hardtails as well as fully suspended fat bikes. Once we have light suspended fat bikes readily available the answer to these questions will change. If you can’t wait and have a lot of $$$ to spend you can get a custom built fully suspended fat bike from a number of bike builders.

Scott rocks my Pugsley…

My Reality

I ride my Surly Pugsley on our local trails as a straight up mountain bike. Not because I need to or I have any aspirations for a 1 bike fleet. It’s a great all around bike that puts a smile on my face when I throw a leg over it. With no suspension and an IGH it’s very low maintenance which is ideal for our sloppy winter conditions and the traction of huge 4″ knobbies isn’t a bad thing either when our trails are wet. I do get beat up a lot more on the Pugsley than on my 29er hardtail or 26er full suspension bike so I ride less aggressively and I don’t use it every ride. I’ve been keeping tabs on the current state of the art in fat suspension forks. I may well buy one at some point, but so far the cost/performance/availability curves haven’t hit a sweet spot for me. I understand some of the major players have fat forks in the works so I’m hopeful there will be something I’m stoked about out for the 2013 or 2014 riding season.

I don’t see myself getting rid of the Pugsley until the frame dies of natural causes. It’s a very versatile fat bike for XC riding, snow/sand missions and bikepacking. Once fat suspension hits the mainstream I could probably be talked into a new fat bike designed to work with a suspension fork…possibly even a full suspension rig. The Pugsley has a short stock fork on it which doesn’t lend itself to adding suspension without compromising the steering geometry. If I do get a hardtail or full squish fatty the Pugsley will get refocused as a soft conditions machine. A mission it tackles well.

Update: I’ve decided to give up on the Pugsely as a MTB. My Nomad does a better job and between full suspension and huge 2.4″ tires gets enough traction to ride our trails in winter. The maintenance issue is the only drawback, but riding a fully rigid MTB on our rocky/rooty trails wasn’t as much fun as I had hoped. I’m going to keep it for soft conditions use and for bikepacking.


Showing the Pugsley some love…

31 01 2013
New and used bling for my Pugs...

New and used bling for my Pugs…

I’m back in Victoria after a lovely trip south of the border. Having ridden my Surly Pugsley a ton in Baja I’ve come to appreciate it more than ever. I figured its many years of loyal service deserved some pay back. So I collected a few new and used parts to install on the bike.

  • Titec H-bar [used to be my Pugs bar and is going back on]
  • Brooks B17 [comfy for long rides]
  • lightly used SRAM 8spd chain
  • Surly Rolling Darryl rims with cut outs

I’ve been through a lot of handlebars and saddles on the Pugsley. I’m going back to the Titec H-bar because it provided the best balance of comfort and control for non-technical riding/touring. I’ve come to the realization that techy MTBing on a rigid bike just isn’t my thing. I’ve got a full suspension bike I enjoy riding technical terrain with much more. My only gripe with the Titec H-bar was the control placement for steep techy terrain. If I take that off the menu the H-bar rocks.

The plastic SDG saddle that’s currently on the Pugs is awesome for short rides of 1hr or 2hrs, but isn’t so comfy for all day rides. I had a spare Brooks B17 so I’ll use that instead.

My Pugsley’s chain is thoroughly trashed after the many weeks of beach use. I found a lightly used 8spd SRAM chain in my spare parts box so I’ll throw it on.

On the wheel front are the only new parts for the Pugs. A set of Surly Rolling Darryl rims with cut outs. My current rims are old skool Large Marges – I think I have the uber heavy DH version. So I’ll be able to drop weight from my wheels and get a wider tire footprint for sand use. This is definitely not an essential upgrade. My old wheels were going strong, but I’ve wanted to check out some of these lighter and wider rims for a while.

Before I mess with my current wheels I’m going to open up the Shimano Alfine 8 IGH. I want to make sure it’s in decent condition after 4yrs of neglect. If it isn’t I’ll use a different IGH – possibly a Rohloff I am not using or I’ll buy another Alfine 8 since they are so cheap and I don’t really need the Rohloff’s wide gear range for my fat biking.

If possible I’ll reuse the old spokes and nipples on the new rims. Who knows I may even get motivated to go tubeless for the maximum pimpage of the Pugs! 😉


Why I haven’t gone tubeless on my Pugs?

22 01 2013
Totally fat - totally tubed...

Totally fat – totally tubed…

I’ve posted on this blog about trying to setup my Pugsley tubeless. I’ve even gone so far as to get the inner tubes I’d need for the split tube method that seems to offer the best results. Having said that my Pugs still sports inner tubes.

If you are wondering why the main reasons are:

  1. laziness
  2. inconsistent use
  3. lack of flats

Setting the Pugs up tubeless isn’t a huge deal. It will probably take me 4 beers to get done, but not doing anything takes a bunch less time and costs nothing so that option has been very appealing. 😉

My Pugsley gets used a lot for a period of time – such as daily rides in Baja for 7 weeks – then it sits gathering dust for a couple months in the garage without a second look until I need it again. My admittedly limited experience with tubeless [2 MTBs] tells me it works best on bikes that see regular riding. The idea of having to reseat the tires and mess with sealant every couple months isn’t motivating me to make the change.

The final factor is the fact I just don’t get any Pugsley flats. I was riding every day in Baja for 7 weeks and didn’t get a single flat with my tubes. This is in thorn country where other bikers are dealing with multiple flats a day. I don’t have many bike related super powers, but this is one of them. If I had 10 flats on my Baja trip you’d see me do the tubeless thing the first day I got home to Victoria!

So the only two reasons I have to do the switch to tubeless are losing some weight and better rolling resistance from my tires. Those aren’t inconsiderable motivations. One of these days I’ll get it done – just not today!

My Pugs with Nates...

My Pugs with Nates…

If you are terribly disappointed by my lack of tubeless fat content you can check out a tubeless Moonlander over at the Gypsy by Trade Blog. That should keep you going! 😉


Ode to my Pugsley…

19 01 2013
Who says Pigs can't fly? ;)

Who says Pigs can’t fly? 😉

When I got my Surly Pugsley there were no complete bikes available. I had to buy a frame/fork and then build the bike from a bunch of new and used parts that fell to hand. The Pugsley’s fat tires and offset drivetrain meant there were more than a few moments of uncertainty as I assembled it. Choices of fat bike specific parts were limited at the time. You could pick from any tire as long as it was an Endomorph and the only offset rims were Large Marges. Happily it was actually a pretty easy build once I started turning wrenches.

Taking the Pugs frame and wheels home...

Taking the Pugs frame and wheels home…

Like most people that ride fat bikes I was first attracted by the freakishly huge rubber they roll on. I held off for a couple years after the Pugsley was launched telling myself it was too specialized and I’d never make good use of it because I was not a snow bike racer type. What sealed the deal for me was a test ride on someone else’s Pugs. After you get over the big tires and start pedaling you realize it’s just a mountain bike that can go places its skinny tired brothers can’t. It rides trails just fine, isn’t bad on pavement and can dirt bike tour like a champ.

Whoa!

Whoa!

After that ride I knew I could get a lot of use out of a Pugsely so I dug deeper into the bike design. Like many other Surly bikes the Pugs is packed with features and is incredibly versatile. I liked the fact it had horizontal dropouts because I planned to use an internally geared hub [IGH] and didn’t want to use a chain tensioner. I also liked the fact that there was a derailleur hang if I changed my mind and wanted to use something more standard in the future. The fact you could swap the front and rear wheels made a lot of sense to me. I built my “front” wheel up with a disc brake fixed gear hub so in the unlikely event my IGH failed I wouldn’t be stuck a long way from help. The geometry of the Pugs is pretty standard for a classic mountain bike and it works great from street to trail to sand and snow.

No maintenance? - No problem! ;)

No maintenance? – No problem! 😉

My Pugs has seen a lot of action in the 4+yrs I’ve owned it. We’ve been to Baja Mexico several times. We’ve been to Burning Man and Shambhala. We’ve ridden the Canadian Great Divide Mountain Bike Trail. And of course we’ve ridden a lot of snow and ice in Alberta. My initial build has held up really well. I tore the bike apart last year to repaint its battered finish and was surprised that other than a new chain, new BB bearings and new cables/housing the bike really didn’t need anything to keep rolling another 4yrs.

Riding the CDN Great Divide...

Riding the CDN Great Divide…

I will admit that as new fat bikes and parts have hit the market [including the Moonlander] I get the occasional urge to upgrade my fatty. So far I have resisted those urges pretty well. I did put a Larry tire on the front of my Pugs and swap between different saddles and bars depending if I’m touring on the Pugs or doing shorter techy rides. I’ll probably upgrade to some lighter rims this year and rebuild the wheels using the original hubs and spokes if possible. Beyond that I’ll just keep riding the beast. Not bad for a guy prone to upgraditis! Mostly what’s keeping my wallet happy is the fact the Pugs works so well that upgrades wouldn’t make it that much better.

With a Pugs winter is snow-problem!

With a Pugs winter is snow-problem!

Now don’t read into this post a retrogrouch sentiment suggesting my aging Pugs is the ultimate fat bike and everything that has come since is just hype. If you gave me a Moonlander, a 907 or a Fatback I’d jump on them and probably enjoy the heck out of them as well. They are certainly different to my fatty and in some ways I can see they’d be better. However, looking at the overall picture there are still some things I like a lot about my Pugs and nothing that I have seen yet makes me feel like I’ll reach new levels of awesomeness over my Pugs.

Fat is fun!

Fat is fun!

Click here for all my Pugsley photos and click here for all my Pugsley related blog posts.

So good it makes you all crazy!

So good it makes you all crazy!


Beach Fatness…

3 01 2013
Sharon's got FAT!

Sharon’s got FAT!

Up to no good...

Up to no good…

Making tracks...

Making tracks…

Rest break...

Rest break…

Get the pressure right...

Get the pressure right…

Life at the beach gets rusty fast...

Life at the beach gets rusty fast…

Sharon proud to be FAT... ;)

Sharon proud to be FAT… 😉


Got sand?

23 12 2012
Sandy Pugselys - just how I like 'em...

Sandy Pugselys – just how I like ’em…

Sharon off to a hula hooping jam on the beach...

Sharon off to a hula hooping jam on the beach…


Fixing the Fatty…

20 12 2012
Pulling the rear wheel...

Pulling the rear wheel…

We’ve done pretty well avoiding flat tires down here in Baja, but Sharon pulled off the main track in an arroyo to let a truck pass and of course there were a million thorns waiting for her. 😦

Hunting for the leak...

Hunting for the leak…

So we took the opportunity to run a fat tire flat fixing clinic!

Checking to make sure rim tape was still in place...

Checking to make sure rim tape was still in place…

I drank beer and provided technical advice to Sharon as she repaired her Pugsley. 😉

Alfine 8 still going strong!

Alfine 8 still going strong!

We took a look at the rest of her fat bike and all is well with the Alfine 8 and the Avid BB7 brakes.

Putting the chain back on...

Putting the chain back on…

My rear brake has been making goofy noises since I got here, but I’ve been too lazy to do anything about it.

Pugs in the fix it position under some shade...

Pugs in the fix it position under some shade…

Sharon’s zeal for bike maintenance got me motivated and I adjusted my rear BB7 for silent operation again.

BB7 all tweaked and ready to roll...

BB7 all tweaked and ready to roll…


Global Fat Tire Bike Day….

6 12 2012
Baja beach fat biking...

Baja beach fat biking…

Global Fat Bike Day was 1 Dec and we got carried away in Baja so it was celebrated a few days late, but in fine style… 😉

The aftermath...

The aftermath…


Got OMM?

18 11 2012

Old Man Mountain Sherpa [old skool version] on Sharon’s Pugsley…

I’m running short on time before I leave for Baja so I am frantically trying to take care of everything on my To Do List.

The OMM racks looks at home on a fatty…

In Mexico our Pugsleys are mostly beasts of burden. They have to carry ice and beer back to camp as well as let us roll down the beach in search of adventure when it’s not windy enough to kiteboard.

Ready to haul…

We’ll do some desert mountain biking as well. The OMM racks are so light that when you don’t have panniers on them you can pretty much forget you have them installed.

That’s one good looking fatbike… 😉


Pugsley Taco Packing Setup…

4 11 2012

Old Man Mountain rack for hauling panniers…

I’m getting the Pugsley ready for a long spell in Baja so I reinstalled the OMM Cold Springs rear rack. I’ll be mounting up some Ortlieb panniers so I can haul beer and ice back to my tent on the beach.

OMM made for carrying stuff…

I left all the mounting hardware on the rack when I pulled it off so putting it back on only took a few minutes.

A MTB riser bar to open up the cockpit…

I replaced the Loop H-bar with a XC MTB riser. This puts the hand position a couple inches further forward increasing the reach. I don’t need all day touring comfort on my Pugsley in Baja. Rides will be shorter and we’ll be doing some mountain biking so this is a better setup.

Old bike – new feel…

I like how changing a few parts gives an old bike a whole new feel. That’s one of the nice things about Surly frames – they are versatile so you can reinvent them as needed. 😉

BTW – I just found out that OMM has stopped making the Cold Springs rack. 😦 That’s one of my favourites, but I have a few copies and they last forever so I’m good until I probably can’t ride a bike any longer! They still make the Sherpa so you continue to have an awesome rack option.


Interior Design…

30 08 2012

2012 Surly Pugsley – 18″ frame…

Mountain bike fashion keeps heading towards a smaller and smaller frame triangle. Ostensibly for increased stand over clearance.

2009 Surly Pugsley – 18″ frame…

One downside of this change is reduced room for cargo inside the frame.

Full bike…

Personally I don’t need any standover clearance on my bikes – including my mountain bikes. I’ve been riding and falling off bikes for decades and never had any groin to top tube issues.

My trusty Pugsley…

What I do have a use for is storage space inside the frame and I’d prefer to use a seatpost that wasn’t 2′ long, but that’s just me 😉

On One Fatbike – even less space…

Scott had to get a custom bike [see below] with a top tube that curves up higher than normal get a ride with a large interior space for a frame bag.

Scott’s custom Hunter 29er…

I couldn’t afford custom bling, but when I was shopping for a 29er frame I did my best to get one without a crazy low top tube. I also got the largest size On One Scandal 29er frame I could ride in order to maximize the interior design.

A guy’s gotta haul his snacks somewhere!

Happily there are a few bike designers who are savvy to the benefits of a large main frame triangle. Jeff Jones offers his line of mountain bikes is the sexy curved spaceframe version and a bikepacking friendly diamond frame version shown below.

Jeff Jones diamond frame with truss fork…

Jeff’s bike line up is nice in that folks who want an uber low top tube have a frame design to choose from and those who want to fit a big frame bag also have an option – yet both bikes share the same geometry and fit.

Jeff Jones spaceframe with truss fork…


Surly Endomorph Tire Review

7 08 2012

Surly Endomorph fat tire in action…

When I first built up my Pugsley 4 years ago the only fat tire you could buy for it was the Endomorph. Fast forward to the present and there are more than half a dozen tire options for a Pugsley. That’s definitely taken some of the spotlight off the venerable Endo and folks are often talking about it like it’s time is over. I’ve spent a lot of time on Endos over the years in sand, snow and on dirt so I figured it was time for a review.

Endos is Baja…

Here’s what Surly has to say about the Endomorph tire:

“It was inevitable that Pugsley was going to need a new pair of shoes. To this point, the current offerings of high-volume, large-footprint bicycle rubber has consisted of downhill specific, or homemade, or scarce out-of-production tires designed for specific out-of-production rims. Though downhill tires are readily available, they are heavier than we need. We ultimately desire a tire that fits the following criteria: 1) The ability to crawl over and through a wide array of soft and loose surfaces and materials without packing up. 2) A size that will fit within the confines of the Pugsley frame and fork. 3) A weight less than 26 x 3.0″ downhill tires. 4) Full compatibility with 26” Large Marge rims and other wide bicycle specific rims. Our only option was to design our own tire.

The Endomorph 3.7 is the product of our effort. It’s 94mm wide (3.7″) x 740mm tall (29″) on our rims. It’s the highest-volume production bicycle tire on the market at this point. And, at 1260 grams, our 60 tpi tire weighs 300–400 grams less than lower-volume 3″-wide DH tires. Most 3″ DH tires hover around 1600 grams.

The center portion of the Endomorph’s medium durometer (60a) tread is comprised of widely spaced chevrons made up of small, low-profile knobs. Higher-profile knobs, at the outer edges of the tread, provide cornering traction and lateral stability in the loose stuff. No tread pattern is going to be perfect in every condition, but the Endomorph’s tread tends to perform quite well on a variety of surfaces. Truthfully, the casing volume has as much to do with our tire’s performance as the tread pattern does. High volume allows the use of low pressure without much risk of pinch flats. The use of low pressure allows the tire casing to spread out on the ground, providing greater traction and floatation due to the increased footprint. We’ve run our tires as low as 5 psi in deep snow, but 8-10 psi is generally low enough for most snow and sand riding. Want to ride on harder surfaces? Pump ‘em up to 15 psi, if the surface is hard, but rough….up to 28 psi, if you’re riding pavement or smooth, hard dirt. Of course, this is just a guideline. Trial and error/success is the best way to determine what pressure will best compliment your riding style, trail (or lack thereof) conditions and your weight.”

Endomorph on the back on my Pugsley…

The Endo has a square profile on 65mm Large Marge rims [also the only fat rim choice when I built my Pugs]. This gives it a lot of floatation for its size and a tractor like feeling in soft terrain. The low-profile chevron tread rolls easily, but lacks aggressive knobs for traction. To hook up with this tire you need to drop the air pressure so it flattens out as much as possible. The square profile and paddle like tread means the Endo needs some encouragement to steer and has trouble on side slopes. The minimal tread doesn’t pack up with mud easily or throw up a ton of sand.

I’m guessing that my Endos are the original 60 tpi variety because they don’t feel as stiff as the 27 tpi Surly fat tires I’ve had my hands on. Surly now sells Endos in 120 tpi [~1440g] and 27 tpi [~ 1560g]. As I noted in my Surly Nate fat tire review riders are finding large variations in tire actual weights so it’s well worth weighing any Endos you are looking at if you have a few to pick from so you get the lightest tire you can.

If you are buying new I’d recommend getting the 120 tpi version for the lighter weight and the supple carcass that will roll with a lot less resistance. However, a lot of fat bikes come stock with 27 tpi Endos and many riders opt to swap in something else right off the bat so it’s quite possible you’ll find some 27 tpi Endos cheap. If so I’d probably grab them. Fat bike tires are crazy expensive at $90-$150 each so I don’t blame anyone for wanting a deal.

Endos on the CDN GDR…

So what are Endos good for?

As you’d expect for the first and for a long time the only fat tire – the Endomorph is a generalist. I used it for all my fat biking for the first 3 years of owning my Pugsley. Riding the beaches of Baja to the snows of Alberta. We mountain biked with Endos on dirt and snow. We bikepacked with them on the CDN GDR. We used them on pavement when we had to get somewhere. And we did it all with a smile.

There are now specialist fat tires for paved riding or with knobs for aggressive trail riding. Surly came out with a tire called the Larry that has a longitudinal tread pattern for better steering control up front. So you’ll often see new fat bikers being told online that they need to dump their Endos in favour of tire X [fill in latest offering by Surly or 45 North]. I call bullshit on that advise in principle. Endos work fine for most fat riders for most conditions. I don’t think it makes any sense to tell a guy or gal who just dropped nearly $2K on a shiny fat bike that they now need to spend $300 on new rubber or else.

If your fat bike has Endos on it my advice is to ride ’em – a lot. Especially if you are new to fat bikes. They’ll be good for most of your riding and when you encounter situations that challenges them you’ll get to learn how to ride your fatty with some finesse. Those skills will be useful no matter what rubber you ride on your fat bike. You’ll also have time to figure out what fat biking means to you and what specialist rubber you want/need. As a bonus by the time to you ride your stock Endos for a season the options for fat rubber will probably change and you’ll have some new choices.

Now don’t get me wrong. I’m not saying Endos are the uber fat tire and there is no point looking at anything else. If money is no object you might as well get one of everything and always have the perfect tire for your needs that day. OTOH – don’t feel like you need to replace your Endos ASAP or you won’t be able to ride your fat bike and smile.

These days I’d use Endos for bikepacking, dry conditions MTBing, urban assault rides, sand/beach use, flattish snow missions and rides that have a lot of paved sections to deal with. Where I think they should be avoided are steep slick conditions [ie. wet techy MTBing or snow].

As with all fat tires pressure is critical. If you aren’t adjusting your tire’s pressure as you change surfaces you won’t be getting full performance out of it. My rule of thumb with Endos is any bouncing means too much pressure and squirmy hard to steer handling means to little pressure. In extreme soft conditions you’ll be down in the mid-single digits for pressure and your Endos will feel a bit odd, but that’s not a bad trade off for riding instead of walking.

Endo in the back and Larry in the front….

When Surly released their second fat tire it was the Larry shown above and it was touted as a great front tire companion to the Endo. That’s how a stock Pugsley or Salsa Mukluk are equipped these days. I’ll review the Larry in a separate post, but I thought it was worth mentioning this combo since it is found on so many bikes. Both our Pugsleys are setup like this at the moment. The Larry is a nice compliment to to Endo. The directional power of the Larry helps keep your fat bike rolling where you want it to go and the Endo’s flat profile and paddle style tread keeps it moving forward.  If your fat bike came with two Endos a Larry up front is a good upgrade and since you wear rear tires faster you’ll use up your second Endo on the back no worries.

Endos in the snow…

Keep your Endomorphs

At some point you’ll buy some specialist fat rubber and perhaps you’ll be tempted to get rid of your Endomorphs. My advice is hang on to them. They are a great general purpose tire and fat rubber is expensive so it makes sense to use your Endos when they fit the bill. I have a set of Surly Nate fat knobbys and while they kill the Endos for traction those same knobs mean they roll slow when I’m looking to cover ground. For a bikepacking trip where I want to put in 100km+ days I can assure you I don’t want to be rolling on Nates. Even for shorter rides I prefer the Endos or Endo + Larry combo over the Nates if I’m not in need of uber traction. That’s why when summer rolled around in Victoria I spooned some Endos on to the rear of both our Pugsleys.
Some folks clam Endos get better traction and steering when run with the chevrons facing to the rear when viewed from the top of the tire. I’ve tried that and not noticed any difference. It’s free so if you are in the mood to experiment it’s worth a try to see what you think.

Endo in Mexican beach sand…

Send me your Endomorphs!

If you have some Endos and don’t want ’em anymore send them to me. I hate to think there are Endos languishing in garages never to be ridden again or worse being thrown out. I’ll use ’em and when they are worn out I’ll recycle the carcass.


Surly Necromancer Pugsley…

1 08 2012

So black – So beautiful…

A-Man rolling a fatty…

Cork Ergon grips…

Microshift thumb shifters…

Wheelie time…

Salsa Moto Ace bar…

4″ Larry on 82mm rims…

Surly Moonlander fork with brazeons galore…

“Thumbies?…nice!”

Subtle Surly logo…

Surly Mr. Whirly MWOD cranks…

Shimano Deore rear derailleur…

The low down…

Clearance for a Big Fat Larry 5″ tire…

Surly Endomorph 4″ tire…

Who needs a stinking kickstand?

Avid BB7 mechanical disc brake with 160mm rotor…

Fatties do fit damn fine!

A-Man admiring his new ride…


Surly Nate Tire Review

26 07 2012

Fat knobby rubber…

The Nate is Surly’s 4″ knobby fatbiking tire. It comes in 27tpi & 120tpi versions. I was shooting for the 120tpi tire, but ended up with the 27tpi model instead. Prior to this tire being released the only options for the Pugsley were the Endomorph and the Larry – both of which are smooth tread tires suited for soft conditions use. Of course a lot of fatbikers used the Endo & Larry for trail riding since they had no options. The arrival of the Nate last year sparked a lot of interest amongst fatbikers for new terrain that could be conquered with knobby traction.

The 27tpi Nates have a spec’d weight of 1730g with a wire bead and price of $90 vs. the 120tpi version at 1280g with a folding bead and a price of $150. I would definitely suggest you go with the lighter 120tpi Nates despite the high cost. Saving over 2lbs is worth it for bikes that are already on the portly side and more importantly the reduced rolling resistance because of the softer carcass will pay you back on every ride you do. I only have the 27tpi version due to an order snafu and if I could do it over I’d hold out for the 120tpi tire. Fattires last a long time so it’s worth the investment.

You should also be aware that riders have noticed hundreds of grams in variation between tire weights for the same model. So if you have access to a LBS with a bunch of fat tires definitely weigh them all and buy the lightest. The difference could easily be a pound over a set of tires at no increase in cost.

My Pugsley with Nates…

Even though I’ve had a fatbike for years I was taken aback by the sight of the Nate’s aggressive knobs and the heft of the tire. It’s sort of like bringing a chainsaw with you on a backpacking trip…you are definitely serious about your campfires or in this case traction! My experience with the Nates has been in Vancouver Island’s wet rainforest during winter and spring. That means slick rocks, slippery roots, mud, steep wet dirt climbs and moss. The Nates did not disappoint in the traction department. When inflated properly they’ll hook up on anything other than roots which are near frictionless when wet. Like all fatbike tires you have to get the pressure right to coax maximum performance out of these bad boys. If they are overinflated you’ll bounce around uncomfortably and wonder where all the traction is you read about online. Despite the big footprint and aggro knobs you do have ride with skill and finesse the bike even with Nates to get traction on steep slippery surfaces. The Nates give you a shot at stuff you wouldn’t have a hope of climbing with Endos & Larrys. You still need to bring your “A” game 😉

Descending Nates hook up well and let you ride your Pugsley much more aggressively in sloppy conditions that you could previously. The same applies to braking.

Fat + Knobs = Nate

The downside to the stiff, heavy carcass and big knobs is that the Nate is noticeably slower than the Endos & Larrys. I’ve done 140km days fully loaded on the latter tires. I wouldn’t even consider that with these 27tpi Nates. That’s okay in my books as I wouldn’t use the Nates if I didn’t need the traction they offer so when they are on my Pugsley I have no other choice and long days in the saddle are probably not in the cards. Although I’m sure the 120tpi version of Nates would be better in this regard I don’t think you’ll see me rolling around on any model of Nate just for fun. When it dried out here I pulled them from my Pugsley and they’ll sit in my garage until this coming winter.

I haven’t used Nates in sand, but I hear they kick up a lot of sand and don’t work as well as Endos & Larrys unless you are trying to climb some steep dunes. I’ve read mixed reviews on snow. For packed trails and steep snow climbs they seem to perform well. For floatation missions – especially rolling over a crust they break through more than a smoother fat tire. In slimy mud they shed the goo well, but in sticky clay-esque mud they’ll pack up and you’ll have to clean them out frequently.

Back when my Nates were clean…

The bottom line with the Surly Nate is you get great traction, but there are some downsides. If you can’t make your riding work with smoother fat tires this may be just what you need. On the other hand I think the Endo & Larry are better general purpose fatbike tires and for loose conditions riding.

Other options:

  • 45 North has come out with a tire called the Husker Du [4″] in a lightweight casing and soon a studded version. The non-studded Husker Du has smaller knobs than the Nate so it likely doesn’t have the same traction potential, but it rolls much better. I haven’t tried a set, but I suspect they’ll be a decent year round fatbike tire for folks that want 1 tire to do it all. The studded version offers traction on ice at the cost of weight and rolling resistance.
  • Surly has come out with 2 new 5″ knobby tires called the Bud & Lou – in front and rear specific tread patterns. I don’t know if they are going to prove significantly better than the Nate enough to make the massive weight gains worthwhile, but they will look awesome on your Moonlander 😉


The Amazing Pugsley…

25 07 2012

My best Pugsley “Blue Steel” look…

With new tire and rim options available for Fatbikes I thought it would be interesting to outline some Pugsley configurations for different biking missions to illustrate how versatile this bike is becoming.

Pugsley 29er MTB

  • add in some 50mm Rabbit Hole rims
  • add in some 29er rubber from 2.1″ to 3″
  • run rigid with the stock fork
  • run a 29er suspension fork [up to ~2.5″ tires and steering geo will change a bit]
  • can run SS/FG or IGH no problem

Pugsley Bikepacking Rig and Touring Bike

  • add in some 50mm Rabbit Hole rims
  • add in some 29er rubber from 2.1″ to 3″
  • run rigid with the stock fork
  • for bikepacking use some 29er MTB rubber
  • for touring maybe some Schwalbe touring rubber
  • use soft bikepacking bags or racks and panniers or add trailer

Pugsley Commuter Bike

  • add in some 50mm Rabbit Hole rims
  • add in some 29er rubber from 2.1″ to 3″
  • run rigid with the stock fork
  • add rear rack and panniers
  • add fenders
  • Schwalbe Big Apple or Marathon tires
  • IGH would be great for low maintenance

Pugsley Fat Trail Bike

  • Marge Lite rims
  • Husker Du or Nate  4″ tires
  • rigid fork or a fat suspension fork when the come out for 2013

Pugsley Sand/Snow Machine

  • Rolling Darryl 82mm rims
  • Big Fat Larry 5″ tires
  • I would use an IGH for this type of riding

One Pugsley To Rule Them All!

  • buy Necromancer Pugs with 82mm rims
  • use stock Larry/Endo 4″ tires for bikepacking and general purpose rides
  • add in a set of Big Fat Larry 5″ tires for snow/sand
  • add in a set of Husker Du or Nate 4″ tires for trail riding
  • add in a set of Black Floyd 4″ smooth tires for commuting or touring use
  • one wheel set and swap tires as needed

Pugsley Hacks

  • IGH + SS/FG gives bombproof, weatherproof low maintenance drivetrain with uber strong rear wheel
  • FG front wheel lets you try out a fixed gear bike without having to invest in a new rig plus it’s dead reliable as a backup to your normal rear wheel
  • SS/SS Marge Lite wheels lets you build a very light Pugsley with two different gear ratios that are easily swappable
  • OMM racks are my favourite on the Pugs because they are light, bolt on easily despite the funky offset front and back – plus they are crazy strong
  • add some plastic velcro on mud deflectors to the downtube and seattube with your OMM racks and you have decent fender-esque mud protection with no extra weight and no way to damage them or clog up
  • look for fat bike compatible suspension forks in 2013 & 2014
  • Surly has released 5″ knobby tires that will likely work on the Pugs…not sure ho much benefit they will be over 4″ knobbies give flotation isn’t key for that sort of tire and knobbies weigh a ton as tires get bigger.


Surly Moonlander vs. Pugsley…

24 07 2012

Surly Moonlander – click for specs…

With the release of the Surly Moonlander last year the Pugsley has fallen out of the fatbike spotlight and some people have questioned what’s the point of the Pugsley when you can have 5″ tires on 100mm rims? The truth of the matter is that the Pugsley is the better fatbike for most riders and the Moonlander suffers from hyper-specialization that renders it far less versatile than the Pugsley. I figured it was worth breaking down the differences between these two models so the choice was clearer for a prospective buyer.

Moonlander

  • 28mm offset drivetrain
  • horizontal 135mm rear dropouts
  • symmetrical front fork [starting 2013 the ML gets an offset fork]
  • uses front 135mm hub with a front disc brake mount
  • requires specialized crank
  • only 100mm rims work [narrower rims can’t achieve adequate spoke tension due to large offset]
  • max clearance is for 5″ tire on 100mm rim

Surly Pugsley – click for specs…

Pugsley

  • 17.5mm offset drivetrain
  • horizontal 135mm rear dropouts
  • offset front fork
  • uses rear 135mm hub with rear disc brake mount
  • wheels are swapable front to rear
  • can use any 100mm BB + crank
  • 50mm to 82mm rims work
  • max clearance is for 5″ tire on 82mm rim
  • smallest tire/rim is 2.1″ on 50mm 29er rim
  • note: Krampus 50mm rim + 3″ tire will fit [OD = 30.5″]

Remember when these were the biggest tires you could get?

What does this mean in practical terms?

  • the Moonlander can only use wide tires and rims making it a flotation machine
  • the Moonlander can’t be fitted with skinny 29er MTB rubber for trail use or even lighter Marge Lite 65mm/82mm rims with 4″ rubber
  • the pre-2013 Moonlander can’t swap front and rear wheels making it less reliable for expedition use. Starting 2013 you can swap wheels front to back.
  • the Pugsley can use skinny 29er MTB rubber on 50mm rims all the way up to 5″ rubber on 82mm rims making it versatile from summer trail use to floatation missions on sand/snow
  • the Pugsley can swap front and rear wheels allowing for a very reliable derailleur + SS/GF or IGH + SS/GF combo perfect for expedition use where a breakdown would have serious consequences

Why we ride…

Who should buy a Moonlander?

  • folks that are pushing the limits of floatation on sand, snow, mud or bogs
  • riders that gotta have the newest/biggest/baddest machines even if they don’t need ’em

Exploring…

Who should buy a Pugsley?

  • fatbikers that want to ride trails, bikepack and be able to ride sand/snow
  • riders that value versatility over the maximum in flotation
  • expedition fatbikers that can’t afford a drivetrain failure
  • riders that want a fatbike and 29er without having 2 bikes

Surly Necromancer Pugsley – click for specs…

What about the Necromancer Pugsley?

  • this is a Pugsley with a Moonlander fork
  • you can run 5″ rubber on 100mm rims up front, but rear clearance is still limited to 5″ tires on 82mm rims
  • you can run 2.1″ 29er rubber on 50mm rims like a normal Pugs
  • you can’t swap the wheels front to back
  • the Necromancer comes stock with non-cutout 82mm rims and an upgraded parts spec vs. the normal Pugs
  • if you want a Pugs with nicer parts and don’t care about the swapping of wheels score this baby

Pugsley – not just for snow…

The Hot Ticket

  • buy the stock Surly Pugsley [if you don’t care about expedition reliability go with Necro for better spec and RD rims]
  • upgrade #1 – set of Nates or Husker Du tires for a knobby trail traction option
  • upgrade #2 – set of Rabbit Hole 50mm wheels with 2.4″ – 3″ rubber for trail riding/bikepacking
  • upgrade #3 – set of Marge Lite rims or Rolling Darryls [swap in for stock rims using existing hubs]
  • upgrade #4 – set of Big Fat Larry 5″ tires for flotation missions on your Rolling Darryls if you ride soft stuff a lot
  • this will give you 2 wheelsets plus a few tire options for dial a bike versatility from one frame/fork

My Green Machine…

Why my Pugsley rocks?

  • IGH is immune to weather and damage on trail from crashes, vegetation or during transport
  • IGH rear wheel is uber strong due to even spoke tension
  • Front fixed gear wheel can be swapped to rear for total backcountry reliablity
  • old style frame is larger for bigger frame bag
  • Jones Loop H-bars for all day riding comfort

My Pugsley setup for bikepacking…


Gravel Pimp – Railway Recon 1

23 07 2012

Sharon on her first recon mission…

JQ commented on my last Gravel Pimp Recon post that the E&N Railway might be rideable from the south end of Shawinigan Lake down into Victoria. If so it would be the most direct non-paved route you could ride so it seemed well worth a look.

Our ride in red – click on map for larger interactive version…

The E&N Railway line runs from Victoria to Nanimo and is currently not being used. There is some talk of reviving it, but the funding issues between Via Rail and the Provincial Government have not been resolved.

3 fat Gravel Pimps on the tracks…

Sharon has been keen to get some Gravel Pimping done, but she only has weekends off so this is the first time a recon mission and her time off coincided. I had reservations about taking her on this ride as I suspected it wouldn’t be the most pleasant one we’ve done, but in the end I figured the spirit of adventure would make up for some of the challenges on this ride. Sharon and I rode our Pugsleys and Scott rode his Jones. So it was a full-fat and semi-fat recon… 😉

It’s not smooth riding!

We started in the north where the E&N tracks meet Stebbing Road just off Shawinigan Lake Road. The thought was that the gentle down grade into Victoria would make up for some of the hassle of riding on the tracks. The elevation drop is ~300m and is a consistent rail grade so you don’t notice it too much, but I am sure it helped us along the ride.

Scott takes the easy path…

The riding itself was fairly brutal. Don’t let these photos fool you. I wasn’t in the mood to whip out the camera when I was been beaten up by the non-stop WHOMP WHOMP WHOMP of the tracks. We rode on the edge of the tracks when possible, but that was probably less than 40% of the time and often there was only a 4″ sloped gravel/dirt margin to ride. So you had to stay very steady or end up sliding down the slope into the ditch. Something I did more than a few times.

Sharon taking the hard path…

Sharon is new to the Pugsley and less confident about her riding skills so she stayed on the tracks more than I did to avoid the nerve-wracking riding on the edge and the inevitable tumbles down to the ditch. I felt really bad for her as she pounded down the tracks, but there wasn’t much I could do other than be encouraging. We aired down our fat tires as much as possible, but the reality is that they don’t help all that much in this situation. Having said that I’m really glad I wasn’t on a rigid MTB with 2″ tires.

Feel the bump! This was 5 out of 10 in terms of the worst bumpy sections.

Scott hustling down the tracks…

The scenery is nice along the route with a remote feel that is welcome especially when you consider the tracks run fairly close to the major island highway. It’s mostly closed in with vegetation on both sides, but occasionally the trees on the left disappear and you get some lovely views of the Sannich Peninsula.

Nice way to break in that Pugsley!

Of course you spend a lot of time looking down and concentrating on not crashing so you don’t get to enjoy the views quite the way you might hope to.

Railway spike…

The railway lines looked to be in great shape other than the overgrown vegetation that obscured the track in spots.

Team Pugsley – still smiling….

Don’t let my lack of enthusiasm for bumping down the tracks make it sound like we had no fun. The adventure of exploring a new part of our island was keeping us stoked. Plus we figured the constant WHOMP WHOMP WHOMP action had to be firming up our butts making us hotter than ever! Hahahaha 🙂

Does this bike make my butt look fat?

I refused to judge Scott and Sharon’s “who has the better butt?” competition.

Police State…

It wouldn’t be a recon mission without encountering the red gates of doom blocking us from entering the Victoria Watersupply Area aka the DMZ. Thankfully this time they were perpendicular to our route and we weren’t forced to find a way around.

Cool tunnel…

We found one tunnel along the route.

Proof I was on the ride…

The tunnel was short so no lights were needed.

A very tall bridge…

There were 2 bridges on the ride.

Don’t look down…

I’m not sure how high they were, but it looked like a long long long way down!

Are we there yet?

After the first 10K I don’t think anyone was excited for more riding on the tracks and we started looking for a convenient exit.

A butt break…

Rest breaks were not for our lungs or legs – they were to give our butts some non-pounding time.

Plant Power!

The E&N kept us riding for something like 17 or 18kms before finally providing an exit onto paved roads in Langford.

The tracks are sinking!

The E&N’s few KMs provided some mud to keep us on our toes.

Sweet relief…

As well as some of the worst of the bumpy track sections, but also some of the nicest margin riding.

The end in sight…

I managed to ride over a wasp nest and got stung a couple times. That was painful, but it did take my mind of the bumpiness of the tracks for a while 😉

The big picture…

A few KMs on Goldstream Ave took us to the Galloping Goose Trail and on to Victoria. If you were enough of a glutton for punishment you could ride the E&N all the way into downtown Victoria – which is ~34kms.

On the plus side you can ride the E&N Railway and it does connect the south end of the Trans Canada Trail [TCT] to Victoria. On the downside it’s not a fun ride. In fact I would only recommend it as a hike – probably quite a nice one actually! If you want to ride the E&N just for kicks once go for it, but I doubt you’ll go back for a second helping. We rode unloaded bikes with big soft tires and it was okay. Fully loaded touring bikes [racks & panniers] would struggle and would probably have to be walked most of the time. I could coax my bikepacking rig down the E&N, but I wouldn’t want to. Although this is the shortest most convenient non-paved route between the TCT and Victoria I think the longer logging road routes to the west are a much better choice for enjoyable riding.

I’m glad we took the time to explore the E&N and see what’s what, but I won’t be going back on a bicycle!

Update: looks like trains will be running along these tracks in full force in year or so when the repairs are done.


Glad I have spares…

3 06 2012

Chilling with my fatty…

My Santa Cruz Nomad is in the shop to have its fork serviced. A long overdue bit of maintenance. I don’t like to rush folks doing important work on my gear and I realize that May is not the ideal time to drop off a mountain bike for quick turn around repairs.

Riding my On One Scandal with Grant and his sweet Chromag Surface 29er…

So I’ve been riding my other mountain bikes – a On One Scandal and a Surly Pugsley fatbike.

Grant pondering the beauty of our local trails…

It’s great to have other bikes to ride so I am not waiting for the Nomad to come back before I can ride some trails.

Scott happy to be out riding…

And although my other bikes are not as supremely awesome as my Nomad they keep me rolling and help me better appreciate my main mountain bike.

Sharon glad I had a spare bike to ride…


Where the FAT is AT?

19 05 2012

Sharon’s purple Pugsley mostly rebuilt…

Still need a chain, saddle and grips…

I put on some Surly Endomorph and Larry tires for sand biking and summer/dry MTBing…

I like the contrast of fresh paint and old worn parts…


Drilling My Fatbike Rims…

15 05 2012

Sharon’s front Pugsley wheel…

I’m [slowly] working on building up Sharon’s Pugsley from the parts Kurt gave me. The frame has been powder coated and new headset installed. The next move was cleaning and drilling out her Surly Large Marge rims. These Large Marge DH rims are heavy – very heavy, but they are paid for so rather than replace them I decided to drill them out.

Just a reminder where we started…

I’ve got Sharon’s front wheel drilled out and looking back I gotta say this is not a DIY project I would recommend unless you are totally motivated to get ‘er done. It’s noisy, messy [you’ll be covered with tiny metal shards] and you can potentially trash your rim. If you own some fat rims and want to drill them fair enough. I’ve warned you!

I’ll finish her rear rim, but I won’t drill out my Surly Large Marge DH rims. I have enough leg power that it’s not vital and when the time comes I’ll just buy some new single walled Surly rims that are already cut out. When I can afford it the price will be worth the hassle I’ll save plus I’ll use light weight hubs for a really killer weight savings and keep my old Pugsley wheels for heavy duty use.

Sharon won’t throw money at bikes like I do [silly!] so one set of wheels has to do it all.

The hole saw – your friend…

I have very few powered tools so here is what I drilled out the rim with:

  • electric drill
  • small drill bit for pilot hole
  • 1.5″ hole saw attachment
  • marking tool
  • ruler
  • dremel tool with grinding bits
  • needle nose pliers
  • eye protection
  • 6 ice cold Mexican beers and a fresh lime

Yikes!

This wheel has been used a lot over several years so I gave it a once over only to discover the aluminum spoke nipples are corroded to the point of self-destruction. I replaced a few with bronze nipples, but at some point this wheel will need to be totally rebuilt.

Oh well. You aren’t riding hard if you aren’t breaking things…;)

Measure and mark…

First thing I had to do is pull the tire, tube and rim tape. Then I marked halfway between the spokes along the centerline of the rim.

Drill pilot holes…

Next up drill a pilot hole at each mark.

Test fitting the hole saw…

I had room for a 1.5″ hole between the spokes.

Raw hole cut into rim…

Start the less than fun process of cutting out holes. This will generate a ton of tiny metal fragments so do it outside if you can or at least not in the living room on your lovely deep shag carpet…=-) I braced the wheel up against the steps of my deck while cutting out the holes. You can use a wall or work bench. Other folks have built jigs to hold the wheel or put the wheel into a fat bike frame that was secured to something else.

Upgraded hole saw…

I foolishly bought the cheapest hole saw at my local hardware store when I started this project. It lasted about halfway through the first rim before it was toast. So I went back and got a better quality hole saw which should get me through the second rim. As soon as you notice the cutting performance of your saw changing swap in a new one.

Holes cut…

Cutting the holes is not tragically hard, but I’ve done more fun DIY bike projects.

Rough edge…

Once the holes were cut I used a dremel tool to smooth out the rough edges. I may use a round file for wheel #2 as it was hard to maneuver the dremel around the spokes.

Smooth edges…

These rims are old and this bike will actually get ridden so I didn’t waste a lot of time trying to make it look bike show perfect. Note the self-destructing middle spoke nipple.

Weight savings = ~200g…

I collected all the big bits of metal and weighed them as 195g say ~200g savings for both rims with all the smaller bits included.

Truing the wheel…

After all the cutting and grinding was done I replaced some corroded nipples and gave the wheel some love. I’m not looking for perfection. I just don’t want the wheel to exploded mid-ride.

I should note that given the double wall construction and amount of material used in these Large Marge DH rims I don’t think the drilled out holes will compromise their strength in any meaningful way. Big guys are rocking the single walled cut out Surly Marge Lites so we shouldn’t have an issue.

The purple pugsley starting to come together…

It took me a solid afternoon of futzing with this one wheel to get ‘er done. I’m not fast at these sorts of projects so you may do better.

I threw some white duct tape in the rim to cover the new holes so I could mount the tube and a skinny 3.8″. Sharon will probably come up with something a bit more “pretty” at some point.

Front done…now for the rear rim…

So a few warnings:

  • don’t hurt yourself [wear eye protection]
  • don’t mistake the valve hole for a pilot hole and cut it out
  • don’t get too enthusiastic pressing down on the hole saw or you can take out a couple spokes