Rivers pointed me at this stove. The simplest DIY beer can stove I’ve ever seen. 😉
OR Rader Pocket Cap…
12 06 2013
My 50 Mision cap…
Often I tour with just a baseball cap on my head – particularly if it’s going to be hot all the time. It’s light, comfortable and keeps the sun out of my eyes. Oh yeah it stops people from noticing my common bad hair days on tour! 😉
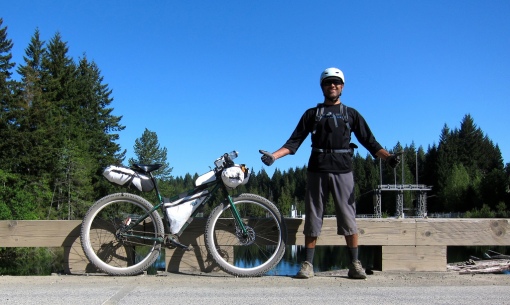
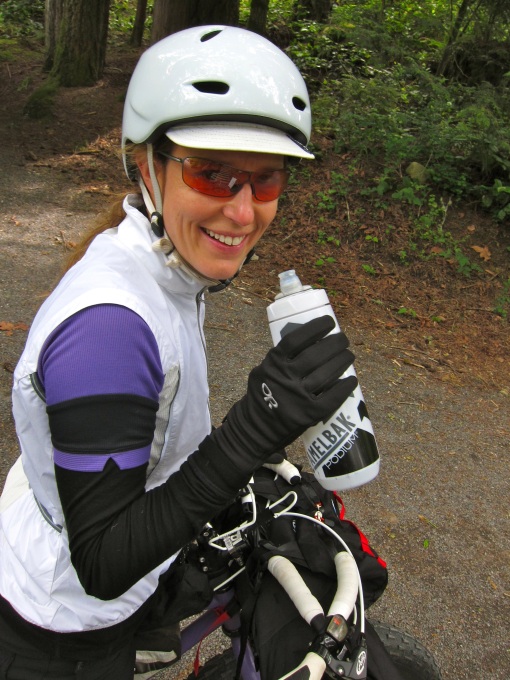
Skid lid…
If I judge that the tour has higher than normal risks of crashing [ie. technical MTBing or I am riding with Scott] I’ll wear a helmet.
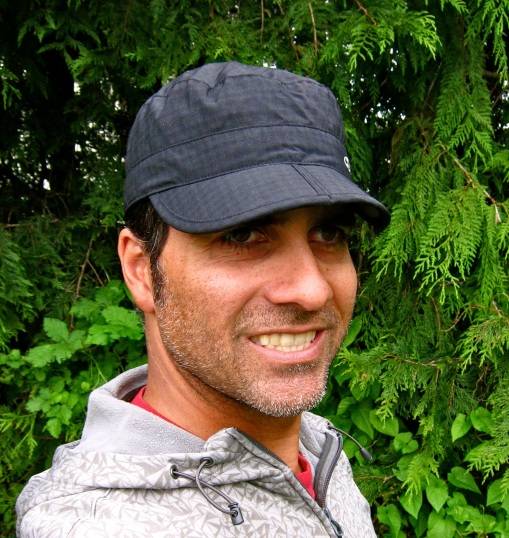
My trusty toque…
I almost always have a toque with me on tour. Canada gets cold at night and in the AM even in the summer. Plus they make everyone look so sexy [see image above]… 😉

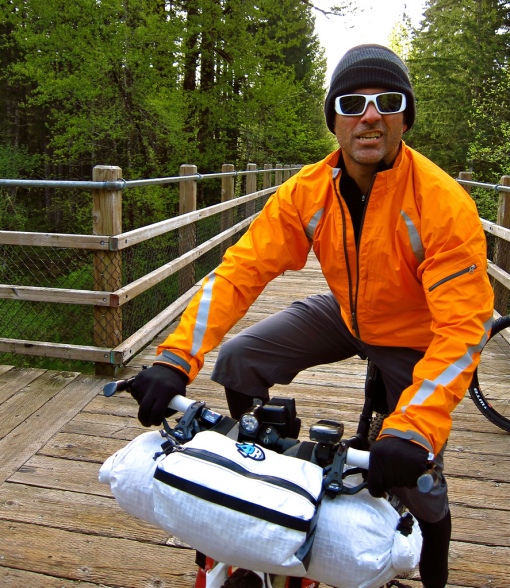
OR cap…
A toque folds up and can be crammed in any nook or cranny. The issue with a normal baseball cap is where do you stash it in bikepacking bags when not in use? It’s easy to screw up the brim and then you look goofy. If you are a goofy looking guy like me you don’t want to go further in that direction.

So small…
One option is a packable cap like this OR Radar Pocket Cap. It folds down into a small thin package that can be carried in a bag pocket without coming back out looking goofy. It weighs 50g for the gram counters and is made of rugged quick dry nylon fabric.
Blue Steel? – perhaps not!
This cap is non-adjustable and although I would normally wear a large or XL hat I’m fine in a medium size for the Radar. So beware if you are ordering online. It’s best to try this bad boy on or go one size smaller than normal.
If you are in Canada MEC.ca sells these.
These caps come in black, bright blue and tan.
Comments : 2 Comments »
Categories : Bike & Gear Reviews, Bike Culture, Bike Touring
Bikepacking Clothing…
10 06 2013
Last month in BC…
My bike touring wardrobe has evolved over the last decade to the point where I wear/pack pretty much the same items on every tour with some minor variations for weather.
- microfibre capris [warm when it’s cool and cool when it’s warm]
- wool socks [longer in the winter and shorter in the summer] x 2pr
- synthetic boxer briefs [quick dry – I never wear padded bike shorts]
- synthetic running t-shirt [quick dry great when it’s hot]
- wool zip neck LS top [adds warmth and can be vented well to adjust temperatures]
- ballcap
- softshell jacket [windproof and water resistant]
- toque
- fleece gloves
- MTB gloves
- buff neck warmer
- running tights
- trail runners
- puffy jacket [great when it gets cold]
- sunglasses
This gives me a wide range of comfortable temperatures on tour without having to pack too much. The next to skin items can be washed and dried reasonably easily on the ride if needed. Everything layers well if needed on cold day.

Patagonia puffy jacket…
My puffy jacket is one of the Patagonia synthetic models. I don’t recall which one exactly. It packs small and adds a lot of warmth. I wear it to bed if my sleeping bag is under gunned. It’s fantastic to wear on chilly mountain mornings while eating and packing. If the day starts with a significant downhill I’ll leave this on to ward off a chill until the day warms up or I start to climb.
You’ll notice most of my clothes are high visibility black or charcoal for safety. I bucked that trend here with a red puffer. 😉
There are lots of variations on the puffy jacket theme. I’d highly recommend you try one.

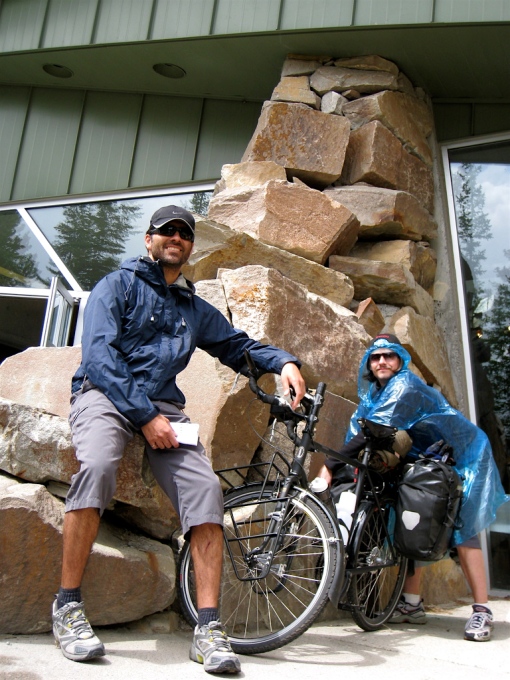
What a Big Dummy…
I’m wearing a MEC Ferrata soft shell jacket in the pic above. I love it. Very durable, windproof and used to resist rain a bit before I trashed the DWR coating. Comfortable to wear next to skin and looks reasonable off the bike if you are in a city. I’ve really thrashed this jacket and it is holding up fine. It should last 20yrs no problem.
Pretty much every outdoor clothing company now offers several soft shell options. Check ’em out they are worth a look.
I’m also wearing a runner’s baseball cap. They fold up pretty small for packing and have a flexible brim that resists permanently getting tweaked thus looking goofy.
I went with high visibility black for safety of course!
Two approaches to rain gear style…
I hate rain on tour so I usually plan trips for windows of good weather and/or locations that seldom get rain. However, sometimes you gotta hit the road when it’s likely to get wet. In those cases I’ll change what I pack a bit:
- delete soft shell and replace with light rain jacket
- delete trail runners and replace with waterproof footwear + mini gaiters to keep socks dry
- or keep trail runners and add goretex socks to keep feet dry
- add rain legs chaps
- add in waterproof over gloves
- probably add in an additional spare set of socks and gloves
- swap sunglasses for ones with interchangeable clear lenses

Staying warm…
When it’s hot I ride in a running t-shirt and capris. Ideally with some short/lightweight socks on. Often the evening turns chilly – especially in camp. So I add some running tights and long wool socks to my capris. I put on the soft shell jacket – possibly with the LS wool top underneath. I also slip on the toque.
If it gets really cold I add the puffy jacket, neck warmer and fleece gloves.
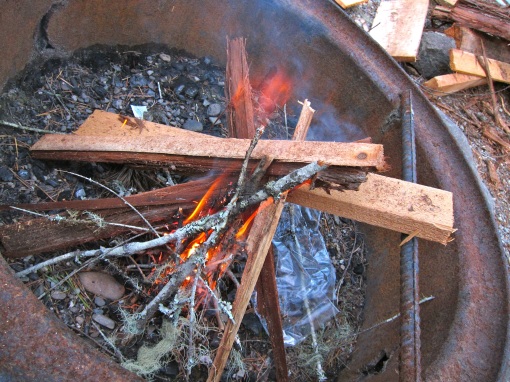
Of course a fire always helps morale when it’s cold as well!

Bug-tastic!
I try to skip tour is horribly buggy areas, but if that’s unavoidable I’ll make the following changes to the packing list:
- add in bug hat
- add in mesh bug jacket
- delete capris and add in full length pants [possibly with zip off legs if it will be hot]
I hate bug spray so I pack mesh clothing and use that to keep the critters at bay.

Wearing water shoes in the desert?
I’ve posted separately about touring footwear, but I’ll recap here:
- trail runners [light, comfy and easy to walk in]
- 5.10 MTB shoes [heavy, rugged, comfortable, excellent pedal grip, great to walk in, but very slow to dry]
- water shoes [fast drying, breathable, comfortable, but limited support]
- light hikers [heavy, waterproof, comfortable, great for hike-a-bike, but can get hot]
I never use clip-in bike shoes for tours. Their off the bike performance sucks and I like being able to jump off the bike without a second thought and run an errand or clamber up a hill to get a photo.
Comments : 9 Comments »
Categories : Bike Touring
JS’ AZT 300 Report…
4 06 2013
John Schilling & the AZT…
John Schilling posted an excellent AZT 300 bikepacking race report on his blog with loads of photos. If you like multi-day mountain bike racing this report is worth a read.
Comments : 3 Comments »
Tags: azt
Categories : Bike Touring, Mountain Biking
The Lazy Bikepacking Packing Strategy…
3 06 2013
The Lazy Rig…
My bikepacking setup has proven to be versatile and capable for my Vancouver Island adventures. I’m using Porcelain Rocket softbags attached to the bike plus a backpack on my body. Some people prefer to ride without a backpack, but I find it adds a lot of flexibility to the mix and if you don’t overload it there isn’t much comfort penalty.
Frame Bag
I use the frame bag for as much of the heavy stuff as I can. This keeps the weight centred and low on the bike in the bag that is most securely attached to the frame.
- bike tools
- pump
- spare tube
- paper maps
- TP + hand sanitizer + lighter
- F/A kit
- pot + stove + fuel + spork + windscreen + stove stand
Top Tube Bag
I use little TT bag for small items I want easy access to and items that would get lost in the bigger frame bag.
- chap stick
- eye drops
- water purification drops
- power bar
- headlamp
- mini-leatherman
Bar Roll
The main bar roll carries light and bulky items.
- sleeping bag inside a 10L OR dry bag
- spare clothes stuffed on either side [items I don’t generally want to access while riding]
Front Pouch
The front pouch is a where I put snacks I want to eat while riding and other items I want to get at during the day that would get lost or damaged in the frame bag.
- cell phone [or in pack]
- spare GPS batteries
- snacks [nuts, dried fruit, energy bars, etc…]
- tent poles carried between front pouch and bar roll
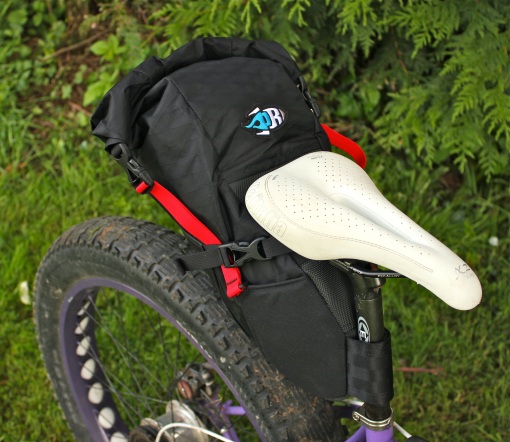
Seat Bag
The seat bag is also for bulky light items and I tend to stuff a jacket in there that I might use on and off during the day since I find accessing this bag pretty easy at a stop.
- sleeping pad
- tent pegs
- tent body & fly
- jacket [soft shell, puffy jacket or rain jacket depending what’s going on]

Getting ready to camp…
Backpack
I use my backpack for carrying food primarily. I also use it for holding extra water on a particularly hot day or stretch where resupply is not easy. I’ll either carry a 2L folded up water bag for that purpose if I know it’s going to happen a bunch or I’ll just buy a plastic water bottle of the needed size at a gas station, used it and then get rid of it if the extra water is just needed for a portion of the trip.
Generally my backpack is not full and I try to keep the weight down for comfort. This means I have extra capacity if something happens or I need to haul more than I planned on for a bit. Since I carry food in the pack and sometimes extra water I know that this bag will usually get lighter and lighter on a trip.
When I camp I transfer all my food items from the frame bags to the backpack for the night and then do whatever is needed with respect to animal food safety. A backpack is great for this purpose.
If I end up in a town or want to go for an off bike hike I can transfer items from the backpack to the bike and vice versa so I have a daypack to use.
I carry my camera either in the pack [DSLR] and/or a point-and-shoot on the waist belt in a pouch which is uber convenient and keeps the camera insulated from a lot of the vibration a camera on the bike would experience. I also keep my money, cell phone, credit cards and ID in my pack. That way I can jump off the bike and not leave anything too valuable on it. I will sometimes pop off my GPS and stash it in my pack on these occassions.
I size the pack for the trip based on how much food/water I’ll need. If I’m carrying the DSLR I’ll upsize for that as well.
- food [besides snacks for day]
- extra water in water bag or recyclable plastic bottle
- ID, cash, credit cards
- cell phone if not using it for something during ride
- extra stove fuel if needed
- tooth paste + brush
- any other toiletries [usually none]
Two benefits of carry food/extra water in a backpack are:
- your bike bags aren’t always over stuffed which makes accessing them and pulling out what you need easy. This is also kind to the zippers and other attachment points.
- when you have to hike-a-bike carrying some of the weight on your back is nice when the terrain is loose/steep/challenging.
Water
Running out of water is no fun, but carrying too much water is a heavy tiring mistake as well. Ideally I a carry just what I need between resupply opportunities plus a bit extra as a safety margin. I always ride with a water bottle on the stem. That is very easy to access so I drink when needed as I ride. I’ve got a 1.5L bottle attached to the dowtube which I decant into the stem bottle as needed. I will carry a water bag in my backpack or a plastic water bottle depending on what the specifics of the tour are.
I always have water purification drops with me and refill bottles as they empty and I pass a water source – usually a fast flowing creek. Cycling through my bottles allows the purification process to happen while I ride and I always have water that’s ready to go.
If I really need a ton of water on a tour I can attach water bottle cages to each fork leg and throw a 2nd water bag into the pack. At the moment I can’t imagine needing more than 7.6L of water between resupply stops.
- stem mounted bottle [0.7L]
- DT mounted bottle [1.5L]
- water bag in pack [2L]
- 2nd water bag in pack [2L]
- 2 water bottles on fork [1.4L]
Of course I always use the water in my backpack to replenish the stem mounted bottle so the weight on my back decreases as fast as possible.
I haven’t toured with a hydration bladder in my pack. On a really hot tour I would consider doing so and using the bladder instead of one of the water bags.

OMM rack on my Krampus…
Rear Rack and Panniers
I’ve got a trip planned for this summer that requires I carry food and stove fuel for a long stretch for myself and a few other people. My backpack strategy is fine for a solo effort, but doesn’t work so well when the load gets heavy. So for those situations I attach a rear rack and panniers.
There are downsides to using a rear rack and panniers, but the benefit is you can haul a lot of stuff on the bike easily. Since this extra weight is mostly food and stove fuel it will get lighter as the trip progresses mitigating a lot of the negatives of running with a rack.
In the picture above I’m test fitting an Old Man Mountain Cold Springs rear rack to my Krampus. I didn’t bother attaching the front struts, but they will go on no problem using p-clips on the seatstays. I’ll be using Ortlieb panniers with the OMM rack.
I don’t expect to use a rear rack much for bikepacking trips, but it’s good to know it works and is available when needed.
Comments : 13 Comments »
Tags: krampus, Porcelain Rocket
Categories : Bike Touring, Mountain Biking
Summer Bikepacking Shoes…
30 05 2013
On the move…
I’m trying to figure out what shoes best meet my needs for summer bikepacking trips.
- all day pedalling comfort with MTB platforms
- reasonable grip biking through technical sections
- able to hike-a-bike comfortably for 4-5hrs at a time over rough ground
- excellent traction off the bike
- breathable
- fast drying after rain or creek crossings
- need to accept my semi-custom insoles

5.10 Impact Low…
My favourite cycling shoe is this 5.10 Impact Low model. They are super comfortable, very durable, grip the pedals like glue and have great traction off the bike. The only downsides are 1) they take forever to dry if they get wet, 2) they are pretty heavy/overbuilt for touring and 3) they don’t breath all that well. If they dried fast I could live with everything else.
I really hate riding in wet feet so these are not a good choice if I think it might rain and/or I would have to carry my bike through any creeks/rivers.

Montrail trail runners…
I love these Montrail runners. They are super comfy and work great on/off the bike for touring. Although they dry faster and are more breathable than the 5.10’s they are not great in either category. They are also on their last legs having been shredded on many previous adventures – soles are almost worn away at the heel, cushioning is compressed and uppers are starting to tear. I just repaired the uppers with shoe goo so I could use them on my last tour, but Sharon laughed at me and said it was time to let them go. I probably will have to do that, but not until the end of the year! 😉

La Sportiva trail runners…
I bought these La Sportivas to replace the Montrails above, but never loved them enough to actually part with the old shoes. There is nothing wrong with the La Sportivas. They do everything well enough, but somehow the fit/performance just isn’t as good as I would like. On the plus side they are light and breathe/dry well. I’ve worn them enough that they are starting to fail at weak spots, but some strategic shoe gooing means they be good for another full year.
At the moment these are the best bikepacking shoe I own and when I have to throw the Montrails out they’ll keep me rolling until I find a replacement.
In terms of bikepacking downsides:
- raised instep not uber grippy on the bike pedals [not awful, but just okay]
- not as stable during hike-a-bike as my other shoes
- lightweight construction not super durable [I’m okay with this as a trade off for fast drying]

Merrel Gaulley water shoes…
I bought these Merrells when I broke my foot and needed a soft stretchy shoe to accommodate my swollen foot. They are water shoes which means they breathe and dry very fast, but they are very flexible and don’t offer much support. I have toured in water shoes before with no issues, but those tours did not involved any hike-a-bike over rough ground which my current trips seem to feature. These shoes also have a fairly non-aggressive sole so I don’t know how well they will do walking/pushing on steep loose terrain.
On the plus side is they fit me, they accept my insoles and they are paid for! 😉
I need to try a hike-a-bike tour with them and see if they work okay. They would definitely be my choice for a trip that I knew would involved a lot of wet feet.

Vibram Five Fingers…
So far I haven’t bothered with a second pair of shoes on tour. Wearing trail runners on my bike means they are comfy for wearing around camp and BC has barefoot friendly campsites [no thorns or sharp rocks] so I can just go without shoes if I need to air out my feet. However, I started to think that maybe carrying these Five Fingers wouldn’t be a bad idea. I could wear them during creek crossings to keep my main shoes/socks dry and they’d be fine in camp if I didn’t want to go barefoot. I could even ride or hike in them if I needed to. Plus they are also paid for! 😉
Most bikepackers who carry a second set of footwear seem to favour flip flops. Presumably for their lightweight, easy packing and low cost. That makes sense – except flip flops are pretty useless in a raging rocky creek or for anything more demanding then chilling in camp.
I’ll test the Five Fingers out this summer and see if they are worth hauling along or not.

Montrail Mountain Masochist trail runners…
I’ve got troublesome feet so I can’t simply order some shoes out of a catalogue and have much success. I’ve got to try on every pair that interests me and see what feels okay in the store. If I am hopeful I’ll buy a pair and wear them at home for a couple days to see what problems crop up once they are on my feet for several hours at a time. If that seems promising I start wearing them outside and give up any hope of returning them for a refund.
My success rate even with this sensible systematic approach is pretty grim. Shoes my feet really love are few and far between. I have given away quite a few pairs of shoes over the years that I thought were winners until an extended trip where their comfort was lacking. Which is why I’m starting to think of this now even though I can keep my La Sportivas going through to summer 2014. It could easily take that long to find a worthy successor! 😦
Comments : 24 Comments »
Categories : Bike & Gear Reviews, Bike Touring
Bikepacking Cooking…
28 05 2013
The cooking gear…
Here is the latest iteration of my bikepacking cooking setup:
- 700 ml MSR pot w/ lid
- Trangia stove
- stove stand
- MSR windscreen
- spork
- small lighter
- 30 ml alcohol fuel x 2
- 125 ml alcohol fuel

Carried inside pot…
The stove, lighter and 60 ml of fuel fits inside the pot. The stove is typically wrapped in a small cloth that doubles as protection from the pot’s handles that get hot. For longer trips where I might cook regularly vs. boil water for a camp meal I would add in a small bottle of dish soap and a cut up scrub pad.

Weight with 60 ml of fuel…
I’m not trying to go ultralight here. I just want the weight to be low enough it’s not a major burden and I also want the packed shape to work with my bike bags.

125 ml of fuel…
Each 30 ml bottle will boil 500 ml of cold water. I carry two 30 ml bottles inside my pot and the Trangia can hold a lot of fuel in the stove body itself if you want to pre-load it before you pack it. If I need more than that I have a bunch of 125 ml bottles like the one shown above that I can carry.
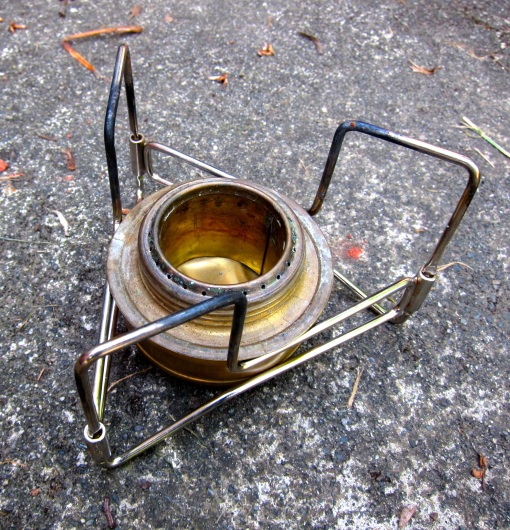
Trangia and stand…
I love my little Trangia stove. It heats water well. Is easy to use and very reliable. It can be used to simmer food unlike a lot of lightweight alcohol stoves. The stand is very strong and stable.

Stove ready to rock…
I use a MSR windscreen to keep drafts at bay. It’s a bit large and I’m going to downsize it a bit so it fits better and packs smaller.

Stove in action…
With no moving parts and constructed of brass the Trangia is a bombproof piece of gear.

Ready to light…
You can see in the picture above that 30 ml of fuel is just a dribble at the bottom of the Trangia. I purposely spill some fuel on the top of the stove to make lighting easier.

Let’s boil some water…
I timed boiling 500 ml of cold tap water using the Trangia in 8 mins. The 30 ml of fuel burned for 10 mins before running out.

Pot inside my framebag…
The shape of this pot fits nicely into my Porcelain Rocket framebag. It also works great in my bar bag or seatbag – just depending where I want to carry it.
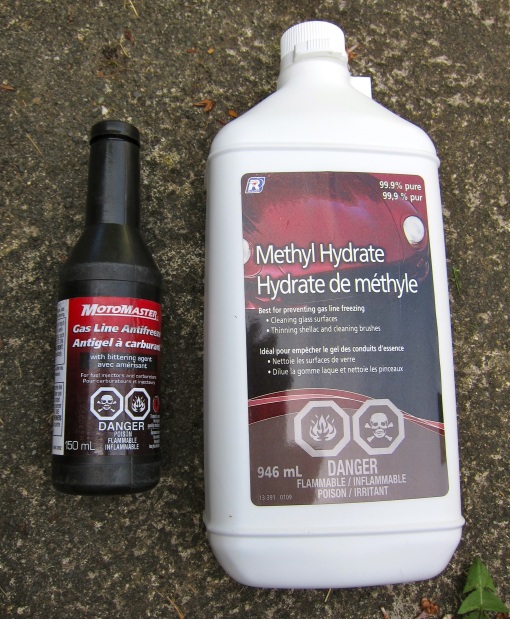
Methyl Hydrate…
I use methyl hydrate to power my Trangia because it’s easy to find locally. I’ve spilled this fuel in my bike bags and unlike gasoline or naptha there is no horror show. It just evaporates and no damage or smell occurs. I like that!
Comments : 18 Comments »
Tags: trangia
Categories : Bike Touring, How To
Vargo Triad Stove Review
24 05 2013
Looks sexy…
These Vargo Triad Ti stoves look sexy, but work like crap. Don’t waste your time buying and returning it! =( I tried one of these out in 2008 and was disappointed. I figured they might have improved it since then so I bought another at MEC.ca.
I filled it with methyl hydrate which is the easiest alcohol fuel for me to source. Lighting it was no problem, but even with a windscreen and inside my garage it was unable to boil 2.5 cups of water that I typically need to rehydrate a camp meal. The water ended up warm, but not boiling.
With my usual Trangia burner I can boil that much water for a meal and if I am lucky boil another cup for tea.

Too bad!
I’ll go back to using my trusty Trangia and try some of the DIY beer can stoves for an ultralight option. This Triad is going back to MEC and I won’t waste my time trying them again.
Comments : 3 Comments »
Categories : Bike & Gear Reviews, Bike Touring
Sharon’s First Bike Tour…
22 05 2013
Sharon on the move…
After a lot of tries to get out on a bike tour the stars aligned so Sharon and I hit the road this past weekend for some bike camping. We fitted Porcelain Rocket bikepacking bags to her Surly Pugsley and head up the Galloping Goose MUP towards the Sooke Potholes Campground. This a 50km dirt ride which is challenging enough on a loaded fatbike to be interesting without being so hard it might deter a novice bike tourist from going on a second tour. The scenery is nice and it’s 99% car free.
Sharon carried her own sleeping bag, pad, food, water and clothing. I carried all the group gear [tent, stove, cups, tools, spares, F/a kit etc..]. I ended up using rear panniers on my Pugsley to carry the extra group gear. It worked just fine, but the whole time I wished I had Porcelain Rocket softbags on my bike. Riding rough terrain with panniers is not a lot of fun.
We stopped on the ride out for a bite to eat at the 17 Mile House Pub which is perfectly situated about an hour from the campground. I wanted to reinforce all the good things about bike touring so stopping to eat, drink and relax seemed important!
I was a bit worried that the campground would be full of party animals as it was a holiday weekend in Canada. Happily we found a whole section of the campground unoccupied and the rest of the campers were chill. Some hot tea, a campfire and a chill session rounded out the evening.
My 2 person bike touring tent is cozy, but once Sharon got the hang out climbing in a out she had a good nights sleep.
The next morning we fired up the stove for tea and oatmeal before checking out the potholes down by the Sooke River.
The ride back was pleasant if repetitive. – sadly there isn’t a good loop route from the potholes back to Victoria that doesn’t involve significantly longer distances and a lot of climbing. We stopped for some Thai curry on the way back – again to emphasize that every good bike tour is an excuse to eat well!
By the end of the ride Sharon had enough energy to beat me to the top of a few climbs while smiling. That was a great sign that we had picked an appropriate route for her first tour. I’ll post something about using a Pugsley as a touring bike separately, but let me say that if you own a Pugs and you want to tour don’t think you need to buy another bike or even another set of wheels.
All in all the tour was a success. I’m sure Sharon will want to head out again once she’s recovered from knee surgery over the summer. The trick will be to pick routes that offer the most smiles for the least gnarliness.

Click for detailed map…

Enjoying the sunshine…
Corn dogs?

My Pugsley…

Where is the pub?
Lazy pulling up the rear…

Beer!

Great reason to bike tour – no traffic jams…
Strait of Juan de Fuca…
Rest stop…

Barnes Station Shelter…

We made it!

Our camp….
Getting a fire going…

Where are you sleeping?

Let’s ride!

Where did the trail go?

The mighty Sooke River…

I think I can ride this!

Bridge to somewhere…

Back at the water…
Let’s get ‘er done!
Still smiling…

Watch out for falling rocks!
Almost home…
Comments : 5 Comments »
Tags: Porcelain Rocket, Pugsley, Surly
Categories : Bike Touring, Fat Tire Biking, IGH
OMM Racks – Born in the USA..
21 05 2013Some behind the scenes footage at Old Man Mountain [aka OMM] racks. Made in the USA by some nice guys that love bike touring. 🙂
Comments : 1 Comment »
Tags: OMM
Categories : Bike Touring, Uncategorized
Sharon’s Porcelain Rocket Surly Pugsley…
20 05 2013
Sharon’s Pugs in adventure mode…
Getting Sharon out on her first ever bike tour is one of our goals before her knee surgery at the end of the month. I got her a new seat and bar bag from Porcelain Rocket so she’s ready to roll. The white frame bag is the same one I use on my Krampus. It actually fits her Pugs better than the Krampus so Sharon will use it when we tour together.

PR seatbag…
The seat bag fits her bike great. It’s nice and tight. Plus it just clears that uber fat rear tire! Sharon will put her sleeping pad and extra clothes back here.

New design PR bar bag…
The PR bar bag has a new attachment system that seems to work well. The bag fits with the Titec H-bars great. Sharon will put her sleeping bag in the bar bag.

Looking good…
The white fabric on the frame bag is crazy expensive so I couldn’t afford to go all matchy-matchy!

Frane bag fits great…
This frame bag was designed to fit my On One Scandal. It slides right into the 16″ Pugsley’s frame.
Another seat bag view…
Besides getting Sharon out on tour part of my motivation to get a second set of PR bags is so I would have some to share if I can rope somebody into coming on tour with me.

Rider’s eye view of bar bag…
Comments : 4 Comments »
Tags: Porcelain Rocket, pugley, Surly
Categories : Bike Touring, Fat Tire Biking
Downtube Water Bottle Cage…
16 05 2013
1.5L water bottle…
I wanted to see how well a downtube mounted water bottle cage would work on my Krampus. I didn’t love the fork mounted cages I tried on my Scandal 29er. Plus if the DT cage worked I could always add fork mounted cages later if I needed a ton of water on a trip.
Two bottle cages…
I just used two hose clamps on the Topeak cage and them a velcro pant strap at the top of the bottle. It seems pretty secure, but only time will tell.
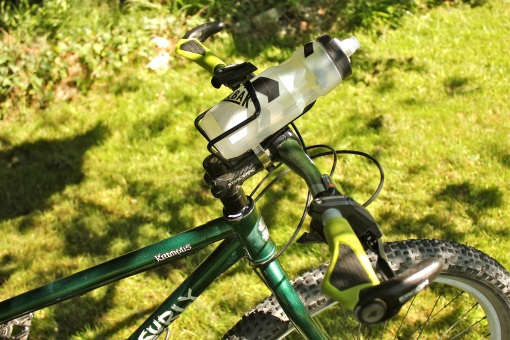
Stem mounted bottle cage…
Combined with the stem mounted bottle that gives me over 2L of water.

Just enough tire clearance…
Here are a couple close ups.

The magic of hose clamps…
Comments : 7 Comments »
Tags: krampus, Surly
Categories : Bike Touring, How To
Gravel Pimp: Port Alberni to Cumberland Loop Part 2…
13 05 2013
Middle of nowhere…
Day 3 – Wrong Turn
I made a serious mistake on the last day. I didn’t question the Google Maps bike route enough. I was so close to PA I could taste the ice cream and I wasn’t thinking straight. I ended up paying the price.
How bad was it?
- 2500′ and 3.5hrs of pushing my bike up Mount Horne
- 30 degree C heat
- limited water
- not realizing it was a dead end until right at the top where I was expecting an awesome downhill run to PA
- road down other side didn’t exist 😦
- 30mins of controlled falling down the mountain on my bike the same way I pushed up
I was totally crushed when I figured out the mistake in my route. I sat down and would have cried if I didn’t feel the need to conserve water! In my defence when I looked at the Google Maps satellite images it put a white line and road name for the imaginary roads. The white line looked just like a break in the trees which is what a logging road looks like. The only way you can tell the real roads from the fake roads is to zoom in uber close at which point the fake roads disappear and are replaced by trees. The real roads of course stay on the screen no matter how much you zoom in. Lesson learned.
The only upside was the cell tower at the top of the mountain meant I had 4bars on my phone so I could download satellite images and scope out a new route – very carefully!
After figuring out where to go next I had to head down the way I came. It was so steep I could barely ride safely and had to stop a few times to let my brakes cool.

Steep road…

and up…

thank God some water…

my Sopranos look…
Forgetting the climb for a second…

at least the views are sweet…

and up we go…

My only reward an awesome cell signal… 😉

Back where I started…
Day 3 – Heading to PA Finally!
4hrs of hard work and I was back where I started from. Bummer. 😦
The safest option would have been to head back to the highway and ride to PA on pavement. Did I take it?
Hell no! 😉
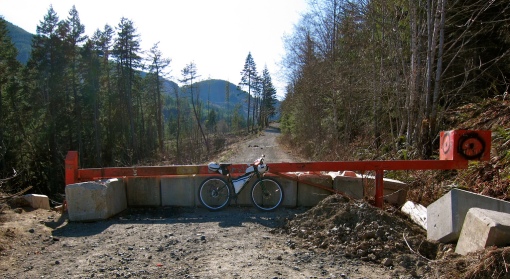
I decided to stay dirty and recon a route around the bottom of Horne Lake on logging roads. This had some risks and since it was now the afternoon one more setback would mean another night of camping as I could run out of daylight. After tasting a bit of main road touring I felt the opportunity to ride alone on logging roads was the better way to spend my time.
Although I felt some trepidation passing another “Keep Out!” gate the road past the gate was pretty nice. Enough shade to help beat the heat and after hours of pushing uphill it was nice just to be riding my bike again. The road deteriorated rapidly and I feared it might dead end, but it kept going and I was rewarded with a connection to a well maintained logging road at the south end of Horne Lake.
I got a little cocky at this point and spotted a shortcut on the map if I was willing to hike-a-bike across a clear cut. It would save me a long logging road detour. So I went for it. As I rode up to the clearcut I realized it was really rough and uphill the whole way. Yikes! I just kept going. Looking back at the effort required to manhandle the Krampus up the clearcut I’m not sure it was easier than riding the long way around, but it was a unique challenge. After many hours of touring on this trip doing something new was refreshing even though it was really hard.
At the far end of the clearcut I thought all my challenges were over, but Google Maps screwed me one more time with a fake road. I thought I had a straight shot to PA. But when I showed up at the intersection it didn’t exist. A zoom way in on the satellite image revealed it was another faker. **sigh**
This time however there was a reasonable alternate route I could take so instead of an 8km ride to PA. I had to ride 14-16kms. Not the end of the world. I had been through enough that even though I was pretty burnt out I knew I would get to PA that night before sunset and be drinking a cold beer.
So I cranked down the last part of the logging road I was on and hit the Alberni Highway. I enjoyed a really long downhill that brought me to the PA city limits with barely any pedalling. I stopped for a sub, bag of chips and a cold Sprite. I was thrilled to be almost done the ride. Not knowing PA very well I didn’t realize I had some super steep hills to climb back to my friends’ house, but nothing could stop me now!
I rolled into their place at 8pm. I guess I didn’t make it for lunch! A shower, 3 beers and a hottub later I felt like a champion. 😉

Another gate…

Looking good…

What happened to the last guy that tried this route… 😉

Getting rustic…

and rough…

and I’m golden…

Stunning views…

more gates to ignore…

One last challenge…

A harsh push through an uphill clear cut…
Halfway up…

Last section of gravel…

The Alberni Highway…

Viktory!

All Hail The Mighty Krampus!

The loop map – click for more details…
Wrap Up
All in all it was a great trip despite the heat and the navigation challenges. I learned a lot about this part of Vancouver Island and about route planning with the tools at my disposal. The Krampus with Porcelain Rocket bags is a capable bikepacking rig.
I cleaned up the GPS tracks on Ride With GPS to remove any detours, backtracks or wrong turns so the routes are more useful to people that download them. Riding 200kms in 3 days doesn’t seem like much, but it was quite hard for me with a lot of pushing.
The great news is I know have ~400kms of dirt touring route mapped out from Cumberland to Victoria BC and I’ve covered a bit less than half of Vancouver Island so there is lots more to come! 🙂

Ride GPS data…
Comments : 13 Comments »
Tags: krampus, Surly
Categories : 29er, Bike Touring, IGH, Mountain Biking
Gravel Pimp: Port Alberni to Cumberland Loop Part 1…
13 05 2013
Bridge on the Log Train Trail…
With a dirt bikepacking route sorted out from Lake Cowichan to Victoria I was eager to push northwards. I know the logging roads from Lake Cowichan to Port Alberni as I have driven them on my kiteboarding adventures. So I skipped that section and looked at how to ride from PA to Cumberland on dirt.

Route map – click for more detail…
I have friends in Port Alberni so I decided to drive 2hrs north to their place and start the ride from there. I figured I’d just do it as an out and back or come up with some loop options once I had a feel for the terrain.

Me and the Krampus at the start…
Day 1 – Port Alberni – end of the Log Train Trail
I got to PA around 1pm on the first day of the trip. Talking about my route with my friend Rob he suggested I should ride the Log Train Trail out of PA rather than the route I had planned. It sounded like a nice ride, but I would have to abandon my well researched GPS route and navigate on the fly. It sounded like a good idea given that I had some spare time in my schedule in case things took longer than expected. Before I could even leave Rob’s place my front tires went flat while we were chatting. Turns out a pinch flat I patched on the last Krampus tour had failed. Possibly as a result of running normal 29er tubes in the big 3″ Knard tire. I ripped off the old patch and applied a new one. which held the rest of the trip.
Rob took the photo of me and my bike at the start of the Log Train Trail above. The LTT was a fun dirt rail bed ride with quite a few rough spots and twists/turns. I got lost several times and spent a lot of energy backtracking and asking locals for directions. I had to ford a fast flowing creek where the trail had washed out and rode the Krampus through a mud puddle that ended up being deeper than the hubs/BB. 😦 I guess it’s time for an oil change in the Alfine 11!
The shoes and socks I was wearing were not designed to dry fast so I had wet feet all day which did not make me happy! I need to figure out some quick dry bikepacking footwear or carry a second set of lightweight footwear [ie. Vibram FIve Fingers for camp use and river crossings]. Since the day was extremely hot ~30 deg C at least getting wet was pleasant for its cooling effect. The LTT also had a lot of tree cover and I appreciated the shade very much.
I spent a lot of time covering the LTT. Much more than if I would have followed my planned route, but the riding was amazing and I was happy to have heard about the LTT from Rob. A quiet rough dirt track with a modest grade and some shade is bikepacking paradise!

Log Train Trail Map – click for larger…

flat Knard!

Lovely countryside…

Nice shade…

Good landmark for navigation…

Time for wet feet…

Where did the trail go?

Quiet riding…
Day 1 – From LTT to Camp near Pear Lake
Leaving the LTT behind I hit logging roads heading north towards Comox Lake. This was part of my planned GPS route so navigation was easy and the riding was fun despite the heat and general uphill trend to the terrain. I stopped at every creek to throw water over my head and refill my bottles as needed. The logging roads did not provide any shade due to the lack of big trees in most places. That meant a lot of baking for me. Although my late start also meant that by the time I hit this section it was the late afternoon and the temperature was heading slowly in the cooler direction.
I’m not a fast rider and I stop frequently to take photos, eat and generally check stuff out. That works well in the heat because I am not pushing myself too hard and I can sustain a constant moderate exertion all day.
As I was riding along I spotted a tiny clearing next to a beautiful little lake. I rode in to investigate and found a lovely campsite with a stool made from a chunk of log and some firewood ready to light next to a fire ring. I had another 90mins of daylight and wanted to push on, but I also wasn’t confident I’d find an equally nice campsite further on and I was tempted by the almost ready to go fire so I could dry my wet shoes/socks. OTOH – if I kept going I’d be a lot closer to breakfast in Cumberland the following day!
After 15mins of deliberating I sat down and lit a fire. An hour later I had dry feet, dry socks and dry shoes! Yeah! 🙂 I had sandwiches and perishable snacks with me so rather than let them go bad I just ate everything I had that wouldn’t last in the heat. That let me skip my usual dehydrated camp meal. The campsite was really peaceful and I enjoyed a good long chill out session by the fire until it got dark.
Last tour I camped up high with my lightweight summer sleeping bag and suffered a lot. This trip I brought the same bag, but temperatures were high and my camp was much lower. What I didn’t realize was that there were about 1000 frogs in the lake I was camped next to and it was date night!!!!! I’ve never heard frogs that loud before – amazing. Happily I am a solid sleeper so I only woke up a few times, but every time I did it was a shock to hear them. Funny thing was when I woke up the last time and the sun was coming up the lake was silent again and I never did see a single frog!
I should mention the bear situation since Vancouver Island is home to a healthy population of black bears. I ran into a couple bears that were on the road during the first day of riding. I don’t carry any bear spray or bear bangers on the island. Black bears aren’t aggressive and they are well fed here. So I just holler at them with a Mr. T impression such as “I pity the fool bear that tries to mess with the Mighty Krampus!” It works every time and the bear scampers away into the woods never to be seen again. I keep my food away from my tent at night, but close enough I can hear an animal trying to steal it so I can get up and shoo them away. I’m actually more concerned with rodents as they’ll quietly chew through any bag to get at a snack and they are harder to notice than a 250lbs bear!
We also have cougars on the island. I don’t carry any anti-cougar safety gear either. A cougar you see isn’t interested in you and will run away every time. The first indication that a cougar wants to eat you is when its jaws are closing around your neck. You aren’t going to get bear spray out and do anything useful in that case. Since a cougar attack is rarer than a lightning strike I don’t worry about it.

Logging road…

Positive message…

Cool water!

Dusty and no shade…

Cell service 50kms from the nearest town…

Nice campsite…

Dry feet… 🙂

Chilling…

Home sweet home…

Breakfast…
Day 2 – Camp to Cumberland
The next morning was nice and cool so I wanted to make tracks for Cumberland before it got too hot. The road went downhill a long way to the lake which actually got too chilly so I stopped to drink some hot green tea I made at breakfast and was carrying in my framebag. That really hit the spot and I was soon greeted with lots of climbing as the road around the lake was very lumpy!
I should have looked at the elevation profile more carefully, but I was expecting a leisurely cruise around the lake to Cumberland. Instead I got lots of steep ups and downs. The kind you couldn’t use your momentum from the previous downhill to get up. So there was lots of sweating and some pushing involved. Since my pace was slow it got plenty hot well before I reached Cumberland. There wasn’t much I could do other than to keep going and think about the cold drinks I could buy when I reached town.
On the plus side the scenery was really nice and I had the road to myself like I usually do when riding BC logging roads.
I did finally reach Cumberland and without thinking I pulled into the first gas station for an ice cold Sprite and a bag of salty chips! I sat outside and devoured them as fast as I could before heading into the center of town.
Early morning downhill…

Comox Lake…

A message…

Getting warm…

Nearly done!

Mar’s on Main = breakfast! 🙂
Day 2 – Cumberland
Getting to Cumberland was great not just for the food and beverages, but it meant I now had ~400kms of dirt bikepacking route mapped out all the way down to Victoria. Almost half the island. Nice! 🙂
First thing I did was find the LBS which is Dodge City Cycles. I knew it was my kind of shop when I saw a Krampus in the window and a well used Moonlander leaning against the counter. Not to mention loads of sweet mountain bikes. Dan and Chris were very kind to me letting me leave my bike in the shop while I walked down to Mar’s on Main for a delicious breakfast.
After eating I bought a trail map from DCC and they let me drop my camping gear in a corner of the shop so I could do some unencumbered mountain biking. Thanks guys! I spent a couple hours exploring the trails closest to town and barely even scratched the surface of the riding potential in Cumberland. Their trail network blows my mind and they keep building more and more each week.
Eventually the heat and the knowledge I had more miles to cover today convinced me to head back to the shop. I chatted with the DCC guys a bunch and then I went over to the Waiverly Pub for some cold beer and shade while I figured out the route back to PA.
I could have gone back the way I had come, but I was really burnt out from the heat and the idea of repeating the hilly, hot and dusty road along Comox Lake did not appeal to me. Looking at Google Maps I decided heading to the coast for a spin down the old island highway made sense. It was flat-ish and would be 10 degrees cooler by the water. I waited until late afternoon to let the temperature subside a bit before heading out. In the meantime I caught up on stuff via my smartphone and watched some hockey recaps on TV.

Dodge City Cycles…

My Krampus taking a break at DCC…

Cumberland tech…

A fresh Krampus at DCC…

Fat skinny…

Cumberland Trail Map…
Heading out of town over the new highway…
Day 2 – Cumberland to Roswell Creek Provincial Park
Riding to the coast I passed over the new Island Highway which is a 4 lane highspeed beast that sees most of the traffic up and down the island. That leaves the old 2 lane Island Highway on the coast much quiter for a bike tourist to enjoy! As expected the coast was much cooler than inland plus the fact it was late afternoon meant long shadows to ride in away from the burning sun. I was happy! 🙂
This section of the ride reminded me of my road touring days – for the good and the bad. The riding was easy with the Knards rolling well on pavement and there were lots of services along the way to fill any desire for food or drink. With people around to interact with the ride was a lot more social. OTOH – even this relatively quiet road had 1000 times more traffic than the deserted logging roads I used to get to Cumberland. The shoulder was wide enough that my safety wasn’t in question – just the difference between peaceful solitude and the hustle/bustle of civilization.
Given how sun blasted I felt I was happy to trade some remoteness for cool air, shade and the odd Sprite! 😉
I turned off the road near Roswell Creek Provincial Park [which doesn’t allow camping] and found a secluded campsite nearby on some undeveloped land. It was a long hard hot day on the bike and I had eaten a sub an hour back. So I just set up camp. Drank a lot of water to fight off dehydration and went right to bed. There was no frog symphony that night to keep me up!

The old Island Higway…

Enjoying a rest stop…

Seals…

Shellfish shells…

Time to camp…
Day 3 – Camp to Wrong Turn
Waking up in camp near civilization didn’t make me hungry for instant oatmeal so I packed up super fast and hit the road. I almost rode past the last cafe I would see all day, but something told me I better stop so I circled back and went to town on a delicious brealkfast. Little did I know this meal would be all that kept me sane during mistakes that would occur later in the day.
After eating I rolled inland and got back on gravel roads. I made it to Spider Lake no problem and figured I was a short 28kms from PA. I’d be there for lunch baby!
No I wouldn’t! 😦
Then I hit a bunch of private roads around Horne Lake that were on my route. I just kept going and ignored the keep out signs. When I asked Google Maps for a good bike route to PA it suggested I ride over a 3000′ mountain on a gravel road. I thought it was a bold choice, but the route was short and seemed worth the climbing. I started to worry when I saw how rough and how steep the “road” was. I could barely get traction to push my bike uphill.
I should have known something was wrong…
To be continued!

Sandbar Cafe…

Breakfast…

Coastal beauty…

Heading inland…

Fighting a giant robot for my bike!.. 😉

Spider Lake…

Private – keep out! – not…

Really keep out!
Comments : 4 Comments »
Tags: krampus, Surly
Categories : 29er, Bike Touring, IGH, Mountain Biking
Gravel Pimp: The Missing Link…
10 05 2013
On a recon mission…
At the end of March I rode the dirt connector route I’ve been working on for a while between Lake Cowichan and Victoria. I’ve since ridden another leg of the Vancouver Island bikepacking route that I am working on. But I’ve told myself that I have to do at least a minimal trip report for the first trip before I do anything about the second trip report.

Route map – click for more details…
You can see all the trip photos here and if you want to get the backstory on how I found this route click here.

I like it! 🙂
It all started with a killer spring forecast for a great weekend on Vancouver Island in March. I couldn’t resist getting out on my bike.
Sharon rocking the purple Pugsley…
Lake Cowichan to Kinesol Trestle via the Trans-Canada Trail [TCT]
Sharon kindly drove me to the start of the ride in Lake Cowichan. That saved me the hassle of doing a car shuttle so it was much appreciated. She decided to ride the first 15kms of the TCT with me. We enjoyed the sunshine and easy riding on the TCT which is an old railway line. We stopped for lunch on a wooden bridge after about 15kms and Sharon turned back towards the car while I headed for the Kinesol Trestle.
She picked a good time to turn around because I ran into several sections of blowdown after I left her. One was particularly big and I got a chance to carry the Krampus and do some gymnastics. 15′ above the ground! Besides the fallen trees the riding continued to be fun and easy.
I spent half an hour checking out the Kinesol Trestle a huge wooden rail bridge that was recently rebuilt for hikers and bikers to enjoy. I wanted to make sure I ate and drank regularly to avoid low energy blahs as much as possible.
The Kinesol Trestle marked the end of an easy 35kms of riding on the TCT. Next up I turned onto the logging roads near Koksilah RiverProvincial Park.

Team Lazy…

Roadblock…

Typical TCT goodness…

Kinesol Trestle…

It’s a tough job, but somebody has to do it…
Koksilah Park to Camp Day 1 below Mt. Lazar
The riding took a definite turn for the remote and the climby. In fact the majority of this leg is the climb up the slopes of Mt. Lazar on logging roads. The sunny weather was nice much of the time, but when I was cranking uphill at 5kph I started to bake. Happily there were many creeks to refill water bottles from and pour cold water over my head.
Eventually I got up top onto the rolling terrain of the mountains. It was beautiful riding with no signs of human life other than the road I was on and the occasional clear cut. I started seeing snow and had to ride through sections of the white stuff, but they weren’t sustained. This section of the ride had been reconed with my motorcycle and I recalled it being easy and fairly short. I remembered badly! It took a long time to ride and involved a lot of climbing. At least it was cool as the sun started to set.
I expected to camp down low on the far side of the mountain, but the setting sun meant I had to call it a day right on top after 40kms. Which was fine except I was carrying my light summer sleeping bag. I cooked up a camp meal and a cup of hot tea before bed. I drank my fill of water so I wouldn’t start the next day dehydrated. I enjoyed a brief campfire for some relaxation time and vainly hoped I could store some heat for later in the evening.
I woke up way early freezing my ass off. I had put on my thermal undies, long socks, toque, neck warmer and puffy jacket before going to bed. They helped, but didn’t solve the problem totally. On the upside I got an early start on the day’s riding! 😉
I knew I’d have the roads to myself after this…

Long hot climb…

I look stupid, but I’m nice and cool for at least the next 5mins… 😉

Clear cut…

Early season mountain riding…

Home sweet home…

Yikes – cold night…

Riding with all my clothes on in the chilly AM… 😉
Day 2 – Riding to Boneyard Main
Riding down the mountain towards Boneyard Main was freezing and I kept my puffy jacket on most of the time. The Krampus loves to bomb downhill fast and the big wheels gave me tons of confidence that I could handle whatever came my way at speed – deep gravel, rocks or potholes?….no problemo!
This was the section of the route I had not actually scouted so I was not 100% that it went through. I had two route options 1) the high probability ride down the mountain to the start of the Boneyard Main logging road and 2) a shortcut along the hard to find Leech Main logging road. As I suspected the later option didn’t exist on the ground even though it was on all the maps!
I didn’t mind going the long way since I was stoked the route was going to work after so many recon missions.
When I finally reach the start of the Boneyard Main logging road after a nice 25kms of downhill riding I took a long break in the sunshine and hit my food bag hard!

Stopping to warm up…

This is logging country…

Prime Gravel Pimp terrain…
Lazy Krampus action…

Boneyard Main…
Boneyard Main to Leechtown
Although I had a lot of riding left to do I was really happy at this point because I had scouted the rest of the route on various previous occasions so I knew it was going to work. I just had to turn the pedals. The ride up Boneyard Main was a bit of a slog as it climbed the whole way. The road followed the Sooke River which I was tempted to ford several times to cut off some distance, but I not only had to get my bike across the river I also had to climb up the far bank to the Galloping Goose MUP. I decided it was best to just ride to Leechtown and cross where the river was uber tame.
I got my first Krampus flat on this section hitting a large rock at speed and getting a pinch flat. The huge Knard tires provide nice traction and floatation, but this is still a rigid bike so you can only slam into rocks so fast before you get pinched. I patched up the tube and ate a snack.
It was getting really hot again so good time find a reasonable ford for the Sooke River. Getting across was no big deal. I just carried the Krampus on my shoulder. I did get wet shoes/socks which I hate, but going barefoot and falling or cutting my feet didn’t seem like a better option.
Once across I was on the Galloping Goose MUP which is familiar territory. I rode down to the Sooke Potholes and hung out at the red shelter we’ve camped in a few times on previous rides after ~122kms of riding. I ate a big snack before pushing off for the roll towards Victoria.

More big logging toys…

Dang a flat! 😦

Scouting the Sooke River…

Leechtown baby! 🙂

Wet feet…
Hunting for the Galloping Goose…

The famous red shelter at the Sooke Potholes Park…
Sooke Potholes to Victoria
I’ve ridden this section so many times I kind of dread it even though it’s quite pleasant. Rather than repeat a description of this part of the ride here is a previous report you can read.

Got her done – yeah! 😉
I’m so happy to get a dirt touring route up island sorted out. This section from Lake Cowichan to Victoria is ~175kms long with less than 1km of paved roads. Best of all I wrapped up the trip on my birthday. Nice!
Next up the section from Cumberland to Port Alberni and on to Lake Cowichan. That will bring the route up to ~400kms of dirt bikepacking goodness. Here are some photos from the PA to Lake Cowican section that I just completed.
Keep ’em rolling! 😉
Comments : 12 Comments »
Tags: krampus, Surly
Categories : Bike Touring, Mountain Biking
Surly Nice Rack For Sale…
4 05 2013
If you like big front racks…
I’m selling a Surly Nice rack – front version in black. It’s been mounted to one bike, but never toured on and looks mint like it just came out of the package. New Nice racks are $135 – this one is for sale at $80 for local pickup. It comes with all the original mounting hardware and instructions.
![Nice rack mounted to my Thorn Sherpa [briefly]...](https://thelazyrando.files.wordpress.com/2013/05/snr.jpg?w=510&h=638)
Nice rack mounted to my Thorn Sherpa [briefly]…
Comments : Leave a Comment »
Categories : Bike Touring
Chilcotin High Country…
12 04 2013
Photo: Pat Mulrooney
Here is one more instalment of Chilcotin mountain bike porn to keep you dreaming through the weekend. 😉
- Castles and Fortresses [Part 1]
- Chilcotin Death March [Part 2]
All these bikes are 650B Norcos for those that care.

Photo: Pat Mulrooney…
Comments : 3 Comments »
Tags: chilcotin
Categories : Bike Touring, Mountain Biking
Vancouver Island Spine Trail Project
10 04 2013
VI Spine Trail Map…
A kindly forum member over at Bikepacking.net pointed me towards a project on Vancouver Island to develop an end to end trail network. The project is called The VI Spine Trail. So far it’s mostly an idea with only work on the small middle yellow segment underway. The completion date is noted as 2016 on the website. That seems unlikely, but even if it gets done in 2020 it will still be rad.
Working on my own bikepacking route that doesn’t have the ambitions of actually building any new trails across the island’s rugged landscape and doesn’t worry too much about stuff like riding down closed roads or other legal technicalities I can appreciate the huge task ahead of the VI Spine Trail project.
They are having an AGM on 1 May in Victoria, BC. I plan to attend with some amigos and see what I can do to help. I’ve also emailed the president of the group to offer my help.
Although I am stoked about the mostly logging road bikepacking route I am working on – I can’t deny that a route with long stretches of real singletrack through the backcountry would be super awesome! 😉
Here is an explanation of the map above that I grabbed from the VI Spine site:
“Our goal of having a complete set of trails that extend from the northern to the southern tip of Vancouver Island is one step closer with the (almost completed) Tuck Lake Trail project. For fun, we have created a Google Earth map which plots both existing and “dream” trails. NOTICE: this is just a sketch and the final Trail route will likely look very different!
Orange – existing trails
- To date, existing trails consist of the North Coast Trail; some trails near Port Hardy; Nisnak Lake Trail; Circlet Lake Trail; the Strathcona Park trek; Cumberland Mountain Biking Trails; the Beauforts; the Alberni Valley Log Train Trail; the Alberni Runner’s Trail; the Alberni Canal Trail; the Cowichan Valley Trail; and the Galloping Goose Trail.
Yellow – trails “in progress”
- The Tuck Lake Trail project was started in early August. Click here to read more about it, or here for some photographs from the September 29/30 trail building.
Purple – proposed trails
- Currently there are four proposed trails for Vancouver Island, with two located Mid-Island near Strathcona Dam and in the Cumberland-Beauforts area. The other two are located on the southern half of the Island, notably one between the Malahat and the Galloping Goose, as well as one running from Johnson Street Bridge along Victoria’s Inner Harbour to Mile Zero on Dallas Road. Both of these proposed trails would become part of the Trans Canada Trail.
Blue – “dream” trails
- As it stands, we have several “dream” trails – those which we hope will connect to existing trails in the future.”
Comments : 4 Comments »
Categories : Bike Touring
Ride the Divide…
9 04 2013
It’s on Canadian Netflix now… 🙂
Comments : 1 Comment »
Categories : Bike Touring, Mountain Biking
Tadhg’s Salsa Mukluk Bikepacking setup…
9 04 2013
Fat bike action…
Hardcore fat bikers come in all shapes, sizes and ages. My buddy Doug’s 9yr old son Tadhg rides a sweet XS Salsa Mukluk on his bikepacking adventures.

On the move…
He’s got a nice set of Porcelain Rocket bike bags to haul his stuff and a great bike to roll on. Doug and Tadhg have already been out winter bike camping this year.
Ready for adventure…
Doug and I have been working on some summer bikepacking plans so I’ll get to see Tadhg and his Muk in action up close and personal. It should be rad! 🙂
Comments : 5 Comments »
Tags: Salsa
Categories : Bike Touring, Fat Tire Biking
Chilcotin Country…
8 04 2013Looking forward to checking out some Chilcotin riding myself this summer… 🙂
Comments : 8 Comments »
Tags: chilcotin
Categories : Bike Touring, Mountain Biking
Blessed Silence!
5 04 2013
What noise?
As I was pounding along last weekend I suddenly realized something was missing from my usual ride experience – noise! My MTB has a Hope hub that sounds like angry bees making love when I coast. It used to make a lot of noise from chainslap as well, but I cured that with a clutch derailleur – although I still get various shifting noises when changing up gears on the Nomad.
My 29er bikepacking bike has an Alfine 11 IGH in it and horizontal dropouts. That means the chain is tight all the time and can’t really move around or make any noise. The A11 coasts and pedals silently. Even the shifts are accompanied by only a very soft click.
I’m so used to my bikes making a lot of noise that it’s a bit of a surprise to experience the peacefulness of a silent drivetrain.
That silence leaves more room for me to hear what’s going on around me and let’s me get lost deeper in my own thoughts.
There are times when making noise to give bears notice I’m coming through is a smart move. However, I’d rather attach a $4 bear bell to my bike when needed. It makes noise anytime I am moving – rather than just when I am coasting and I can take it off when I don’t want to make a racket.
There are loads of good reasons to use an IGH and specifically an Alfine 11, but at the moment silence is what I am appreciating the most.
Comments : 16 Comments »
Tags: Alfine
Categories : 29er, Bike Touring, IGH
DIY stem mounted water bottle…
4 04 2013
Water bottle on stem…
Last year I tried water bottle cages mounted to my bike’s fork for added hydration capacity while bikepacking. It worked, but I didn’t love it. They were always in the way when I would lean my bike up against something, they got splattered with mud/horse shit off the road/trail and I couldn’t access them while riding. So I thought I would try a stem mounted bottle and see what I thought.

Cage hose clamped to stem…
I just grabbed a plain old aluminum bottle cage and attached it to the stem with a hose clamp. I used some electrical tape and a bit of old inner tube to avoid damaging the stem. The whole install took 5 mins.

The hose clamp is key…
I like DIY projects that I can source all the parts from my garage in a few minutes. This one was particularly easy.

Bottle in action…
So the important question is how did it work?
- it was 100% secure….no movement or issues even with a lot of high speed dirt road pounding
- having a bottle so close at hand was awesome….I drank on the move a lot
- I’ll definitely use this setup again

Easy on – easy off…
Since I’m not bikepacking every weekend I like the fact this cage is very easy to remove when not needed. I pulled it off and threw everything into a ziplock bag for next time.
For the most recent trip I carried another water bottle in my framebag and a 2L water bag in my backpack that I left empty until I figured I needed a bunch of extra water [say before making camp]. That worked well.
I can always add water bottles to my fork legs if needed on a particularly dry trip as well as carrying more water in my backpack. Coastal BC riding isn’t particularly dry.
Comments : 13 Comments »
Categories : Bike Touring, How To
Gravel Pimp – Got her done!
2 04 2013
Getting up while the moon was still bright in the sky…
I spent a lot of time last year doing recon on a dirt route from Lake Cowichan to Victoria. With the Galloping Goose MUP mostly dirt from Sooke Potholes Park to Victoria it seemed straightforward to just find a route from Lake Cowichan to the potholes. As it turned out that wasn’t so easy after all.

First try along the cyan line above…
At first it looked simple to run down the Trans Canada Trail [TCT] and along the east side of Sooke Lake down to Leehtown and then hop on the Goose MUP to Sooke Potholes Park and onwards to Victoria. The trouble was Victoria takes its water-supply very very seriously and has blocked off any access through the area we wanted to ride with gates, fences and guards. Click on the map above to read what happened.

E&N Railway route…
We tried riding the E&N Railway corridor from Shawnigan Lake To Victoria which is quite a bit to the east of our previous route. It worked, but riding on the tracks was pretty brutal so I couldn’t really recommend it as a bikepacking route. Not to mention it was almost too easy with no real grades and such a straight shot to Victoria. The Gov’t keeps threatening to reactivate the rail service along this line, but so far it hasn’t happened. It you don’t mind getting bounced around a lot and want to check it out it’s a viable option.

What roads?
Not to be deterred we returned to Sooke Lake area and tried to go to the west of the Sooke Lake drainage. Both my print maps and electronic maps showed logging roads leaving the Leechtown area and heading west then north to join up with roads around the Koosilah Provincial Park. Sadly these roads were fictional. They exist only as a cartographer’s dream! 😦

Another dead end…
About this time I realized that riding a bicycle out to Leechtown and back for every route recon was taking up too much time and frankly riding the Goose MUP so many times was getting boring. So I broke out the KLR dualsport motorcycle. I plotted another route uphill out of Leechtown that looked promising on the map [pink line above], but I only got as far as the burgundy line on the lower right before I hit a water-supply gate and the rest of the mapped roads stopped existing.
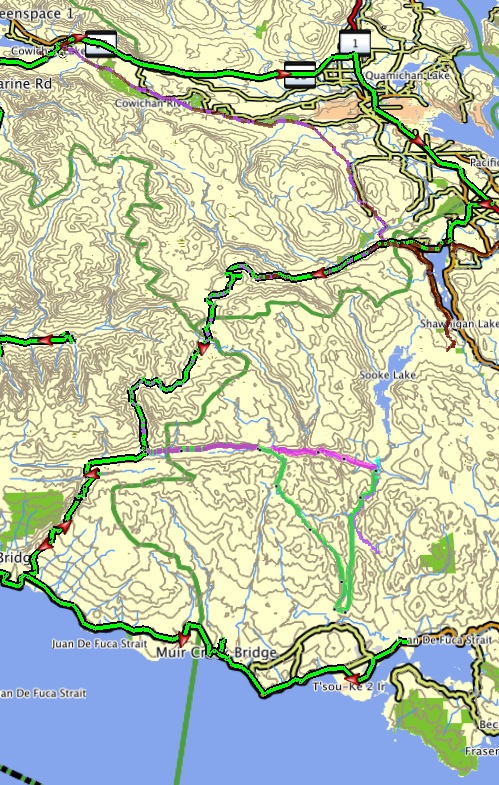
More moto recon…
Next time out I burned a whole day on the motorcycle going in and out of various logging roads as I kept running into more locked gates or dead ends. I managed a loop from Victoria out to Port Renfrew then up to Lake Cowichan before heading back home. The good news is it was a fun day on the moto and I learned a lot about the local logging road network. The bad news is I still didn’t have a route that went all the way through, but I had narrowed down the options enough I thought it was time to take another chance with the bicycle.

Getting down to the last few options…
With a lot of recon done I figured one of the two connectors shown above in pink and green would work. Obviously I’d rather ride the shorter pink route. Especially because the green route features a ton of altitude loss as you head south and a bunch of fresh climbing as you head back north on top of triple the mileage. Locked logging gates stop me on my motorcycle so it was time to start pedalling again to finish the route off.

Finally it got done…click image for GPS info…
This past weekend I headed out from Lake Cowichan and rode my bicycle down the TCT to the Kinesol Trestle and past the Koosilah Provincial Park. I headed up into the mountains on the Kapur Main logging Rd and connected with the West Jordan Main logging road. That took me to the [supposed] junction of the Butler Main logging road and the Leech Main logging road, but once again the Leech Main [the pink short cut in the map 2 above] doesn’t actually exist on the ground. So I rode south on Butler Main dropping altitude fast and connected with Graveyard Main to head north again to Leechtown. I knew I would make it at this point, but the landscape had changed at Leechtown since my last visit with logging equipment gone, vegetation grown and creeks running hard with snowmelt. I had to poke around a bit until I found the bushwhack across the Sooke River to the Goose MUP. Once I rolled up to the familiar red shelter I’ve slept in a bunch of times I was really happy to finally put that mission down as a success in the books.

Sooke River…
The GPS says it’s 175kms from Lake Cowichan to Victoria along my route. Those numbers don’t sound impressive, but when I look back at all the time I spent pouring over maps, riding my motorcycle and pedalling my bike it was quite a job to figure this route out. I had decent maps and a bunch of dirt roads available for me to use. I didn’t have to do one lick of trail building or mapping to find this route. So I am even more impressed with all the trails I’ve ridden in the past and the effort the folks have put into finding them or building them. Thanks!

Phase 2…
Now that Phase 1 of the Vancouver Island Bikepacking Route is done I’ve got plans for Phase 2. The next part of the adventure is to map a route from Cumberland/Comox down to Lake Cowichan. The green segment on the map above goes from Port Alberni to Lake Cowichan and I’ve been down all those roads in my truck so I know they are a sure thing. The cyan segment at the top of the map goes from Cumberland to Port Alberni. It looks pretty straightforward, but I’ve said that before! I’ll do an initial run with my motorcycle this spring to confirm the route from Cumberland to PA works and is a decent one to ride. Then I’ll come back with my bicycle to enjoy it by pedal power. 😉
My goal for 2013 is to get that far.

Phase 3…
You can see from the map above that Phases 1 & 2 get me a little better than halfway up Vancouver Island. I’d like to go all the way to the top on dirt, but my knowledge of the north island is limited and it will take 3-4hrs just to get to the bottom of that area on my motorcycle so there will be some serious time involved in that part of the recon. I’d like to get at least one moto recon session in the books for 2013 so I have a lay of the land in my head to help me situated data I glean from maps.

Keep on rolling…
I’ll get a trip report for the latest ride posted later this week or next – here are the photos for now. I’m excited for another great year on the bike with lots of new roads and trails explored.
Keep those wheels rolling Gravel Pimps of the world! 😉
Comments : 15 Comments »
Categories : 29er, Bike Touring
Chilcotin BC Bikepacking Videos…
15 03 2013The map shown in yesterday’s post is for the Spruce Lake area of the Chilcotins in BC. These videos do a great job of showing the bikepacking potential there. Thanks to Doug aka Cold Bike for sending me the links!
I haven’t spent time in the Chilcotin area since my days in the army. It will be nice to go back with a bike and nobody shooting at me! 😉
Thanks to 2xNomad for taking the time to film, edit and post these videos. Getting to see a lot of the area from the comfort of a warm house is ideal for stoke building in the winter!
The plan will be to travel light so as to enjoy the mountain biking as much as possible.
Bike Geek Alert – these guys are riding FS bikes and using Old Man Mountain rear racks and panniers.
Comments : 3 Comments »
Categories : Bike Touring, Mountain Biking
Route Planning…
14 03 2013
Now is the time to plan…
With spring and summer heading our way March is a great time to spend a few hours indoors planning trips. Electronic maps and GPS receivers are amazingly useful tools, but I like to have paper maps to start my trip planning process. They are a nice way to avoid even more computer time. You can use them with a friend to share the planning experience and on a trip if your GPS dies it’s ideal to have a battery-free back up for navigation.
Paper maps require some old school skills like reading elevation profiles and they don’t tell you route distances automatically, but you can get by with some string! Eventually I’ll program the route into my electronics mapping software and download a route to my GPS.
On the bike following the GPS is easier than pulling out a map frequently. On the other hand when the planned route turns out to be impossible a paper map is convenient to work out a detour rather than trying to assess the situation on a small GPS screen.
If you made me choose between GPS or paper maps I’d take the paper maps every time, but I’m glad I don’t have to leave either one at home.
Comments : 1 Comment »
Tags: chilcotin
Categories : Bike Touring
Scott in AK…
12 03 2013
Photo: Scott Morris…
Scott Morris posted a two part report on his recent Alaska fatbike tour on his blog. It’s well worth a read. Click on the top image for Part 1 and the bottom image for Part 2.

Photo: Scott Morris…
Comments : Leave a Comment »
Categories : Bike Touring, Fat Tire Biking
Ortlieb Repair…
6 03 2013
Buckle tear…
I had my first real Ortlieb failure. The buckles that close the roll top on my rear Ortlieb panniers both started to tear. I noticed it at home so it didn’t cause a problem.

Fresh buckle…
I emailed Wayne at The Touring Store where I buy all my Ortlieb panniers and he mailed me some replacement parts for free. Thanks Wayne! 🙂

It’s an easy fix with 2 bolts holing the buckle…
Swapping in new buckles took a few minutes with a multi-tool. I checked the edges of the plastic frame to make sure they weren’t sharp. These are from the set of Ortliebs I lend to folks I tour with so it’s possible one of my friends got overly enthusiastic about tightening the buckles.

Ready to roll…
My Orlieb products have been virtually trouble free which is great, but it’s also nice to know that when stuff does go wrong I have a solid dealer to support me and that the product is designed to be easy to repair in the field.
Comments : 7 Comments »
Tags: Ortlieb
Categories : Bike & Gear Reviews, Bike Touring
Kite Bike…
29 12 2012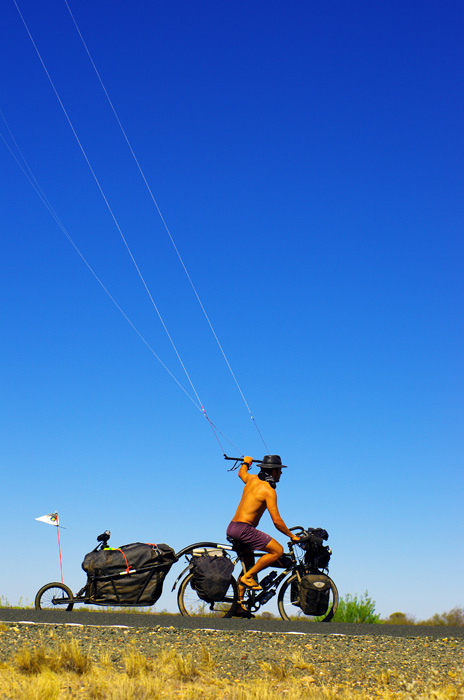
Not sure who this photo belongs to???
Someone sent this to me. I don’t know how practical it is to power your touring rig with a kite, but it makes for a great photo! 😉
Update – Gerco sent me this video link which explains what’s going on a bit – starting at 5:44. 😉 Thanks!
Comments : 2 Comments »
Categories : Bike Touring


Recent Comments