Some behind the scenes footage at Old Man Mountain [aka OMM] racks. Made in the USA by some nice guys that love bike touring. 🙂
OMM Racks – Born in the USA..
21 05 2013Comments : 1 Comment »
Tags: OMM
Categories : Bike Touring, Uncategorized
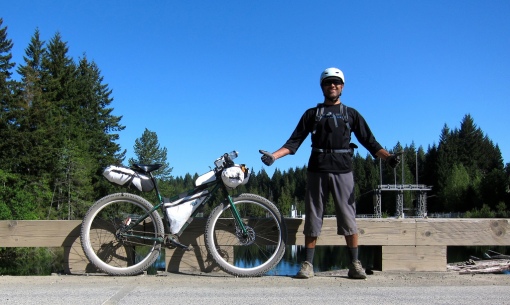
Got OMM?
18 11 2012
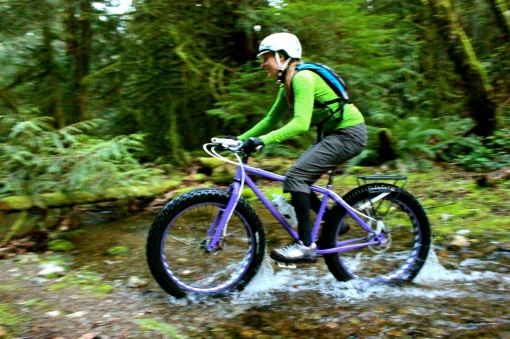
Old Man Mountain Sherpa [old skool version] on Sharon’s Pugsley…

The OMM racks looks at home on a fatty…
In Mexico our Pugsleys are mostly beasts of burden. They have to carry ice and beer back to camp as well as let us roll down the beach in search of adventure when it’s not windy enough to kiteboard.

Ready to haul…
We’ll do some desert mountain biking as well. The OMM racks are so light that when you don’t have panniers on them you can pretty much forget you have them installed.

That’s one good looking fatbike… 😉
Comments : 1 Comment »
Tags: old man mountain, OMM, Pugsley, Surly
Categories : Fat Tire Biking, IGH
Sharon’s first 2012 Commuter Flat…
22 10 2012
Sharon taking off her front wheel to fix a flat…
Sharon got her first flat of 2012 and first flat in well over 12 months. Not bad at all. She’s running Grand Bois Cypres 700 x 30mm tires. These are fast, supple and comfortable tires with no flat protection. The benefit is she gets the maximum benefit from her pedaling effort and a comfortable ride. So far the Grand Bois are getting less flats than her previous tires that had some designed in puncture protection.
Trouble with getting so few flats is Sharon doesn’t get much practice fixing them. So she tackled the repair in my office so I could provide some advice. She only used tools she carries with her on her bike to ensure field repairs would be possible.

Sharon fixing her own bike…
Sharon located the hole in her tube and used that information to narrow down the search for the culprit in her tire. We found some glass that had cut her tire. It didn’t quite go through the casing. We discussed the pros and cons of using this tire vs. replacing it. She had a spare Grand Bois sitting around just for such a circumstance. She decided that since it was a front tire she wouldn’t take any chances and she’d replace it. She kept the old tire and will use it as a rear tire if needed at some point with a patch on the inside. Likely this tire won’t ever see action again as we’ll buy a spare from the Fairfield Bicycle Shop.

Small cut across tread…
It sucks to lose an expensive tire that’s nearly new, but given how little maintenance Sharon’s Surly Cross Check takes to keep working well as her commuter rig this is no big deal.
Comments : 20 Comments »
Tags: cross check, Grand Bois, Surly
Categories : Bike Commuting, How To
Sharon’s Bike Commuter Update
25 04 2012
Sharon and her Surly Cross Check commuter bicycle...
Sharon’s bike commuting skills have been steadily improving since we moved to Victoria. At first she rode a few days a week. Then she rode every warm dry day. Then she started riding when it was dry and cold. Finally she’s now riding even with some rain in the forecast – which means far more days on the bike.
I’ve been careful not to push her or to say much about her bike commuting other than to give her a high five after she comes home on a particularly gnarly day and help with some bike maintenance.

Ortlieb Downtown - click for info...
Part of the process of riding in more demanding weather conditions and more often in general has been the addition of some new biking gear to Sharon’s quiver. Although I have helped narrow down the options and discussed the pros/cons of each choice she’s been the one to pick what she wants. She’s made some very smart choices such as:
- decided to test out a Donkey Boxx pannier
- bought a Showers Pass Portland Jacket
- asked for an Ortlieb Downtown pannier/briefcase for a X’mas present
- bought a Gore Bike Wear rain jacket
- bought some MEC cycling tights
I took the photo at the top of this post yesterday. As you can see Sharon is still rocking her Shower Pass Portland jacket. It’s ideal for days when there is some chance of rain, but it’s not likely to pour. She likes it because it fits well, is comfortable for a wide range of weather conditions at a moderate exertion level. She appreciates that it doesn’t make her look like a traffic cone when she’s riding or has to walk to her office. If the forecast is more on the rainy side she just bought a Gore Bike Wear shell which she uses instead as it’s more appropriate for those conditions.
The Ortlieb Downtown Bag attaches to her bike like a normal pannier, but when you pull it off the pannier frame stays on the bike and you just have a reasonably stylish bag to take with you to your meeting. It’s waterproof which is essential around here and holds enough to be useful for a bike commuter without looking like you are going on an expedition.

Thumbs up for Donkey Boxx...
We are coming up on a year with Sharon using a Donkey Boxx on her bike. It stays on there 24/7 and is her main pannier. She then adds a second soft pannier on the left side of the bike for additional capacity. The Donkey Boxx has survived a serious bike wrecking crash with minimal abrasion marks as well as being generally banged around and bumped over our rough roads. Not only is the Donkey Boxx trucking along just fine, but Sharon really digs it. I took it off her bike after the crash to get repairs done and as soon as it was ready to ride again she wanted the Donkey Boxx reinstalled immediately.
Overall the Surly Cross Check itself has been working great since we repaired it from Sharon’s crash last summer. It’s comfortable, speedy and with fenders and bags can carry Sharon to work with her stuff in most weather conditions. The Nexus 8 IGH means that the only maintenance has been adding some air to the tires and lubing the chain. I think it’s about time that I put the CC in my workstand and give it a once over just to make sure the fenders are tight and nothing needs fixing before the summer. I know she wants new bar tape as she is over the pink and it’s getting pretty grubby looking.
One hassle with this bike is playing the battery game with Sharon’s headlight. For her birthday this year I’ll install a dynohub and B&M light. If I am feeling very motivated I may wire in a tail light as well. That way she should have lights 24/7 without thinking about it which will be nice.
One pedal stroke at a time!
Comments : 13 Comments »
Tags: cross check, donkey boxx, Ortlieb, showerpass, Surly
Categories : Bike & Gear Reviews, Bike Commuting
Commuter Style
24 01 2012
Leaving for work on a dark chilly winter morning...
Sharon tries hard not to look like a traffic cone when riding her bike while still being visible to other cyclists and drivers. She’s found a bunch of clothing that’s practical for cycling without being garish. That’s important because if you want more people to ride bikes you need to make them excited about the idea and for a lot of people the traffic cone chic is not an acceptable way to look when arriving at work or a social event. Luckily there are lots of cycling specific clothing and cycling adaptable clothing options these days that you can find to match your personal tastes while staying comfortable.
For visibility Sharon has two powerful rear lights, a powerful [considerately focused] headlight and some reflective trim on her clothing and bike bags.
Not only is it cool that Sharon has found a bike and gear that she is into and reflects her own tastes I think there are a bunch of other potential commuter cyclists who need to see someone dressed stylishly yet sensibly so they can get motivated to start riding to work themselves. Hopefully Sharon is setting a positive example for them as she rolls to work on her Cross Check.

Aaron taking a break after tagging a fence...=-)
Just so the guys don’t feel left out Aaron and I took some male cycling style photos. Aaron always turns up for our rides dressed super nice so I figured I should tap into his fashion wisdom. I’ll be putting up a whole post with his bike clothing tips shortly, but the image above is a taste of what’s to come.

Here I am all coned up!
To avoid a bunch of comments telling me there is nothing wrong with the traffic cone look let me say I agree there is nothing wrong with it. There is also nothing wrong with the bike commuter who dresses up in a Tour de France replica kit and rockets to work on a carbon fibre race bike. However, those two schools of cycling fashion are well represented on the streets around here and are what the general public think about when it comes to riding a bike around town. Since a lot of potential commuter cyclists wouldn’t feel comfortable wearing a traffic cone or skin tight spandex I think it’s important to show them there are other clothing options that are comfortable on the bike, will keep you warm and dry in inclement weather and would be acceptable to a wide range of fashion palates.
Seeing more people on bikes makes me happy and to make that happen we have to give people options they are stoked about.
Comments : 9 Comments »
Tags: cross check, Ortlieb, Surly
Categories : Bike Commuting, Bike Culture
Sharon’s a Commutinator!
30 12 2011
Nearly home...
2011 was Sharon’s first full year as a bike commuter. She started cycling in the rain and dealt with a fairly serious accident caused by another cyclist. Through all the challenges she kept smiling [mostly] and has remained a dedicated transportation cyclist. Awesome work! Keep the blue Surly a rocking in 2012…=-)
Comments : 4 Comments »
Tags: cross check, Surly
Categories : Bike Commuting
Upgraded OMM Sherpa Rack…
26 07 2011
Old Sherpa on left and new OMM Sherpa on right...
I love Old Man Mountain [OMM] racks and have them on almost all my bikes that use racks:
- Surly Big Dummy [OMM Cold Springs front rack]
- Surly Pugsley [OMM Cold Springs racks x 2]
- Surly 700c LHT [OMM Cold Springs front rack and OMM Red Rock rear rack]
- Surly 26″ LHT [new OMM Sherpa rear rack and old OMM Sherpa front rack]
I’ve tried the other contenders in the rack department [Tubus Cargo, Surly Nice rack, etc…] and prefer to use OMM products. I’m coming up on 10yrs of Old Man Mountain rack use with no failures, no hassles and all smiles…=-)

New rack on bottom...
One thing I like about OMM is that they don’t churn out new improved products every year that aren’t any better than last year’s version just to get people to buy the latest greatest gizmo. My very first set of OMM Cold Springs racks looks pretty much the same as what you can buy today 10yrs later. To me that’s a solid design that performs and doesn’t need hype to sell. So I was interested when I heard that OMM had come up with some changes to their Sherpa rack design after all these years.
You can see a comparison between old and new Sherpa racks in these photos:
- the main rack tubes have been increased from 10mm to 12mm
- the top rails remain at 10mm for pannier compatibility, but on the new rack the top rail is one unit and is welded on to the larger lower 12mm portion of the rack
- the new rack platform is 2cm longer than the old one
- picking them up I can’t detect any weight difference by hand although I assume the new one is a few grams heavier

New rack is on bottom...
The new rack retains the same high quality made in the USA construction OMM is famous for and uses the same modular mounting hardware that can be customized to fit any bike. I really like that my 10yr old OMM rack will fit just about any touring bike I care to throw it on – disc brakes?…no problem….lack of rack braze ons?…no problem, bizarre full suspension frame?….no problem, etc…

Another view of new on left and old on right...
To be honest I never felt that the old Sherpa rack was in need of being more beefy or stiff. I tend to carry moderate loads so perhaps I am not at the far end of the rack abuse spectrum, but I do ride rough dirt roads/tracks with my loaded bikes and that takes it’s toll on gear. I’ll be using the new OMM SHerpa rear rack on my 26″ LHT build so I’ll be reviewing it as I ride that bike, but OMM products kinda suck for blogging purposes because they just work and provide no drama to report on – that get’s boring!
Comments : 14 Comments »
Tags: old man mountain, OMM
Categories : Bike & Gear Reviews, Bike Touring
Brynne’s Rando/Commuter…
8 06 2011
Freshly installed Velo Orange metal fenders...
Mike C swung by with his lovely wife Brynne’s rando/commuter rig for some fender love. We installed a set of Velo Orange smooth metal fenders on her Soma Double Cross.

Beautifully smoooooth....=-)
Like my previous VO fender installs they went on pretty easily. We had to scrounge some scrap metal and DIY a rear bracket to get the rear fender low enough on the wheel for a nice fender line. The front fender went on pretty well, but next time I have a moment I’ll DIY up a bracket to lower it down a just a tad.

Next up some mudflaps!
I’d also like to fabricate some mudflaps and get them installed when I get a chance. Mike was mentioning that this bike will be seeing some other upgrades like: a new dynolight, new stem and new bars. This a pretty sweet ride and with a bit of new bling will be even nicer…=-)
Comments : 3 Comments »
Tags: BC Randonneurs
Categories : Bike Commuting, Randoneering
Sharon – Bike Commuting…
30 05 2011
Sharon and Donkey off in the morning!
Sharon has become a hardcore bike commuter. I’m impressed at her determination and zeal for the pedal to work. She’s progressed from a non-cyclist to riding her bike 4-7 times a week while her car collects dust in the driveway. She’s not just a fairweather cyclist either. Freezing temperatures and light rain don’t deter her. About the only thing that will keep her off the bike is heavy persistant rain or snowy/icy roads which is pretty lousy for biking to work. Happily that’s not very common here in Victoria – only a handful of winter days are truly horrible!
I will give myself a bit of credit for Sharon’s biking enthusiasm in that I helped make sure she always had a comfortable, reliable bike to ride that was setup for carrying gear and all weather day/night riding. When your gear is dialed it makes everything easier and more fun.
I will also give the City of Victoria some credit for the excellent bicycle infrastructure that makes Sharon’s commute safer and more pleasant. For about half the year we’ve been here she had to ride across town to the Royal Jubilee Hospital using various surface roads – many with bike lanes. Now that she works at the Victoria General Hospital she rides the Galloping Goose Trail [a paved MUP] almost all the way to work which is about as pleasant as it gets living in a city.
Finally I’ll give the Vancouver Island Health Authority [VIHA] for providing lots of secure covered bike storage for the hospital staff.
You know someone is riding a lot when you buy tires for their bike 4 at a time! Go Sharon…=-)
Comments : 8 Comments »
Tags: cross check, donkey boxx, Surly
Categories : Bike Commuting
DeLorme GPS with Spot Communicator
19 12 2010
DeLorme PN-60W Earthmate with Spot
Update: this unit is $100 – $150 [varies with model] until 31 Dec 2010. I’m very tempted, but must restrain myself!
I’ve used my buddy Kurt’s SPOT satellite locator beacon a few times. It’s a handy way to keep folks aprised of where you are and even summon help when in remote spots. I’ve been thinking about getting one myself, but it hasn’t worked its way to the top of my priority list yet…especially when I can borrow Kurt’s! Well this new version is paired with a DeLorme GPS so you can transmit not only your position, but a one way text msg back to civilization.

Specifications...
That’s awesome! If I’m kiteboarding at a remote lake and want to let other people know conditions are great I’d be able to do that so they can drive out. If I’m on a bike tour in a remote spot and need to set something up for my return, like ordering a spare part or arranging to meet someone for a pick up, I can now do that in the middle of nowhere. Sweet!

Features...
I won’t be buying one when they first come out because I have a GPS I like and I don’t really want to spend $550USD to get the SPOT functionality. I’m hoping they’ll make a SPOT that I can hook up to my iPhone or something like that to type a msg. I’m not sure that will happen, but if it did I’d be ordering one tomorrow! For now I’ll see how people like this product when it gets released this summer. It may not be a sure fire acquisition, but getting a SPOT has moved up my priority list a bunch!
If anyone out there buys one let me know how you like it.
Comments : 5 Comments »
Tags: DeLorme, GPS, SPOT
Categories : Bike & Gear Reviews, Safety
Pugsley OMM Racks Mounting Upgrades
15 06 2009
Note silver washers used to space out racks mounts.
When I mounted my OMM racks last December I had to use some washers at most of the lower mounting locations to get the clearance and fit I needed. You can see the washers I used on the rear left mount in the photo above. Rack mounting bolts are meant to work in shear where they are strongest. As soon as you add a spacer in between the rack and the braze-on the mounting bolts experience a bending moment and are weaker. The minimal amount of spacers I had to use didn’t pose a problem for carrying moderate loads on smooth ground or light loads off road. However, with the upcoming GDR tour I was concerned that carrying moderate loads off road would break something. Having a rack fail miles from the nearest services would have been a real bummer.
Luckily my friend Kurt is more mechanically gifted than me and enjoys futzing with tools. Last night we ordered some pizza, got a case of beer and he set about modifying my OMM racks so that they would fit on my Pugsley without the need for spacers.

After Kurt's handy work the same rear OMM rack mount without any spacers.
On the rear Kurt had to bend the upper mounting arms to allow the lower portions of the OMM rack to move inwards enough to eliminate the need for any spacers. He even did it so the bends looks professional – unlike the mangled hack job that would have been the result of my DIY efforts!

Front OMM lower mount filed down for clearance with Pug fork.
On the front the lower rack mounts interfered with the Pugsley fork legs. Kurt filed away the rear of each mount to get the required clearance. Once that was done the OMM racks could be mounted without any spacers on the front.

Front lower OMM rack mount without spacers after it was filed down.
It doesn’t seem like a lot of work, but it took about two hrs from start to finish with lots of trial fittings before Kurt did any modifications – he is a stickler for measure 3 times cut once. The result looks great and should be stronger than before. Kurt has also suggested we buy hardened bolts to replace the standard rack bolts to make the racks on our Puglseys totally bombproof.
Bumping down the GDR with my loaded Pug I’ll be enjoying the trail without worry about my racks.
It pays to have handy friends!…=-)
Comments : 9 Comments »
Tags: old man mountain, OMM, Pugsley, Surly
Categories : Bike Touring, Fat Tire Biking
I’m a bike commuter…
25 05 2009
My Bike Friday NWT daily commuter!
How can a guy who works at home be a bike commuter? Easy you just need a girlfriend who has much nicer place to live than you do so you stay there overnight a lot and have to bike back to your home office in the AM. It may be a self-imposed commute, but it’s a commute nevertheless! It’s only a 2km ride, but I forgot how much I enjoyed getting on my bike every morning for a ride before starting work. Fresh air, bright sunshine and crazy motorists – smells like victory!…=-)

Kona Wah Wah BMX pedals
I needed some BMX platform pedals for my Surly Big Dummy and my LBS Bow Cycle was sold out of the NRG Slabalanche BMX pedals I have on a few other bikes so I had to settle for some bright white Kona Wah Wah pedals. Not afraid to bling out my Bike Friday NWT I took the black NRG pedals from the NWT and swapped in the white Konas. A bit ridiculous? – sure, but if you can’t have fun with your bikes what can you have fun with? Just like you’d expect the Kona’s are comfy, versatile and grippy. I tend to commute in a pair of 5.10 Impact low bike shoes so staying firmly attached to the bike is not an issue.

Ortieb panniers on my Bike Friday rear rack.
I haven’t toured with the NWT yet, but carrying enough wine, beer and ice for a sunny afternoon in the backyard is a decent test of the rear rack and panniers. The NWT is rock solid with a heavy rear load. I love how fast I can adjust these Ortlieb panniers to go from one rack to the next. Although my feet are fairly large 11.5-12US I don’t have any heel strike issues with this rack & pannier combo. I even have an additional inch of adjustment if I wanted to move my panniers further back, but I prefer to keep the load as far forward on the bike as I can without hitting my feet on the panniers.

The Bike Friday rear rack provides lots of ground clearance.
Without any bags on the rear rack the Bike Friday rack looks like it sits excessively high, but once you have full size rear panniers on it you can see the extra height is needed to get a reasonable amount of ground clearance with the smaller 20″ wheels.
Comments : Leave a Comment »
Tags: Bike Friday, Kona, new world tourist, NWT, Ortlieb
Categories : Bike Commuting
Lazy Rando Command Centre Video Tour
25 01 2009I’ve had a number of requests asking for some details about how I store/live with 8 bikes in a small downtown apartment. This video is your answer! I make no claims about being a video master so keep your expectations low and you won’t be dissapointed….=-)
Comments : 13 Comments »
Tags: Big Dummy, Bike Friday, LHT, NWT, Surly, thorn, Tikit
Categories : Bike Culture, How To
Tikit Commute
31 12 2008Originally posted to my Tikit blog May 2008.

Riding the light transit with the Tikit
I’m working at home quite a lot these days, but I do need to visit our office outside of town occasionally. Yesterday I had a meeting in the next town over and was then headed for our office located on a rural property outside of Calgary. I grabbed the Tikit on my way out the door and rode 2kms to the train station – folded my bike and traveled 25kms by train to the southern edge of Calgary. With my new Blackberry I was able to deal with a few emails on the train which was nice. Once at the last station I unfolded the Tikit and rode the 25kms to Okotoks where I had a meeting. After the meeting I threw the folded Tikit in a colleague’s car and went for lunch on the way back to our office. At the end of the day she gave me a lift to the train which I took back into downtown. Jumping on the Tikit I rode to meet a friend for coffee/dinner and an evening bike ride before finally heading home. I’ve had the Tikit long enough that I’m taking it a bit for granted, but when I think about it I’m quite amazed how versatile this bike is and how it just seems to fit into my life so well.
A few things I observed today:
- The Greenspeed Scorchers are amazing on rough pavement and even rumble strips. Riding this same route with my road bike or recumbent involves some tooth rattling moments. Given my Tikit has really small wheels I was amazed that riding across the rumble strips was almost a non-event. I didn’t feel the usual buzz from rough pavement at all. I pumped the rear Scorcher up to ~55psi and the front to ~50psi which seemed to work well.
- My time for the 25km high way ride was 55mins for an average speed of ~27kph. My average speed along the same route [over many trips] on my Cannondale road bike was ~30kph so that is not bad at all. There was no wind on my ride and I suspect the upright position I am in on my Tikit would suffer quite badly against a headwind. Although I could fit drops to the Tikit if I wanted.
- I’ve largely given up on bike shorts and bike specific clothing for a lot of my riding. Wearing synthetic performance fabrics I was able to ride reasonably far & hard while arriving cool and dry at my meeting.
- I was happy that the 8 speed gearing on my Tikit was more than adequate for this route which entails a decent amount of climbing.
Comments : Leave a Comment »
Tags: Bike Friday, Tikit
Categories : Bike Commuting, Folding Bikes
Doug’s OMM Pugsley Rack Hack
2 12 2008
Doug
I was pondering the challenge of getting racks mounted on my Pugsley. I have some OMM racks which I like a lot and would be a good choice for this bike as they are strong and light – the Pugsley doesn’t need any extra weight! The trouble is they mount using a special QR at the hub. Normally this is a very versatile system and I’ve used it with no issues on my Surly LHT and Big Dummy.
The trouble with the Pugsley is I’m using a Shimano Alfine IGH at the back which means I’ll be bolting on that wheel and can’t use the special QR OMM supplies with the rack. I could use the QR on the front wheel, but I want to be able to swap wheels [both wheels on a Pugsley are rear wheels] should the Alfine act up when it gets really cold.
I’m lucky on two fronts – first the OMM racks are very versatile so the QR mount isn’t the only way to go and second I have other smart bikers who have plowed this road ahead of me. I thought I recalled Doug had used OMM racks on his Pugsley and I thought he may have skipped the QR mounts as well. A search of his blog proved my sometimes unreliable memory correct.
A quick read of the related posts and the problem was solved. I can mount my OMM racks directly to the Puglsey by simply bolting them on to braze-ons that are just above the disc mounts – sweet. I may even have some of the shorter OMM rack adapters like Doug used to lower the racks down a bit – as the new mounting points are a couple inches higher than the usual spot at the axle. If not the guys at OMM are always happy to send out whatever small parts you need to fit their racks to a new bike. They’ve been very helpful to me in the past.

Doug
Thanks Doug – I hope you are feeling better!
Comments : 4 Comments »
Tags: OMM, Pugsley, rack, Surly
Categories : Fat Tire Biking, How To
OR Rader Pocket Cap…
12 06 2013
My 50 Mision cap…
Often I tour with just a baseball cap on my head – particularly if it’s going to be hot all the time. It’s light, comfortable and keeps the sun out of my eyes. Oh yeah it stops people from noticing my common bad hair days on tour! 😉
Skid lid…
If I judge that the tour has higher than normal risks of crashing [ie. technical MTBing or I am riding with Scott] I’ll wear a helmet.
My trusty toque…
I almost always have a toque with me on tour. Canada gets cold at night and in the AM even in the summer. Plus they make everyone look so sexy [see image above]… 😉

OR cap…
A toque folds up and can be crammed in any nook or cranny. The issue with a normal baseball cap is where do you stash it in bikepacking bags when not in use? It’s easy to screw up the brim and then you look goofy. If you are a goofy looking guy like me you don’t want to go further in that direction.

So small…
One option is a packable cap like this OR Radar Pocket Cap. It folds down into a small thin package that can be carried in a bag pocket without coming back out looking goofy. It weighs 50g for the gram counters and is made of rugged quick dry nylon fabric.

Blue Steel? – perhaps not!
This cap is non-adjustable and although I would normally wear a large or XL hat I’m fine in a medium size for the Radar. So beware if you are ordering online. It’s best to try this bad boy on or go one size smaller than normal.
If you are in Canada MEC.ca sells these.
These caps come in black, bright blue and tan.
Comments : 2 Comments »
Categories : Bike & Gear Reviews, Bike Culture, Bike Touring
Bikepacking Clothing…
10 06 2013
Last month in BC…
My bike touring wardrobe has evolved over the last decade to the point where I wear/pack pretty much the same items on every tour with some minor variations for weather.
- microfibre capris [warm when it’s cool and cool when it’s warm]
- wool socks [longer in the winter and shorter in the summer] x 2pr
- synthetic boxer briefs [quick dry – I never wear padded bike shorts]
- synthetic running t-shirt [quick dry great when it’s hot]
- wool zip neck LS top [adds warmth and can be vented well to adjust temperatures]
- ballcap
- softshell jacket [windproof and water resistant]
- toque
- fleece gloves
- MTB gloves
- buff neck warmer
- running tights
- trail runners
- puffy jacket [great when it gets cold]
- sunglasses
This gives me a wide range of comfortable temperatures on tour without having to pack too much. The next to skin items can be washed and dried reasonably easily on the ride if needed. Everything layers well if needed on cold day.

Patagonia puffy jacket…
My puffy jacket is one of the Patagonia synthetic models. I don’t recall which one exactly. It packs small and adds a lot of warmth. I wear it to bed if my sleeping bag is under gunned. It’s fantastic to wear on chilly mountain mornings while eating and packing. If the day starts with a significant downhill I’ll leave this on to ward off a chill until the day warms up or I start to climb.
You’ll notice most of my clothes are high visibility black or charcoal for safety. I bucked that trend here with a red puffer. 😉
There are lots of variations on the puffy jacket theme. I’d highly recommend you try one.

What a Big Dummy…
I’m wearing a MEC Ferrata soft shell jacket in the pic above. I love it. Very durable, windproof and used to resist rain a bit before I trashed the DWR coating. Comfortable to wear next to skin and looks reasonable off the bike if you are in a city. I’ve really thrashed this jacket and it is holding up fine. It should last 20yrs no problem.
Pretty much every outdoor clothing company now offers several soft shell options. Check ’em out they are worth a look.
I’m also wearing a runner’s baseball cap. They fold up pretty small for packing and have a flexible brim that resists permanently getting tweaked thus looking goofy.
I went with high visibility black for safety of course!
Two approaches to rain gear style…
I hate rain on tour so I usually plan trips for windows of good weather and/or locations that seldom get rain. However, sometimes you gotta hit the road when it’s likely to get wet. In those cases I’ll change what I pack a bit:
- delete soft shell and replace with light rain jacket
- delete trail runners and replace with waterproof footwear + mini gaiters to keep socks dry
- or keep trail runners and add goretex socks to keep feet dry
- add rain legs chaps
- add in waterproof over gloves
- probably add in an additional spare set of socks and gloves
- swap sunglasses for ones with interchangeable clear lenses

Staying warm…
When it’s hot I ride in a running t-shirt and capris. Ideally with some short/lightweight socks on. Often the evening turns chilly – especially in camp. So I add some running tights and long wool socks to my capris. I put on the soft shell jacket – possibly with the LS wool top underneath. I also slip on the toque.
If it gets really cold I add the puffy jacket, neck warmer and fleece gloves.
Of course a fire always helps morale when it’s cold as well!

Bug-tastic!
I try to skip tour is horribly buggy areas, but if that’s unavoidable I’ll make the following changes to the packing list:
- add in bug hat
- add in mesh bug jacket
- delete capris and add in full length pants [possibly with zip off legs if it will be hot]
I hate bug spray so I pack mesh clothing and use that to keep the critters at bay.

Wearing water shoes in the desert?
I’ve posted separately about touring footwear, but I’ll recap here:
- trail runners [light, comfy and easy to walk in]
- 5.10 MTB shoes [heavy, rugged, comfortable, excellent pedal grip, great to walk in, but very slow to dry]
- water shoes [fast drying, breathable, comfortable, but limited support]
- light hikers [heavy, waterproof, comfortable, great for hike-a-bike, but can get hot]
I never use clip-in bike shoes for tours. Their off the bike performance sucks and I like being able to jump off the bike without a second thought and run an errand or clamber up a hill to get a photo.
Comments : 9 Comments »
Categories : Bike Touring
Surly Pugsley in the Rivendell Reader circa 2007…
7 06 2013
Click to jump to Rivendell bikes…
I found this 2007 Rivendell Reader article about the Surly Pugsley floating about the interweb. I figured it was worth archiving and reposting for historical interest.
You can read it in higher resolution at these links:
If you think it’s cool Rivendell was hip to fatbikes back in 2007 jump to their website and see what cool gear they have that might be of interest to you.
BTW – if you are from Rivendell Bikes and want these scans pulled down to protect your copyright just drop me a comment and I will do so.
Comments : 1 Comment »
Tags: Pugsley, riv, Surly
Categories : Fat Tire Biking
The Lazy Bikepacking Packing Strategy…
3 06 2013
The Lazy Rig…
My bikepacking setup has proven to be versatile and capable for my Vancouver Island adventures. I’m using Porcelain Rocket softbags attached to the bike plus a backpack on my body. Some people prefer to ride without a backpack, but I find it adds a lot of flexibility to the mix and if you don’t overload it there isn’t much comfort penalty.
Frame Bag
I use the frame bag for as much of the heavy stuff as I can. This keeps the weight centred and low on the bike in the bag that is most securely attached to the frame.
- bike tools
- pump
- spare tube
- paper maps
- TP + hand sanitizer + lighter
- F/A kit
- pot + stove + fuel + spork + windscreen + stove stand
Top Tube Bag
I use little TT bag for small items I want easy access to and items that would get lost in the bigger frame bag.
- chap stick
- eye drops
- water purification drops
- power bar
- headlamp
- mini-leatherman
Bar Roll
The main bar roll carries light and bulky items.
- sleeping bag inside a 10L OR dry bag
- spare clothes stuffed on either side [items I don’t generally want to access while riding]
Front Pouch
The front pouch is a where I put snacks I want to eat while riding and other items I want to get at during the day that would get lost or damaged in the frame bag.
- cell phone [or in pack]
- spare GPS batteries
- snacks [nuts, dried fruit, energy bars, etc…]
- tent poles carried between front pouch and bar roll
Seat Bag
The seat bag is also for bulky light items and I tend to stuff a jacket in there that I might use on and off during the day since I find accessing this bag pretty easy at a stop.
- sleeping pad
- tent pegs
- tent body & fly
- jacket [soft shell, puffy jacket or rain jacket depending what’s going on]

Getting ready to camp…
Backpack
I use my backpack for carrying food primarily. I also use it for holding extra water on a particularly hot day or stretch where resupply is not easy. I’ll either carry a 2L folded up water bag for that purpose if I know it’s going to happen a bunch or I’ll just buy a plastic water bottle of the needed size at a gas station, used it and then get rid of it if the extra water is just needed for a portion of the trip.
Generally my backpack is not full and I try to keep the weight down for comfort. This means I have extra capacity if something happens or I need to haul more than I planned on for a bit. Since I carry food in the pack and sometimes extra water I know that this bag will usually get lighter and lighter on a trip.
When I camp I transfer all my food items from the frame bags to the backpack for the night and then do whatever is needed with respect to animal food safety. A backpack is great for this purpose.
If I end up in a town or want to go for an off bike hike I can transfer items from the backpack to the bike and vice versa so I have a daypack to use.
I carry my camera either in the pack [DSLR] and/or a point-and-shoot on the waist belt in a pouch which is uber convenient and keeps the camera insulated from a lot of the vibration a camera on the bike would experience. I also keep my money, cell phone, credit cards and ID in my pack. That way I can jump off the bike and not leave anything too valuable on it. I will sometimes pop off my GPS and stash it in my pack on these occassions.
I size the pack for the trip based on how much food/water I’ll need. If I’m carrying the DSLR I’ll upsize for that as well.
- food [besides snacks for day]
- extra water in water bag or recyclable plastic bottle
- ID, cash, credit cards
- cell phone if not using it for something during ride
- extra stove fuel if needed
- tooth paste + brush
- any other toiletries [usually none]
Two benefits of carry food/extra water in a backpack are:
- your bike bags aren’t always over stuffed which makes accessing them and pulling out what you need easy. This is also kind to the zippers and other attachment points.
- when you have to hike-a-bike carrying some of the weight on your back is nice when the terrain is loose/steep/challenging.
Water
Running out of water is no fun, but carrying too much water is a heavy tiring mistake as well. Ideally I a carry just what I need between resupply opportunities plus a bit extra as a safety margin. I always ride with a water bottle on the stem. That is very easy to access so I drink when needed as I ride. I’ve got a 1.5L bottle attached to the dowtube which I decant into the stem bottle as needed. I will carry a water bag in my backpack or a plastic water bottle depending on what the specifics of the tour are.
I always have water purification drops with me and refill bottles as they empty and I pass a water source – usually a fast flowing creek. Cycling through my bottles allows the purification process to happen while I ride and I always have water that’s ready to go.
If I really need a ton of water on a tour I can attach water bottle cages to each fork leg and throw a 2nd water bag into the pack. At the moment I can’t imagine needing more than 7.6L of water between resupply stops.
- stem mounted bottle [0.7L]
- DT mounted bottle [1.5L]
- water bag in pack [2L]
- 2nd water bag in pack [2L]
- 2 water bottles on fork [1.4L]
Of course I always use the water in my backpack to replenish the stem mounted bottle so the weight on my back decreases as fast as possible.
I haven’t toured with a hydration bladder in my pack. On a really hot tour I would consider doing so and using the bladder instead of one of the water bags.

OMM rack on my Krampus…
Rear Rack and Panniers
I’ve got a trip planned for this summer that requires I carry food and stove fuel for a long stretch for myself and a few other people. My backpack strategy is fine for a solo effort, but doesn’t work so well when the load gets heavy. So for those situations I attach a rear rack and panniers.
There are downsides to using a rear rack and panniers, but the benefit is you can haul a lot of stuff on the bike easily. Since this extra weight is mostly food and stove fuel it will get lighter as the trip progresses mitigating a lot of the negatives of running with a rack.
In the picture above I’m test fitting an Old Man Mountain Cold Springs rear rack to my Krampus. I didn’t bother attaching the front struts, but they will go on no problem using p-clips on the seatstays. I’ll be using Ortlieb panniers with the OMM rack.
I don’t expect to use a rear rack much for bikepacking trips, but it’s good to know it works and is available when needed.
Comments : 13 Comments »
Tags: krampus, Porcelain Rocket
Categories : Bike Touring, Mountain Biking
Summer Bikepacking Shoes…
30 05 2013
On the move…
I’m trying to figure out what shoes best meet my needs for summer bikepacking trips.
- all day pedalling comfort with MTB platforms
- reasonable grip biking through technical sections
- able to hike-a-bike comfortably for 4-5hrs at a time over rough ground
- excellent traction off the bike
- breathable
- fast drying after rain or creek crossings
- need to accept my semi-custom insoles

5.10 Impact Low…
My favourite cycling shoe is this 5.10 Impact Low model. They are super comfortable, very durable, grip the pedals like glue and have great traction off the bike. The only downsides are 1) they take forever to dry if they get wet, 2) they are pretty heavy/overbuilt for touring and 3) they don’t breath all that well. If they dried fast I could live with everything else.
I really hate riding in wet feet so these are not a good choice if I think it might rain and/or I would have to carry my bike through any creeks/rivers.

Montrail trail runners…
I love these Montrail runners. They are super comfy and work great on/off the bike for touring. Although they dry faster and are more breathable than the 5.10’s they are not great in either category. They are also on their last legs having been shredded on many previous adventures – soles are almost worn away at the heel, cushioning is compressed and uppers are starting to tear. I just repaired the uppers with shoe goo so I could use them on my last tour, but Sharon laughed at me and said it was time to let them go. I probably will have to do that, but not until the end of the year! 😉

La Sportiva trail runners…
I bought these La Sportivas to replace the Montrails above, but never loved them enough to actually part with the old shoes. There is nothing wrong with the La Sportivas. They do everything well enough, but somehow the fit/performance just isn’t as good as I would like. On the plus side they are light and breathe/dry well. I’ve worn them enough that they are starting to fail at weak spots, but some strategic shoe gooing means they be good for another full year.
At the moment these are the best bikepacking shoe I own and when I have to throw the Montrails out they’ll keep me rolling until I find a replacement.
In terms of bikepacking downsides:
- raised instep not uber grippy on the bike pedals [not awful, but just okay]
- not as stable during hike-a-bike as my other shoes
- lightweight construction not super durable [I’m okay with this as a trade off for fast drying]

Merrel Gaulley water shoes…
I bought these Merrells when I broke my foot and needed a soft stretchy shoe to accommodate my swollen foot. They are water shoes which means they breathe and dry very fast, but they are very flexible and don’t offer much support. I have toured in water shoes before with no issues, but those tours did not involved any hike-a-bike over rough ground which my current trips seem to feature. These shoes also have a fairly non-aggressive sole so I don’t know how well they will do walking/pushing on steep loose terrain.
On the plus side is they fit me, they accept my insoles and they are paid for! 😉
I need to try a hike-a-bike tour with them and see if they work okay. They would definitely be my choice for a trip that I knew would involved a lot of wet feet.

Vibram Five Fingers…
So far I haven’t bothered with a second pair of shoes on tour. Wearing trail runners on my bike means they are comfy for wearing around camp and BC has barefoot friendly campsites [no thorns or sharp rocks] so I can just go without shoes if I need to air out my feet. However, I started to think that maybe carrying these Five Fingers wouldn’t be a bad idea. I could wear them during creek crossings to keep my main shoes/socks dry and they’d be fine in camp if I didn’t want to go barefoot. I could even ride or hike in them if I needed to. Plus they are also paid for! 😉
Most bikepackers who carry a second set of footwear seem to favour flip flops. Presumably for their lightweight, easy packing and low cost. That makes sense – except flip flops are pretty useless in a raging rocky creek or for anything more demanding then chilling in camp.
I’ll test the Five Fingers out this summer and see if they are worth hauling along or not.

Montrail Mountain Masochist trail runners…
I’ve got troublesome feet so I can’t simply order some shoes out of a catalogue and have much success. I’ve got to try on every pair that interests me and see what feels okay in the store. If I am hopeful I’ll buy a pair and wear them at home for a couple days to see what problems crop up once they are on my feet for several hours at a time. If that seems promising I start wearing them outside and give up any hope of returning them for a refund.
My success rate even with this sensible systematic approach is pretty grim. Shoes my feet really love are few and far between. I have given away quite a few pairs of shoes over the years that I thought were winners until an extended trip where their comfort was lacking. Which is why I’m starting to think of this now even though I can keep my La Sportivas going through to summer 2014. It could easily take that long to find a worthy successor! 😦
Comments : 24 Comments »
Categories : Bike & Gear Reviews, Bike Touring
Sharon goes Double Black Diamond…
19 04 2013
Sharon enjoying the shade…
We have been riding harder and longer trails each day of our trip here in Sedona. That was capped off yesterday by a loop around Highline Trail which was our most ambitious ride so far.

Riding on the edge…
Sharon has done lots of slow techy riding in BC, but she has never faced riding on a cliff for an extended period of time, riding fast through tech or riding for 4hrs+. So she had some doubts about this ride and we agreed we would turn around or walk anything that was too gnarly.

Enjoying the views…
As it turned out she did just fine. Everyone told her that BC was the hardest riding she would ever have to do and they were right! She’s rocking and rolling through the tech here in Sedona.

The Desert Squirrel…
The only real challenge for her was the length of the ride and the building heat. Our Hartland rides usually clock in at 2-2.5hrs and since it’s a compact trail network you can always call it a day and head back to the car from any point in the ride. On a 25km loop you are often 1-2hrs from the car so your only choice is to continue to crank the pedals.

Hitting her crusing speed…
Highline remains lightly travelled….we ran into 2 other solo riders on it and a couple groups of hikers. That leaves lots of empty space to be alone with your thoughts and the stunning scenery.

Rolling down the slickrock…
We have friends coming in to ride starting Monday so we’ll need to reset the gnar-meter and start back on some easier shorter rides next week. So I’m glad we got Highline done and we’ll tackle a couple more challenging rides over the weekend so we are ready for a break when we show our buddies around the trails.

Cranking up some steep slickrock…
After the ride we took Sharon’s bike to Dave at the Sedona Fat Tire Bike Shop for some TLC. 4hrs of intense work later her bike runs better than new. Dave is a master mechanic and these trips to Sedona and worth it just for the access we get to his expertise. If you own an expensive fullsuspension mountain bike you owe it to yourself to get it to Dave and have it tuned to perfection. The only trouble is you’ll have to keep coming back to Sedona because you will now know what your bike is capable of.

Nearly done…
Sharon’s bike is a whole new machine now and she’s excited to ride it again.

Rest stop by the creek…
Sharon was a bit shocked when we rolled up to a rest stop at Oak Creek. She wasn’t expecting to see water in the desert! Oak Creek is an oasis of awesome for a couple hot and dusty mountain bikers.

Lazy enjoying some climbing…
Now that we have Highline in the books Sharon knows the rest of the trails we ride will be both shorter and easier so she’s feeling relaxed and ready to tackle more red dirt.

Proof we are both on the same ride… 😉
If you ever have a hankering for a MTB holiday I can certainly recommend Sedona. Great trails, specatcular scenery, friendly local riders and a sweet town to enjoy pre and post ride. 🙂

One last roll down…
Comments : 2 Comments »
Tags: Santa Cruz, Sedona
Categories : Mountain Biking
Yakima Fat Racking…
17 04 2013
Sharon’s Pugsley and Yakima rack…
Sharon uses a Yakima Hold Up 2″ receiver hitch rack on her car. It’s an older version so not exactly the same as what’s shown on the Yakima site, but looks pretty similar. We had never used it for a fat bike until the Missing Link Tour.

Front wheel…
The Pugs went into the rack with little difficulty with its 4″ tires. The front wheel was secured normally with the rack’s arm. I added a small bungee to the front wheel so it couldn’t move. It doesn’t sink as deeply into the rack slot as a skinny tire MTB would.

Rear wheel is fat…
The rear wheel is too fat to use the rack’s ratchet strap. So I attached it with another bungee cord. It held fine like this for a short-ish drive to Lake Cowichan. For a longer haul or if I was going down some rough roads I would use something more robust to secure the rear wheel.

Krampus Fits Fine…
The Krampus dropped into the rack without any special accommodations.
Comments : 1 Comment »
Tags: Pugsely, Surly
Categories : Fat Tire Biking, How To
The Girlz ride Terra Nova Trail…
15 04 2013
Dead fall…
Last time I went riding with Sharon and her friend J [fall 2012] we left with J having two broken hands and Sharon could barely walk. That was an easy paced chill ride… 😉

One of many water crossings…
So when we all went riding again last week our mission was clear – everybody comes home in one piece!
I picked a trail that is as close to XC as I have near at hand to our home in coastal BC. Sadly that doesn’t mean buff endless singletrack. But it does mean you can ride your bike a bunch of the time without facing a techy obstacle at every turn and when you do face an obstacle you mostly have to get off your bike and walk. Walking may not be as fun a riding, but it’s safer…;)
Here is a solo ride report from the same trail last August when it was much much drier.

Sometimes you gotta push in the bush…
Our typical MTBing trails are what the kids call “all mountain”, which translates to steep and techy. I’d call it “Costal BC all mountain” which in my mind denotes a higher than normal density of the tech and often slippery conditions”. So although this isn’t a Colorado Buff trail this is a chill safe-ish MTB option around here.

Sharon riding her Pugsley…
I suggested that Sharon ride her Pugsley instead of her 6″ travel FS bike. Partially because this trail didn’t really need tons of travel and partially because I want her to get comfy doing easy MTBing trails on the Pugs to facilitate future bikepacking adventures.

J still smiling…
Although Sharon has turned into a decent shredder she’s only been riding MTBs for 3yrs. Has really only ridden 1 MTB [Santa Cruz Nomad] and 95% of her MTBing has been in 1 bike park. So her skill set is good, but not broad.
She also has a lot of Baja sand riding experience, but that’s a pretty niche skill set not much use most other places.

Team effort…
For the first hour I got flack about suggesting the Pugs because she got pounded on a rigid bike trying to ride it like a long travel FS bike. Her FS bike has a dropper post so I setup her saddle at 70% normal height which she thought was too low when it was chill and too high on the few steep sections.
So she walked her bike a bunch when she could have ridden and complained a lot. I just told her that the bike she had at the moment was the Pugs and to get on with riding it…lol…tough love!
The mighty Krampus…
It would have helped morale if I was riding my Pugs as well, but it was at the LBS getting my Rolling Darryl rims built into wheels. I was riding my Krampus which was rigid and semi-fat so I didn’t feel guilty for flying along on a cloud of high-tech suspension!

Gloomy forest singletrack…
The good news is that after an hour the complaints went away and Sharon started shredding the rocky climbs and other challenging sections. Then she even commented how easy it was to climb the Pugs on rough or slippery terrain and how it rolled over river rocks like they weren’t there.
Mission accomplished! 🙂
Splish Splash!
I’m not one of these guys that thinks fat bikes are the best MTBs for just about every kind of riding. I like my other MTBs plenty and for a lot of the riding I do they are miles better than my fatty…BUT…for ‘xploring poorly maintained trails in wet conditions big fat rubber is pretty sweet and the Pugs has a great geometry for this kind of riding.
I’m glad Sharon came to that conclusion on her own. Especially riding an unloaded bike on a short trail ride. This will make the leap to carrying some camping gear and having to mountain bike a lot easier.

J charging the creek…
I’m happy to report J made it back to the car un-broken and smiling. 😎

Racing the setting sun back to the car…
Of course Sharon did have some criticisms of the BB7s for MTBing compared to her Nomad’s hydros as well as a few other upgrades. I pointed out that the Pugs was a bike worthy of upgrading and when she wanted to spend some $$ we could tackle anything she liked…:D;):thumbsup:
Comments : 5 Comments »
Tags: Pugsley, Surly, terra nova trail
Categories : 29er, Fat Tire Biking, IGH
Gravel Pimp – Got her done!
2 04 2013
Getting up while the moon was still bright in the sky…
I spent a lot of time last year doing recon on a dirt route from Lake Cowichan to Victoria. With the Galloping Goose MUP mostly dirt from Sooke Potholes Park to Victoria it seemed straightforward to just find a route from Lake Cowichan to the potholes. As it turned out that wasn’t so easy after all.

First try along the cyan line above…
At first it looked simple to run down the Trans Canada Trail [TCT] and along the east side of Sooke Lake down to Leehtown and then hop on the Goose MUP to Sooke Potholes Park and onwards to Victoria. The trouble was Victoria takes its water-supply very very seriously and has blocked off any access through the area we wanted to ride with gates, fences and guards. Click on the map above to read what happened.

E&N Railway route…
We tried riding the E&N Railway corridor from Shawnigan Lake To Victoria which is quite a bit to the east of our previous route. It worked, but riding on the tracks was pretty brutal so I couldn’t really recommend it as a bikepacking route. Not to mention it was almost too easy with no real grades and such a straight shot to Victoria. The Gov’t keeps threatening to reactivate the rail service along this line, but so far it hasn’t happened. It you don’t mind getting bounced around a lot and want to check it out it’s a viable option.

What roads?
Not to be deterred we returned to Sooke Lake area and tried to go to the west of the Sooke Lake drainage. Both my print maps and electronic maps showed logging roads leaving the Leechtown area and heading west then north to join up with roads around the Koosilah Provincial Park. Sadly these roads were fictional. They exist only as a cartographer’s dream! 😦

Another dead end…
About this time I realized that riding a bicycle out to Leechtown and back for every route recon was taking up too much time and frankly riding the Goose MUP so many times was getting boring. So I broke out the KLR dualsport motorcycle. I plotted another route uphill out of Leechtown that looked promising on the map [pink line above], but I only got as far as the burgundy line on the lower right before I hit a water-supply gate and the rest of the mapped roads stopped existing.
More moto recon…
Next time out I burned a whole day on the motorcycle going in and out of various logging roads as I kept running into more locked gates or dead ends. I managed a loop from Victoria out to Port Renfrew then up to Lake Cowichan before heading back home. The good news is it was a fun day on the moto and I learned a lot about the local logging road network. The bad news is I still didn’t have a route that went all the way through, but I had narrowed down the options enough I thought it was time to take another chance with the bicycle.

Getting down to the last few options…
With a lot of recon done I figured one of the two connectors shown above in pink and green would work. Obviously I’d rather ride the shorter pink route. Especially because the green route features a ton of altitude loss as you head south and a bunch of fresh climbing as you head back north on top of triple the mileage. Locked logging gates stop me on my motorcycle so it was time to start pedalling again to finish the route off.

Finally it got done…click image for GPS info…
This past weekend I headed out from Lake Cowichan and rode my bicycle down the TCT to the Kinesol Trestle and past the Koosilah Provincial Park. I headed up into the mountains on the Kapur Main logging Rd and connected with the West Jordan Main logging road. That took me to the [supposed] junction of the Butler Main logging road and the Leech Main logging road, but once again the Leech Main [the pink short cut in the map 2 above] doesn’t actually exist on the ground. So I rode south on Butler Main dropping altitude fast and connected with Graveyard Main to head north again to Leechtown. I knew I would make it at this point, but the landscape had changed at Leechtown since my last visit with logging equipment gone, vegetation grown and creeks running hard with snowmelt. I had to poke around a bit until I found the bushwhack across the Sooke River to the Goose MUP. Once I rolled up to the familiar red shelter I’ve slept in a bunch of times I was really happy to finally put that mission down as a success in the books.

Sooke River…
The GPS says it’s 175kms from Lake Cowichan to Victoria along my route. Those numbers don’t sound impressive, but when I look back at all the time I spent pouring over maps, riding my motorcycle and pedalling my bike it was quite a job to figure this route out. I had decent maps and a bunch of dirt roads available for me to use. I didn’t have to do one lick of trail building or mapping to find this route. So I am even more impressed with all the trails I’ve ridden in the past and the effort the folks have put into finding them or building them. Thanks!

Phase 2…
Now that Phase 1 of the Vancouver Island Bikepacking Route is done I’ve got plans for Phase 2. The next part of the adventure is to map a route from Cumberland/Comox down to Lake Cowichan. The green segment on the map above goes from Port Alberni to Lake Cowichan and I’ve been down all those roads in my truck so I know they are a sure thing. The cyan segment at the top of the map goes from Cumberland to Port Alberni. It looks pretty straightforward, but I’ve said that before! I’ll do an initial run with my motorcycle this spring to confirm the route from Cumberland to PA works and is a decent one to ride. Then I’ll come back with my bicycle to enjoy it by pedal power. 😉
My goal for 2013 is to get that far.

Phase 3…
You can see from the map above that Phases 1 & 2 get me a little better than halfway up Vancouver Island. I’d like to go all the way to the top on dirt, but my knowledge of the north island is limited and it will take 3-4hrs just to get to the bottom of that area on my motorcycle so there will be some serious time involved in that part of the recon. I’d like to get at least one moto recon session in the books for 2013 so I have a lay of the land in my head to help me situated data I glean from maps.

Keep on rolling…
I’ll get a trip report for the latest ride posted later this week or next – here are the photos for now. I’m excited for another great year on the bike with lots of new roads and trails explored.
Keep those wheels rolling Gravel Pimps of the world! 😉
Comments : 15 Comments »
Categories : 29er, Bike Touring
Toronto Tidbits…
19 03 2013
NHL Hockey…
Not a ton to report from Toronto. I’ve mostly been hanging at one or the other of my parents’ apartments. That means I had a rare opportunity to combine TV, cable and lots of time with not a lot to do. I have to report TV still sucks – so many channels and so little on. I mostly watched sports. I have a slight addiction to any sport that’s televised and is holding some sort of championship tournament. Tennis, curling, hockey – whatever…if it’s a best of the best tournament I can get into it….problem is I can’t easily get out of it! Luckily the only championships I could find was in figure skating and they didn’t get out of hand. I also watched a bunch of NHL games. It’s a novelty not to have to head to a pub to watch a game. Of course not being able to buy a pint of beer was a clear downside to the home viewing experience.

iPhone internet…
Sadly both my parents have crap internet connections and neither has WiFi…how can they live??? 😉 Happily I was able to tether my laptop to my iPhone so I could work and surf the net during the trip. I haven’t used that feature much before, but it works great.

Jun…
I did get out on my own Friday for a bit of a jaunt downtown. I met up with biker, blogger and all around nice guy – Jun Nogami for lunch at Sansotei Ramen. I’m not a ramen expert, but the meal was fresh and tasty. The place was bustling so they are clearly popular and worth a try if you are in downtown TO and have a hankering for ramen noodles.

A Rocking Lobster…
Jun was riding a cool pink Rock Lobster. He’s an uber commuter and cargo biker. He was on his way to a human powered helicopter record attempt and invited me along. I was interested in checking it out, but I had to decide if I wanted to spend a few hours travelling around the city to see the helicopter or spend the time chilling in downtown.
Since it was my only day “off” on the trip I decided to roam the core on my own.

Bike crime scene…
I headed over to The Urbane Cyclist LBS. It reminds me of a much bigger version of The Fairfield Bicycle Shop in Victoria. They both specialize in practical bikes for getting around with a nod towards the funky end of the bike spectrum. Quite a few years ago I bought my first folding bike [a Dahon Speed D7] at Urbane so we have a bit of history.

Water bottle cage budget bling…
It was quite cold outside so I spent a lot of time just geeking out on bikes and chatting to the staff. I left with a cool metal bottle cage and a 2013 Ortlieb catalogue. Yes I am a bike nerd and I like my Ortlieb porn! 😉

Cool design…
I saw some cool architecture near Urbane and really enjoyed tromping along the busy streets with music pumping in my headphones. When I was young that was how I spent a lot of my free days and something I rarely do anymore. Having a soundtrack to your aimless wanderings is fun. My ears are probably happy I don’t use headphones a lot anymore.

Magazine porn…
I’m not a huge magazine reader, but when I am travelling having a few mags in my backpack makes the inevitable waits, planes, trains and buses more enjoyable. My iPhone is an older 3GS version with a limited battery so I can’t really expect it to entertain me on the move too much if I want it working for navigation and other mission critical tasks when I need it. There are a few magazines I really enjoy so I scored copies of: Bicycle Quarterly, Surfer’s Journal and Dirt Rag. I also grabbed a Mountain Bike Action and a Bike Magazine – neither of which are on my A List of sports journalism, but like a donut the occasional empty calorie is fun as long as you don’t go nuts! 😉
Surfer’s Journal and Stand Up Paddle Journal [sadly I had already read the current issue of SUP Journal] are truly excellent magazines with quality writing combined with stunning photos. You only get halfway through an issue before you start thinking about your next surfing trip. I’d love to find a mountain bike equivalent.
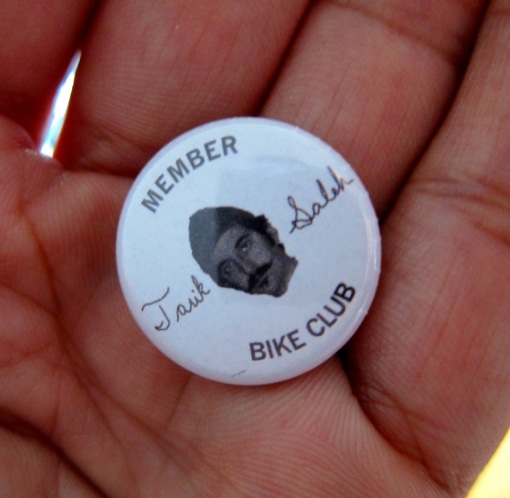
Jun made me a member of Tarik’s Bike Club…thanks! 😉
With some reading material in hand I cruised the core stopping at a few gear stores to see the latest shiz and warming up. I’m well stocked on camping gear and clothing so I kept my wallet safely stashed in my pocket. I’ll save my gear fun tokens for travelling this year and wear out some gear.
I found myself in a nice pub for a couple hours to beat the cold and enjoy some draught beer in a comfy setting. Once again the iPhone and laptop came to my rescue as I was able to get some work done while relaxing for a bit.

Jun and his daughters make these ribbons…
Eventually my free time ran out and I joined the throng for a Friday rush hour commute to the burbs where my dad lives for more family time.
I can’t say I really like Toronto. I’m not a big city guy, but it is fun to visit for a change of pace. 🙂

Ortlieb 2013 goodness…
Comments : 5 Comments »
Categories : Bike Commuting, Bike Culture
MEC Ace Sunglasses Review…
18 03 2013
MEC Ace Sunglasses…
I’ve been an Oakley sunglass whore for a couple decades. I love them, but they are expensive so as my Oakley lenses got scratched up and downgraded for more and more abusive use I decided to try some cheaper sunglasses as replacements. I was at MEC.ca so I looked at what they had and these Ace sunglasses fit me pretty well.
I’ve used them for 6 months so far.
What I like:
- optics are nice and clear
- great for driving
- they look a little nicer than my typical plastic framed sporty sunglasses
- they fit my face
- at $32 the price is reasonable
- they come with a bag that doubles as a cleaning cloth
- MEC is great about warranties and customer service
- polarized version available for $60
- thin arms work well with most retention neck bands
What I don’t like:
- frames are very flexible and small impacts bend them
- lenses are heavy and glasses want to fly off my face if I’m making quick moves
- starting to get scratched [about average in this department]
- can’t really pack them in a bag unless I use a hard case or they will get bent
These sunglasses are working great for casual use. I like them a lot for driving my truck. They live on my face or get stored in the truck’s sunglass holder. I don’t like them so much for sporty use as they are not secure on my face due to the heavy lenses and not so grabby arms. Worse once you no longer need them on your face you have to be really careful or they be badly bent. They have been fixable every time I have bent them, but it takes a long time to get them back to a comfy shape.
For the price I would recommend them as a fashion sunglass or for driving. For active use I’d give them a miss.
I may buy a polarized pair to keep in the truck once I wear this pair out.
Comments : Leave a Comment »
Tags: MEC
Categories : Bike & Gear Reviews
Pugsley 29er Wheels…
8 03 2013I love my Surly Pugsley and I have considered building up a 29er set of wheels for it a few times over the years. The Pugsley has a 17.5mm offset of the rear wheel to the right so the chain clears the big fat tire. That works great with the wider fat rims out there as they have enough real estate to offset the hole over to the right so that the end result is a strong wheel with reasonably even spoke tension on both sides. My Large Marge rims [shown below] have the spokes offset ~13mm to the right for example.

Note offset spokes…
With narrower 29er rims you can’t move the spoke holes over as much so there are some compromises to be made that are worth looking at.
What’s normal?

Standard rear MTB wheel…
I like strong wheels with even spoke tension, but most mountain bikes roll along just fine on rear wheels that are tensioned at 100%/60%. So that’s worth keeping in mind.
Offset Fork + Zero Offset Rims

Zero offset rim in the rear of the Pug…
If you build a Pugsley a set of 29er wheels using standard zero offset MTB rims [spoke holes centred in the rim] you get the spoke tension shown in the images above and below.
The rear wheel uses a SRAM X9 hub and the spoke tension is 100%/45%.
The front wheel uses a Surly 135mm SS hub in the Pugs offset fork and the tension is 100%/30%
Neither of these options looks that great, but I know folks that have built up 29er wheels for Pugsleys using zero offset rims and they can work if the rider isn’t super heavy and/or the use is gentle [ie. road commuting vs. loaded dirt touring].

Surly SS hub in Pugs offset fork…
Offset Fork – 4mm Offset Rims

Velocity Synergy OC 4mm offset rims with SRAM X9 rear hub…
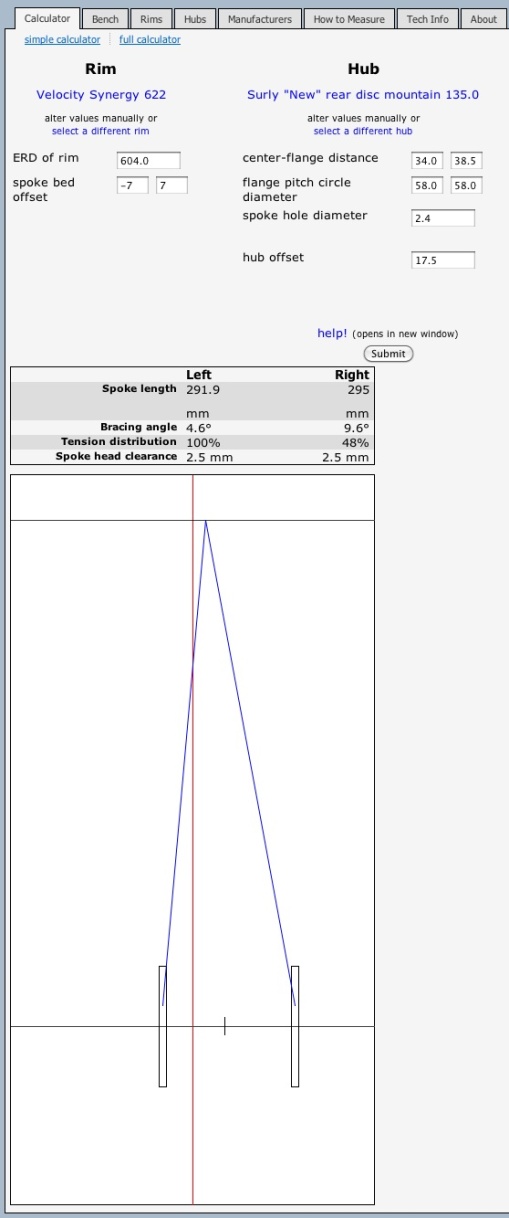
Nick over at the Gypsy By Trade Blog posted about building a Pugsley 29er wheelset using 4mm offset Velocity Synergy OC rims. As far as I know these offer the most offset in a “standard” 29er rim.
The rear builds up with a tension of 100%/62% – so that’s essentially the same as our “normal” MTB rear wheel at the top of the post. Although this wheel has slacker spokes on the driveside vs. the “normal” MTB wheel which has the slacker spokes on the disc brake side. I’m not sure if that matters a lot – anyone have a comment on that?
The front builds up with a tension of 100%/40%. A normal MTB front wheel is around 100%/70%. But the front wheel sees less abuse so perhaps this is just fine as long as you aren’t on the really heavy/rough end of the use spectrum. I’m keen to follow Nick’s blog and see what happens.

Surly SS hub in offset fork with 4mm offset rim…
Offset Fork – 7mm Offset Rim

7mm offset rim in rear of Pugs on SRAM X9 hub…
Surly has released a 50mm wide Rabbit Hole rim that takes 29er tires as well as their new Knard 29 x 3.0″ uber wide rubber. It has a 7mm offset and fits into a Pugsley frame/fork no problems. I wish Surly has pushed those spoke holes out another couple mms to get better tension with the Pugsely offset frame/fork. It looks like there is enough real estate on the rim to do that.
The rear builds up with 100%/78% spoke tension which is nice.
The front builds up with 100%/48% spoke tension which is better than the 4mm offset rims, but still quite a bit short of the 100%/70% tension of a standard MTB front wheel.
So you are getting a more balanced build with these wide rims, but they are heavier [~200g/rim compared to the Synergy OC rims]. OTOH – they are wider so if you want to run wide 29er rubber including 3.0″ wide Knards the weight penalty may be worth it on that count.
Surly SS hub in Pugs offset fork with 7mm offset rims….
Zero Offset Moonlander Fork – Zero Offset Rims

Moonlander symmetrical fork with zero offset rim…
If you have a Necromancer Pugsley you have a symmetrical Moonlander fork that takes a 135mm front hub. I don’t have the specs on Surly’s 135mm front disc hub so I used the same Surly rear hub as the other examples. It gives you a pretty good idea where things are headed although the spoke tension with the front 135mm hub may be a bit worse since the right flange doesn’t have to make room for a cog.
For a zero offset rim I got 100%/89% spoke tension which is great. You could use 4mm or 7mm offset rim to get an even stronger wheel.
Pugsley 100m Symmetrical Fork – Zero Offset Rim

100mm front hub in Surly Pugsley 100mm symmetrical fork…
Surly sells a 100mm symmetrical fork for the Pugsley at a cost of ~$99. That would allow you to use an existing standard 29er MTB wheel which you may own or can buy pre-built for a lot less than a custom wheel build. You can also swap this wheel into another MTB you own. The spoke tension is 100%/70% – which what most MTB front wheels would be.
Note this would be the same result as using a 29er suspension fork with your Pugsley.
IGH + Pugsley Offset – Zero Offset Rim

Alfine 8 in Pugsley offset frame with zero offset rim…
If you are like me and want to use an IGH with your Pugs you find out that it’s a challenge with 29er wheels. As you can see from the example above of an Alfine 8 in the rear of a Pugs with zero offset rims the spoke tension balance is poor at 100%/30%. It’s essentially the same as the tension achieved with the Surly SS hub in all the examples above so your best case using a 7mm offset Rabbit Hole rim is ~100%/50% tension balance.
Some Other Ideas
Here are some additional things to consider:
- a wider flange to flange spacing will make for a stronger more stable wheel all other things being equal
- it may be possible to drill new spoke holes on Surly Rabbit Hole rims further to the right than the stock ones
- you can use two rear cassette hubs in your Pugs to avoid the funky spoke tension you get with a SS/FG hub up front
So what should you do?
The very first thing I would do if you are going down this road is to evaluate how tough you are on wheels. That will let you know how important getting strong wheels should be to you.
- how much to do you weigh?
- how much gear do you carry?
- how rough is the terrain you ride?
- are you a finesse rider or a smasher?
- how much do you ride?
- how well do normal MTB wheels last under you?
- how much attention do you want to spend on your wheels?
Next up you need to consider some of the other factors like:
- how frequently do you plan on swapping wheels?
- how far from help do you ride?
- do you have an existing 29er front wheel you could use?
- do you want to ride narrow 29er rubber? [less than 2.4″]
- do you want to ride uber wide 3.0″ 29er rubber?
- do you want to use a suspension fork?
- what is your budget?
There is no set answer.
- The more abuse you will dish out the stronger your wheels need to be.
- If you want to swap wheels once a season a fork swap is no big deal.
- If you want to swap wheels twice a week swapping forks will get old fast.
- If you own an existing 29er front wheel you like getting a $99 Pugsley 100mm symmetrical fork is a great idea.
- If you ride far into the backcountry you won’t want to take a lot of risk.
- If you are never more than a few miles from the car you can afford to have a wheel failure.
Don’t use a Pugsley
If you haven’t got a fatbike and using a 2nd set of 29er wheels is important to you than you may well be better off buying one of the symmetrical rear end fatbikes being sold. Without the offset rear end you can build up some 29er wheels without much trouble although you will need the correct size hubs for your frame so an off the shelf 29er wheel set won’t work.
What would I do?
Well I’ve talked myself out of a 29er wheelset for my Pugs. Using an IGH doesn’t get me a good wheel build even with a Rabbit Hole rim. I don’t feel like swapping wheels and the fork every time I want to run 29er wheels either. So that sort of leaves a whole bunch of not so great options on the table.
I think the better plan for me is to have a dedicated 29er MTB and leave the Pugsley on fatbike rubber. I have a garage and I have the existing 29er parts to outfit a frame at a cost that wouldn’t be much more than a custom set of wheels.
Having said that if I was a one bike guy and owning/storing a second bike was out of the question I’d switch my Pugsley over to a 1 x 9 derailleur drivetrain and use a Moonlander fork upfront. I’d run Rabbit Hole rims because I’ll either run a 2.4″ or 3.0″ tire. I like wide rubber.
Comparison to my existing Pugsley wheels…

Alfine in Pugs with Large Marge rim…
Since we are going to town on wheel calcs the images above and below show my current Pugsley wheels. The rear Alfine has a spoke tension of 100%/92% with a Large Marge rim that has 13mm offset [same offset as Rolling Darryl rim]. The front Surly FG hub in my Pug’s offset fork has a spoke tension of 100%/69%. Both ends are pretty strong in theory and that’s backed up by a lot of abuse with zero issues.
It’s nice to be able to ride your bike as hard as you can without having to give a second thought to your wheels.

Surly SS rear hub in Pugsley offset fork with Large Marge rims…
Comments : 13 Comments »
Tags: Pugsley, Surly
Categories : 29er, Fat Tire Biking, How To
New Canfield Brothers Nimble 9…
1 03 2013
New and improved…
I test rode Grant’s N9 in 2011 and liked it a lot. In retrospect the geo was probably better suited to my riding needs [HA of 68/69 depending on fork] than the Scandal I bought [HA ~71]. One issue I had was the heel to chainstay clearance for my big feet and it looks like they have fixed that.
Here is the Canfield spew:
The Canfield Brothers 29er revolution continues with the ALL NEW Nimble 9. From the start of the redesign of the current Nimble 9, we wanted to give the bike a distinctive look different from what is currently available in chromo hardtails. We wanted to incorporate a hydro formed toptube and a 44mm head tube. New innovations include a removable front derailleur block that allows the frame to look super clean when setting it up as single speed. We also designed new sliding dropouts that are reminiscent of something seen on a custom motorcycle. Lastly, we gave the new Nimble 9 the innovative Canfield Brothers 29er geometry.
We will be releasing the new Nimble 9 in nine colors, Canfield Glow in the Dark Sparkle Blue, Sparkle Orange, Sparkle Green, Matte Black, Gloss Black, Deep Red, Midnight, Forest Green and Limited Edition Chrome.
The Nimble 9 is currently in production with an estimated ship date of May 2013.
Features:
- 4130 chromoly steel
- 68° head angle with a 120mm fork
- Adjustable 16.25“ – 16.9” chainstays
- Lower toptube for increased stand over height
- Custom sliding 135mm x 10mm rear dropouts for geared or single speed options
- ED Black treated for corrosion resistance
- NEW hydroformed toptube
- Removable direct mount front derailleur block
- Improved chainstay heel clearance
- Two water bottle bosses
- 6.5 lbs (estimated)
- $750 US retail, ($800 Limited Edition Chrome)
Build Specs:
- Recommend fork lengths – 100mm – 120mm
- Headset – 44mm upper and lower cups
- Front derailleur – Shimano direct mount – top pull, single bolt, or Sram HO series
- Bottom bracket – 73mm
- Seat post – 30.9mm
- Seat clamp – 35mm
- Rear dropout spacing – 135mm
- Post brake mount
Click on the image above for more info and discussion over at MTBR.com.
Comments : Leave a Comment »
Tags: canfield, nimble 9
Categories : 29er, Mountain Biking
For Sale On One Scandal 29er MTB Frame and Fork…
23 02 2013
My On One Scandal 29er in bikepacking mode…
I’ve decided to sell my On One Scandal 29er frame and fork. This is an excellent XC 29er mountain bike. It’s well suited to a role as a bikepacking rig. It comes with SS/IGH dropouts and vertical dropouts so you can run a derailleur. The build quality, finish and attention to detail on this frame is outstanding. It puts my Surly frames to shame.
The fork and frame are in mint condition with very little signs of use and probably under 1000kms of riding on it. With a lot of that being non-technical bikepacking rides.

Scandal in Sedona…
It’s a great bike so why am I selling it?
Our terrain around here is technical and steep. I’m finding the XC geometry of the Scandal isn’t ideal for mountain biking where I live. If I am going to have 2 mountain bikes I need to enjoy the second one on the trails as well as for bikepacking trips. My plan is to get another 29er with slacker geometry that will handle the steeps better.

Bikepacking with the Scandal…
Here are some Scandal features:
- AL frame [no rusting] – 19.5″ frame with ~24.5″ effective TT
- frame weight ~3.5lbs
- sweet anodized stealth black finish with subtle laser engraved logos
- tapered heattube
- lots of clearance in frame for big rubber and mud [up to 29 x 2.5″]
- swappable horizontal or vertical dropouts
- accepts a dropper post
- gusseted downtube for durability
- large frame triangle for decent sized frame bag
- rear rack mounts for touring or utility riding versatility
- Rock Shox Reb RLT 100mm fork + spare seal kit [mint condition]
- On One headset installed
You can see tons of photos of the bike at this link.

Downtube detail…
Price:
- frame + Reba RLT + headset + BB = $600USD
- shipping = $50USD anywhere in Canada/US
- will pack the frame/fork very well for safe shipping
- I will give preference to a local sale.

Dekerf style seatstay/seattube junction…
My experience with On One was great and I’ll certainly consider another one of their frames. The design details and build quality is one level higher than my usual affordable frame solution – Surly. In fact the only frames I have seen that are nicer are custom builds that cost 7 – 10 times as much.

Swappable horizontal dropouts…
Note the rear brake is mounted inside the rear triangle for a clean build.

Red rocking and rolling…
Who should buy this frame/fork?
- I’m 5’11” with a 33″ inseam and long arms
- I wouldn’t recommend the Scandal for anyone smaller than me
- someone larger can fit fine as I used a very short stem
- this would be a very nice XC race bike or XC trail bike
- it’s versatile so you can bike tour with it using a rear rack
- or you can bikepack with a set of frame bags
- setup with an IGH it’s very low maitenance

Headtube/top tube detail…
You can read my review of the Scandal 29er here and you can read another review of the Scandal 29er here.

Thumbs up for the Scandal 29er…
There are a bunch of reviews of the Scandal 29er on MTBR at this link.

Alfine 11 IGH drivetrain…
In its current build it’s a perfect bikepacking rig and a low maintenance XC trail bike.
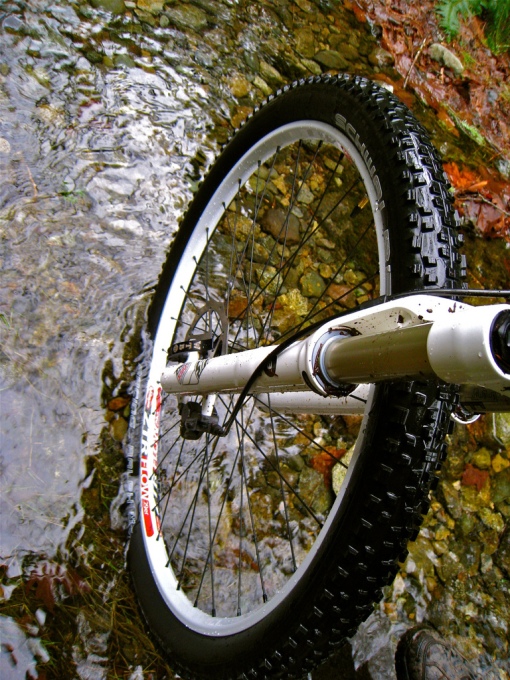
Schwalbe Racing Ralph + Stans Flow rim + Hope Pro II hubs…
Comments : 5 Comments »
Tags: on one, scandal
Categories : 29er


Recent Comments